An iOS Shortcuts tidbit I figured out yesterday: if you start with a piece of HTML as your input, it will be converted by Shortcuts to its internal “Rich Text” data type by default.
To send that HTML as HTML to another shortcut or an external service (such as a Micropub endpoint) then you need to convert the Rich Text back to HTML using a Documents > Make HTML from Rich Text action. If you don’t do this, your endpoint or whatever that doesn’t natively understand Shortcuts’ Rich Text format will receive the plain text value.
I really need to revisit my IndieWeb iOS Shortcuts article from last year. I’ve added and improved so much about my workflow since then.
This post has two main purposes in my mind: write an idea down, in case I find myself able to return to it; put the idea “out there,” in case anyone else wants to pick it up and run with it.
About a year ago I had the nebulous idea for a simple #Indieweb directory built around webmention:
sites would add themselves by creating a post which sends a webmention to the directory.
The directory would retrieve and parse the post to retrieve site name, base url, feed links, etc.
Any tags and categories marked with p-category would be used for directory classification and organisation.
There would be a simple administrative queue for approvals and data cleanup (parsing errors and the like). Sites wouldn’t appear until they were approved.
Site owners could preview what an unapproved directory listing would look like by signing in with IndieAuth. They’d also be able to delist themselves/make changes (also possible through webmention).
I never had a chance to get further than very initial experiments with this, so I’m wondering if I should just let the domain (indieweb.directory) expire in a couple of days, or renew it “just in case.” I can’t see me having any extra free time this year to actually do something with the idea.
Inspired/spurred by gRegor’s post, I finally posted on Facebook something that’s been on my mind for a long time. Like, years long:
I’m going to be deleting my accounts on all Facebook-owned apps/websites on the 31st December. Facebook, Instagram, Messenger/WhatsApp… the whole shebang. I encourage you to do the same, but realise many people have compelling reasons to stay. You do you.
The downside to this is that some of you I don’t have any other way of keeping in touch/up to date with (not that I’m a particularly chatty person…), but at the same time, I don’t want to assume you’d like to continue to have a way of doing so outside the Facebook ecosystem. Unlike Facebook’s surveillance of you, here you can opt-in.
So, if do you want to stay in touch – however infrequently – drop me a message before the 31st with another way to contact/keep up with you – email, alternative social media, blog/newsletter, or whatever. If appropriate, I’ll send you a response so you’ll have my details. If you have an old profile/email/whatever of mine, don’t assume it still works.
I’ve been putting off getting rid of Facebook for so long… mainly from a mixture of laziness, complacency, and FOMO. But with the start of a new year/decade approaching, something in me decided it was now or never. Now I have a set timeline to stick to, and public posts to help keep me accountable to it.
“@jackyalcine Agree, video tough. If openly licensed can use @internetarchive. Also been thinking about peertube. “
I’ve been thinking about video lately too. For very short clips (<2 minutes) I think I would self-host, despite WordPress making it awkward as heck in my experience. Anything longer than that and it’s more of a conundrum.
Could small, “collective” PeerTube instances in the vein of runyourown.social be viable? Needs buy-in from interested parties — or a benefactor — but it’s a way to spread the hosting costs around while offering an alternative to a community. /cc Jacky.
I mentioned last week I had setup iOS Shortcuts to post Likes, Reposts, and Bookmarks to my website, and automatically syndicate those posts to Twitter. This solved a particular pain point in my “workflow,” where I’d share something to my website with Indigenous, but then have to go in to the WordPress editor through a browser to get the post to share back to Twitter. This was enough of a pain I avoided it where possible. With the new shortcuts I don’t have to worry about that. A couple of taps, and everything “Just Works”(tm).
This post is an attempt to document how I have my shortcuts setup, so you can make some of your own. I’ve tried to keep things as jargon free as possible, but the instructions do assume the following:
optionally, your website can syndicate to other sites through Micropub syndication target. WordPress users can use the Syndication Links plugin.
My own setup uses WordPress with all of the IndieWeb plugin pack, so that is what this guide has been tested with, but everything here should be universal to any Micropub server. To get started, you will first need to install a pre-requisite shortcut.
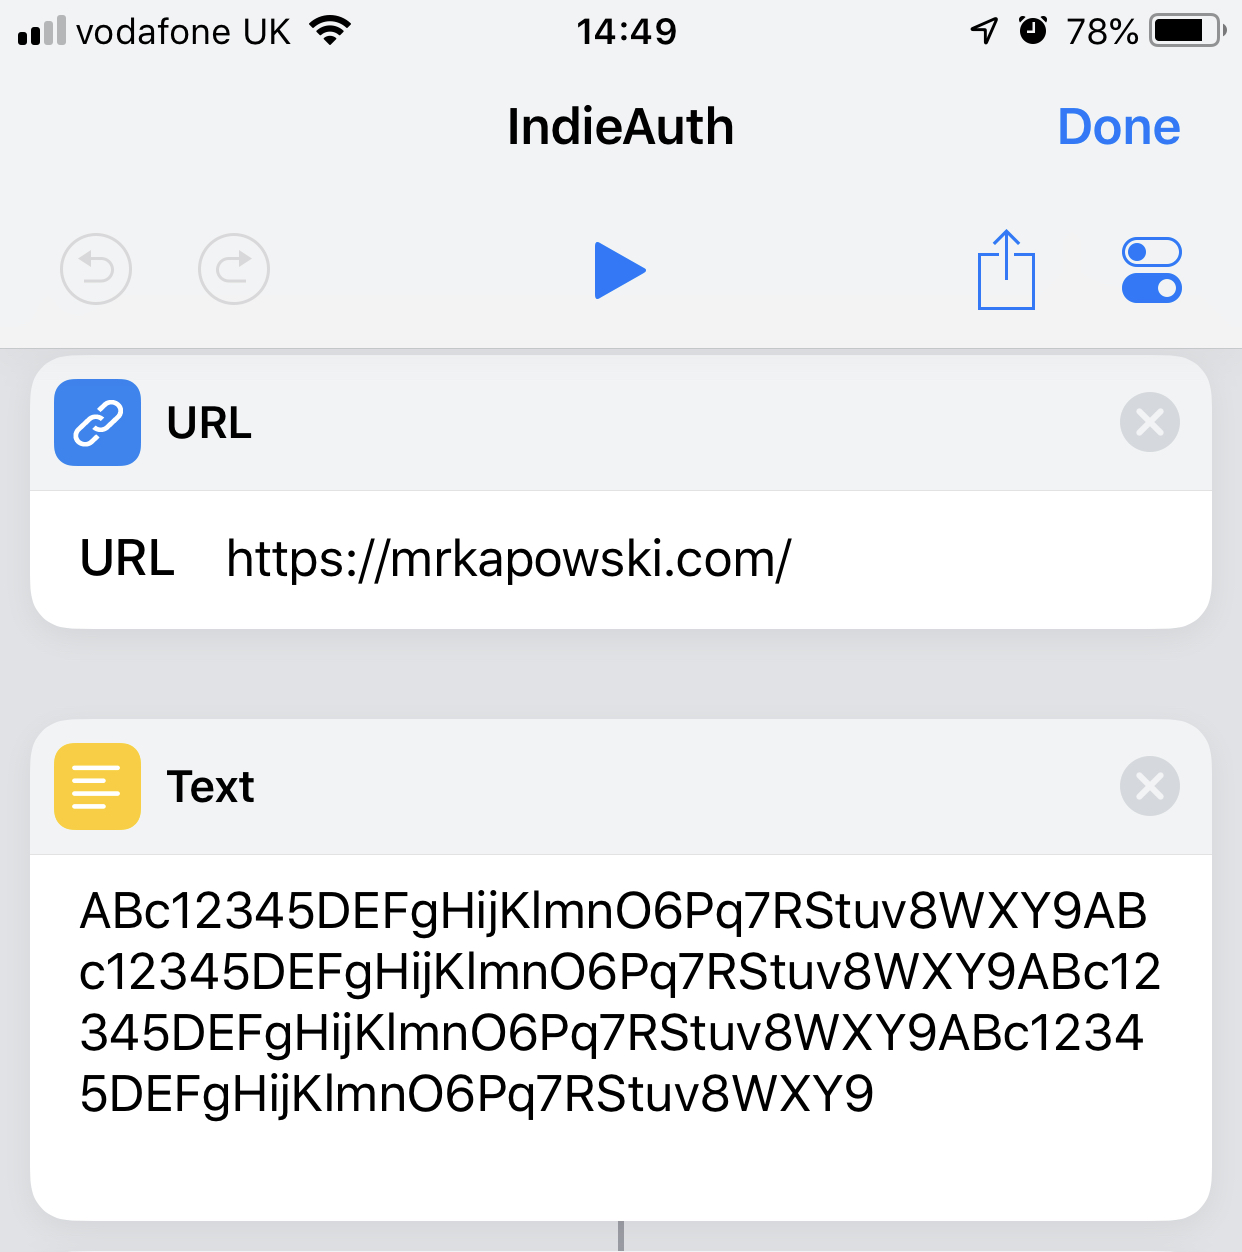
Install the IndieAuth Shortcut.
This is the foundation for the other shortcuts. With out this, your shortcuts cant authenticate with your site. It can be found here, with some more notes found on this IndieWeb wiki page about Shortcuts. While installing it, you can configure it with the URL of your site and run through the authentication process to get a token, or enter a pre-existing token. Alternatively, if you already have a valid token from somewhere, you can enter that into the shortcut for it to use.
Note for WordPress users.
I ran into an issue with the IndieAuth shortcut, where WordPress didn’t interpret the authentication scopes properly, meaning the generated token wouldn’t work. I didn’t spend much time debugging this, so I don’t know if the issue is in the plugin or how Shortcuts sends the request. Thankfully, there’s a workaround. Go to your WordPress admin area > Users > Manage Tokens. At the bottom of the screen will be a form where you can generate an appropriate token. You’ll want to select at least the “create” scope. Do this, then copy and paste the token code in to the text field at the top of the shortcut, like this:
With our authentication mechanism setup, it’s time to build the shortcut proper.
Building the Shortcut.
Initial Setup.
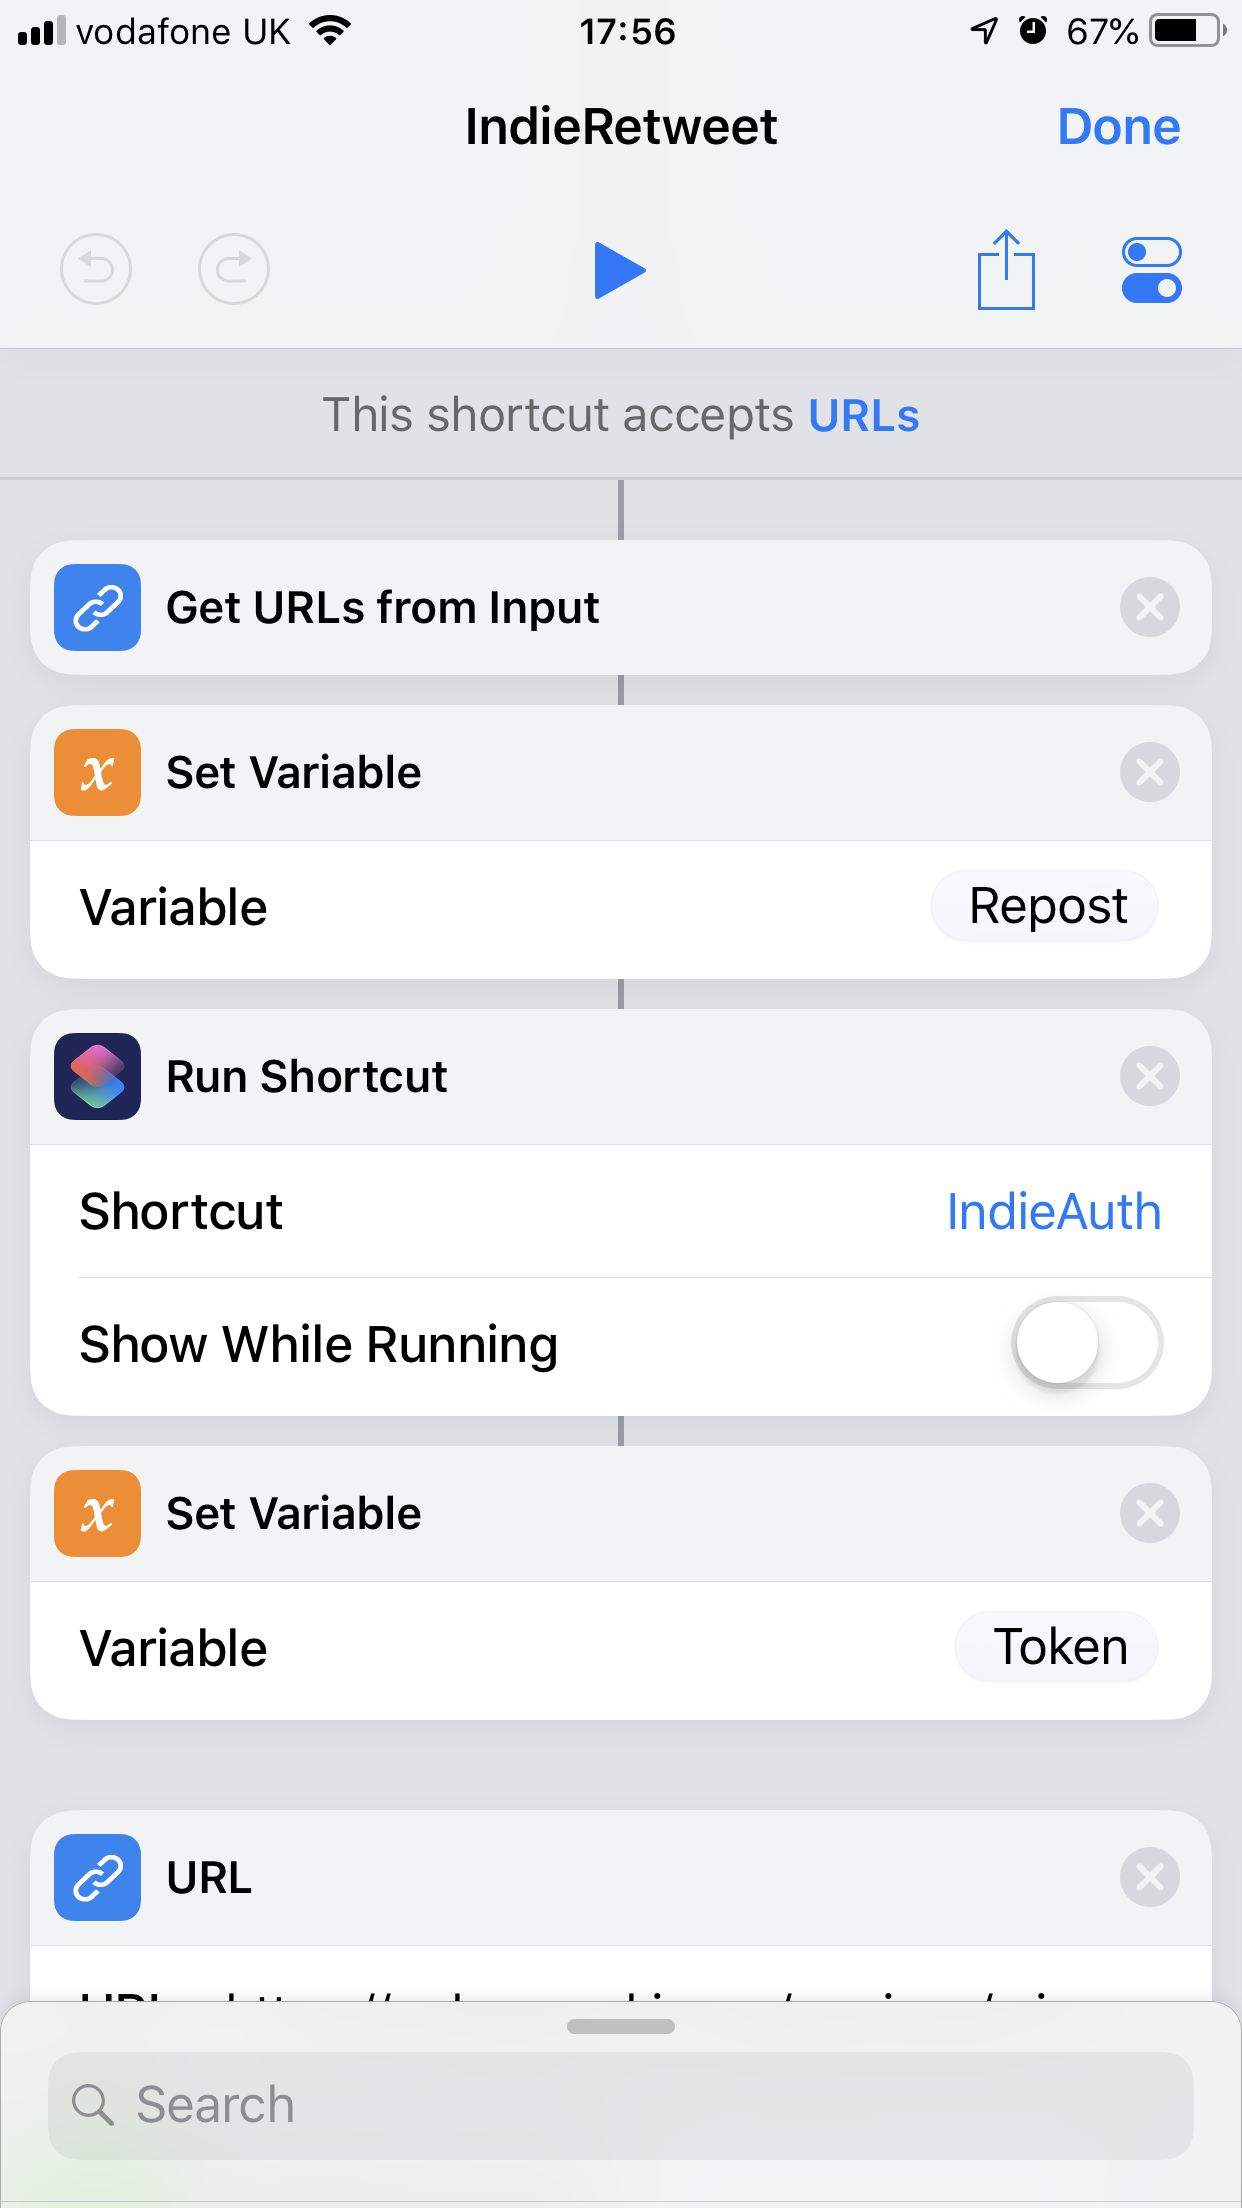
In the Shortcuts app, create a new shortcut. The first thing we need is a “Get URLs from Input” block, then a “Set Variable” block. Name the variable something memorable, as we’ll be using it in a couple of places. I called mine “repost” in my Retweet shortcut.
Next, add a “Run Shortcut” block, and another “Set Variable” block after it. The shortcut block should be set to run your IndieAuth shortcut, and you can turn off “Show While Running”. Set the variable name to “token.” Once done, you should have something like this:
Posting to Your Site.
This is “where the magic happens.” In broad terms, the next few blocks will:
Be configured with the Micropub endpoint of your site,
Craft a POST request to your endpoint, with the following pieces of information:
Your authentication token
The type of Micropub post we’re creating (“entry”)
The URL we’re sharing, as a “repost-of”, “like-of”, or whatever
Set a syndication target.
With these steps in mind, onward we go!
Add a URL block to your site. Enter the URL of your Micropub endpoint. If you’re not sure exactly what this is, check the source of your site. Look for a link tag with rel=“micropub”. Alternatively, I’ve written another shortcut which will try to detect an endpoint for a given domain. You can find it here. Note that I’ve not tested this shortcut on any device but my own, so there may be bugs. The Get Endpoint shortcut will check if the endpoint variable is set, and if not, ask for a domain to parse for the endpoint. Once parsed, the endpoint URL will be copied to the device clipboard for pasting elsewhere, and return a URL.
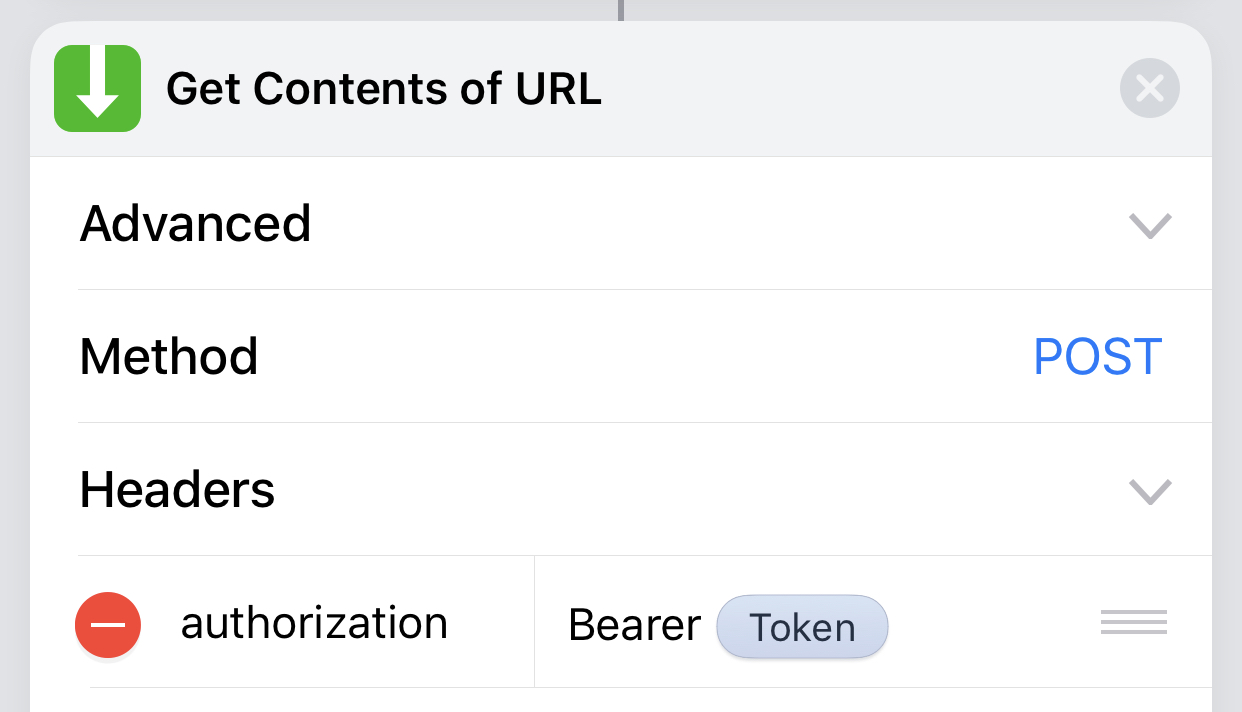
Back in the sharing shortcut, add a “Get Contents of URL” block. Tap on “Advanced,” then set the Method to POST. Tap on “Headers.” Add a header called “authorization” (note the US spelling, if you’re using a UK keyboard or similar). Set the value of this header to “Bearer ” – with the space at the end – then insert the token variable created earlier.
Next, in the Request Body section, set it to Form. If you’re replicating my setup, add three new fields: h, repost-of (or like-of, etc.), and mp-syndicate-to. Set the value of h to entry. Set repost-of to the variable you created from your input URL, right back at the start.
Finally, set mp-syndicate-to to the UID of the syndication target you want to share to. In my WordPress setup, this is twitter-bridgy. Your system may vary, if you’re not using WordPress + the Syndication Links plugin. If you’re not sure what your UID might be, you can try running another shortcut I’ve created, which will query your site to find all the places you can syndicate to. The shortcut requires the “Get Endpoint” shortcut linked above, and will return text listing all UIDs configured for your site. As an example, the output for me looks like this:
{"name":"XYZ IndieWeb","uid":"xyz-indieweb"}
{"name":"XYZ Linking","uid":"xyz-linking"}
{"name":"IndieNews En","uid":"indienews-en"}
{"name":"XYZ Books","uid":"xyz-books"}
{"name":"Twitter via Bridgy","uid":"twitter-bridgy"}
{"name":"Github via Bridgy","uid":"github-bridgy"}
If you don’t want to syndicate your post, remove the mp-syndicate-to field entirely – don’t just leave it blank, or you might run into issues.
Once all fields in your Like/Repost shortcut have been filled in, you should have something like this:
You can leave things here, if you want, or you can add something like a Notification block to show you the returned response from your site, for debugging purposes. Unfortunately, the current limitations of Shortcuts mean we can’t get the URL to our new post from the results. Maybe that will change in iOS 13.
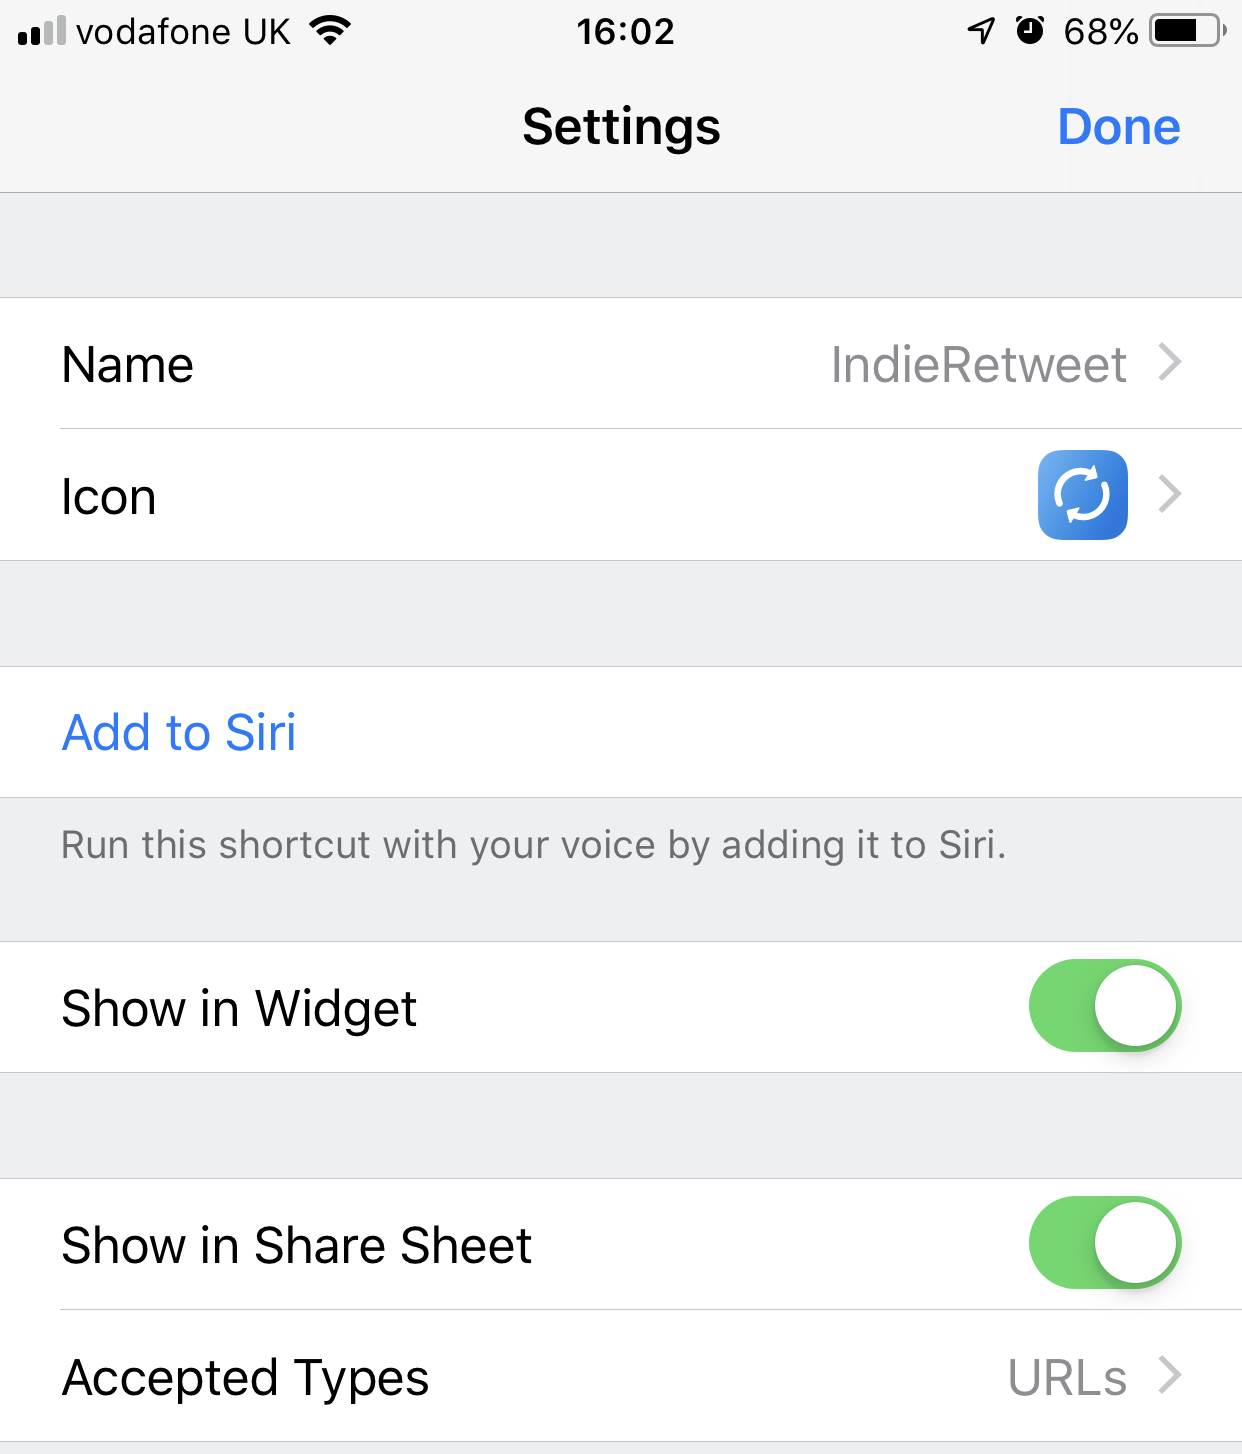
Set your new shortcut with an appropriate name and icon. Turn on the option “Show in Share Sheet,” and optionally set the “Accepted Types” to “URLs.” Tap Done a couple of times, and your shortcut should be complete! The best bit is, you can duplicate the shortcut, change repost-of to like-of (or viceversa), and you’ll have a working Like shortcut too 😃
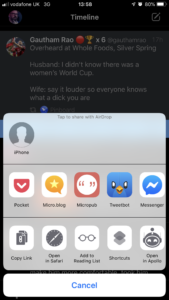
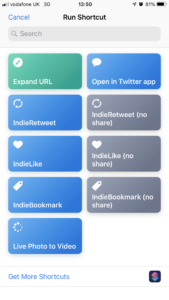
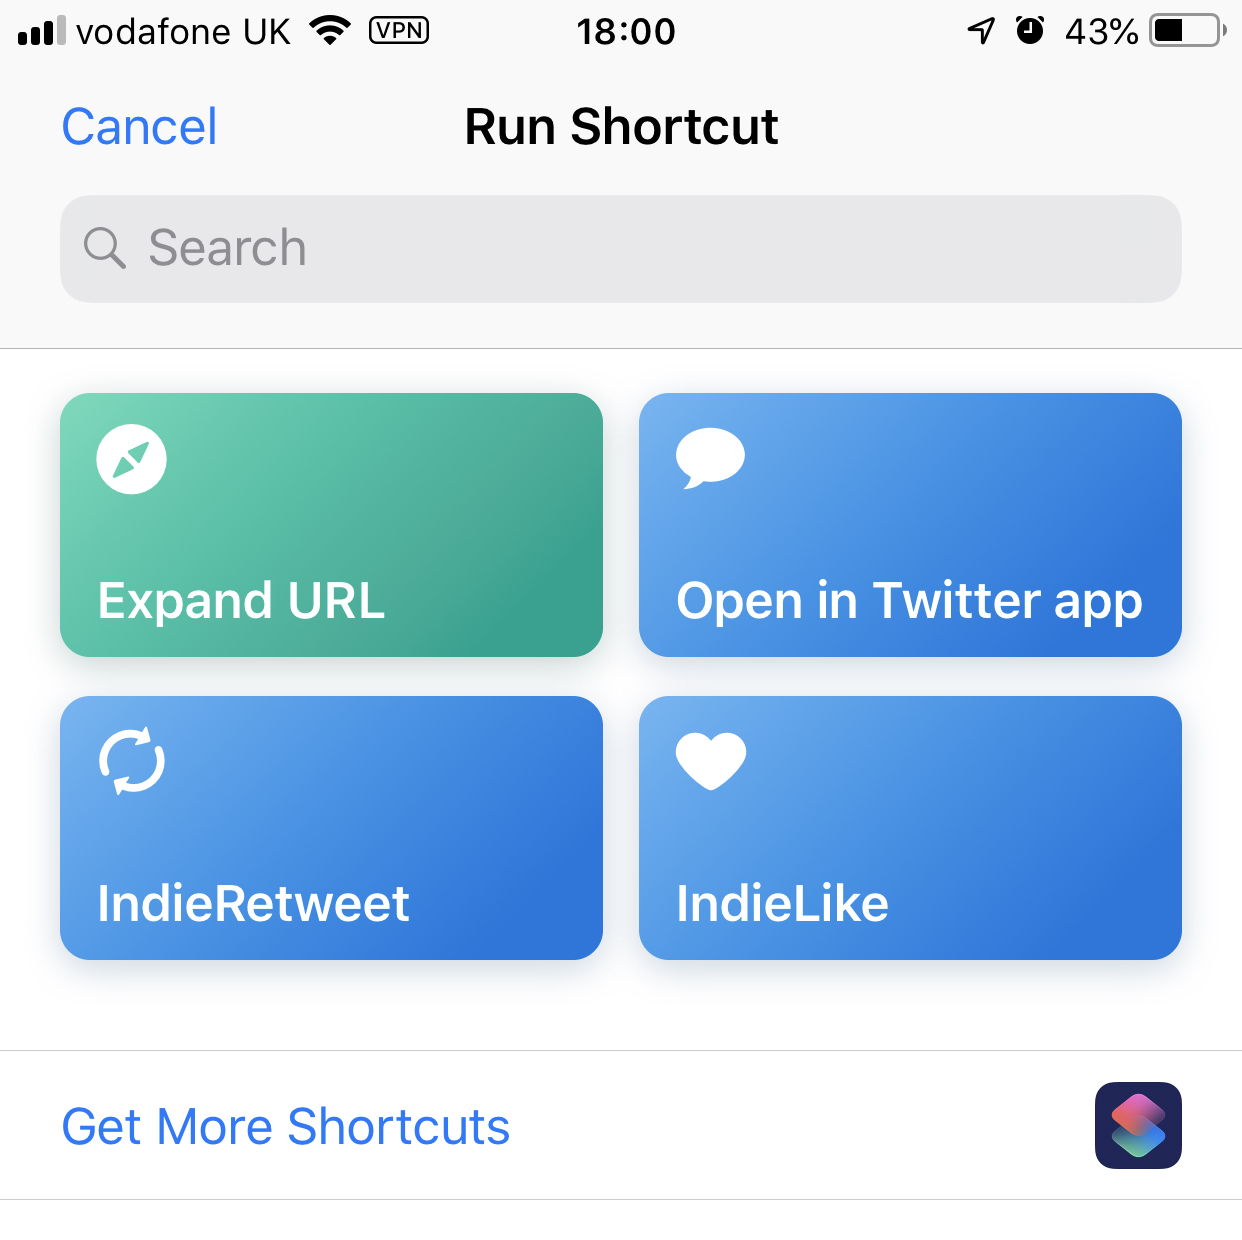
Now, you can use the iOS share sheet for any URL to run your shortcut. Tap the share icon, tap Shortcuts, then tap the relevant shortcut from the list:
As a bonus, here’s a couple of short clips of the Like shortcut in action:
If you run into any issues getting the shortcut created, please do let me know through a comment or Webmention, and I’ll try to help where I can.
I’m mostly done writing the first draft of my #IndieWeb iOS Shortcuts guide. Just got some screenshots to add, mostly. It’s sitting at ~750 words, although I’ve tried to keep it fairly technical-term free. Hopefully I’ll get it published tonight or tomorrow.
PhD Candidate at the University of Toronto’s Faculty of Information. Broadly, my research is concerned with values, labour, and interoperability in communication technologies. My dissertation investigates these features in alternative web infrastructures. I combine qualitative and quantitative methods such as critical making, analysis of digital trace data, and interviews.
Hello. I'm Darius Kazemi. I'm an internet artist. I also cofounded Feel Train, a creative technology cooperative in Portland, Oregon. I make bots and generators and other weird internet stuff.
I’d hoped to write up some loose documentation on the #IndieWeb iOS Shortcuts I have setup, but diagnosing all manner of WordPress plugin issues has taken up my night. I’ll try again tomorrow.
Inspired by @schmarty‘s #IndieWebSummit keynote, I’ve just hacked together a pair of iOS Shortcuts that will take URLs from Tweetbot, post them to my site as a Like or Repost, then syndicate back to Twitter automatically 🙌