My news reader is filled with peoplepostingtheirtips for working remotely in this time of COVID-19 and “social distancing.” I wrote my own six tips for working from homefifteen years ago(!!! – yay for blog archives!), and they largely still hold up, mostly because they aren’t tips around what no-longer existing technologies to use or anything like that. They’re focussed on what you can do to make your working from home experience better for you.
If I had to add any more tips, the biggest would be – make sure your work area is comfortable and ergonomic. If you can, invest in the best office-style chair you can. Ideally, have a decent-sized desk which affords you a good amount of working space. Basically don’t try and work for hours in an uncomfortable, cramped, space. If you don’t have access to that at home, try decamping to somewhere like the local library, even for a couple of hours (when you know you won’t have to make any calls!).
Last night, Mrs K. and I were at a loss for anything new to watch, and not in the mood to read or do anything hobbywise, we ended up rewatching several episodes of Tabletop.
First thing’s first: gosh I miss that show. It was so simple, fun, and “pure”.
Secondly: we couldn’t believe it when YouTube was telling us the newest of these videos was four years old. It really felt like just a year or two had passed.
Anyway. I was watching with a slightly different perspective than the first time through. At the weekend we had playedMunchkin with one of the kids, and we all had a really good time*. I was looking for some more games to add to the collection, that would be friendly to young children, while still fun and appealing for the whole family… and preferably not take long to play through a game or a round.
The first candidates which met the criteria were Roll For It and Sushi Go, coveniently both played in the same episode. Roll For It has a simple premise: roll a number of dice, then try to match the values on a card to score the points on that card. Sushi Go is a brightly-coloured card game where players score points for “collecting” various dishes.
No longer having to deal with The Wheaton Effect, both games were readily available for around £13 each. which made them good “impulse purchases”.
It’ll be a couple of weeks until we get to try these games with the kids, but I’m already looking forward to it. I love exposing them to new and different ways of spending their free time.
* I don’t think they really understood the game, or really read most of the cards, but they quickly developed a strategy of making monster fights harder for the other players before offering to help them in exchange for some of the treasure.
Random, unstructured, thoughts on the state of play on the last day of the election campaign:
First and foremost, I detest the Tories. For what their policies did to my dad years ago, and what they’re doing to the country now and over the last nine years. They seem to be importing more and more behaviours from the Trumpist wing of the GOP (but wrapped up in bumbling Britishisms to mask it), and it’s genuinely terrifying.
Boris Johnson is the perfect distillation of everything terrible about the Tory Party.
I think that in any other time, this election would barely be a contest. By rights the Tory Party should be facing a massive loss.
I have no strong feelings about Corbyn. I’ve largely tuned out the noise around him. I suspect my grandad would’ve loved him.
Brexit is a terrible idea, isn’t going to be resolved by this election, and is going to drag on the U.K. for years – if not decades – to come.
My short-term goal is left-leaning U.K. government, with ideally no Brexit. Long-term is Scottish Independence.
I’d have considered voting Labour, but the Scottish Labour Party have explicitly ruled out giving any ground on the issue of Scottish Independence. Their local campaign has been as tone-deaf as every time since 2014.
I’m not overly enthralled by the current SNP offerings, but they are the best chance of getting another independence referendum, and securing a non-Tory government. It feels like they’ve lost a bit of their edge. In my constituency they’re the only left-leaning party with a genuine chance of keeping the Tories out.
The Lib Dems are a pointless waste of space in most of Scotland, and they’ve not enamoured themselves to me nationally over the course of the campaign. They’ve come across as very disengenuous. Their loal campaign material basically only highlighted two things: No Brexit, and no to Scottish Independence.
The Scottish Greens are finally standing a Westminster candidate in my constituency. I’d love to give them my vote, but it’d be wasted in my constituency – and I dare not let the Tories in “through the backdoor”.
If I lived in England I would vote tactically for whoever had the best chance of beating the Tories in that seat, but with a preference for Labour… I think.
The level of disinformation happening online is astounding, but also feels oddly obvious and transparent.
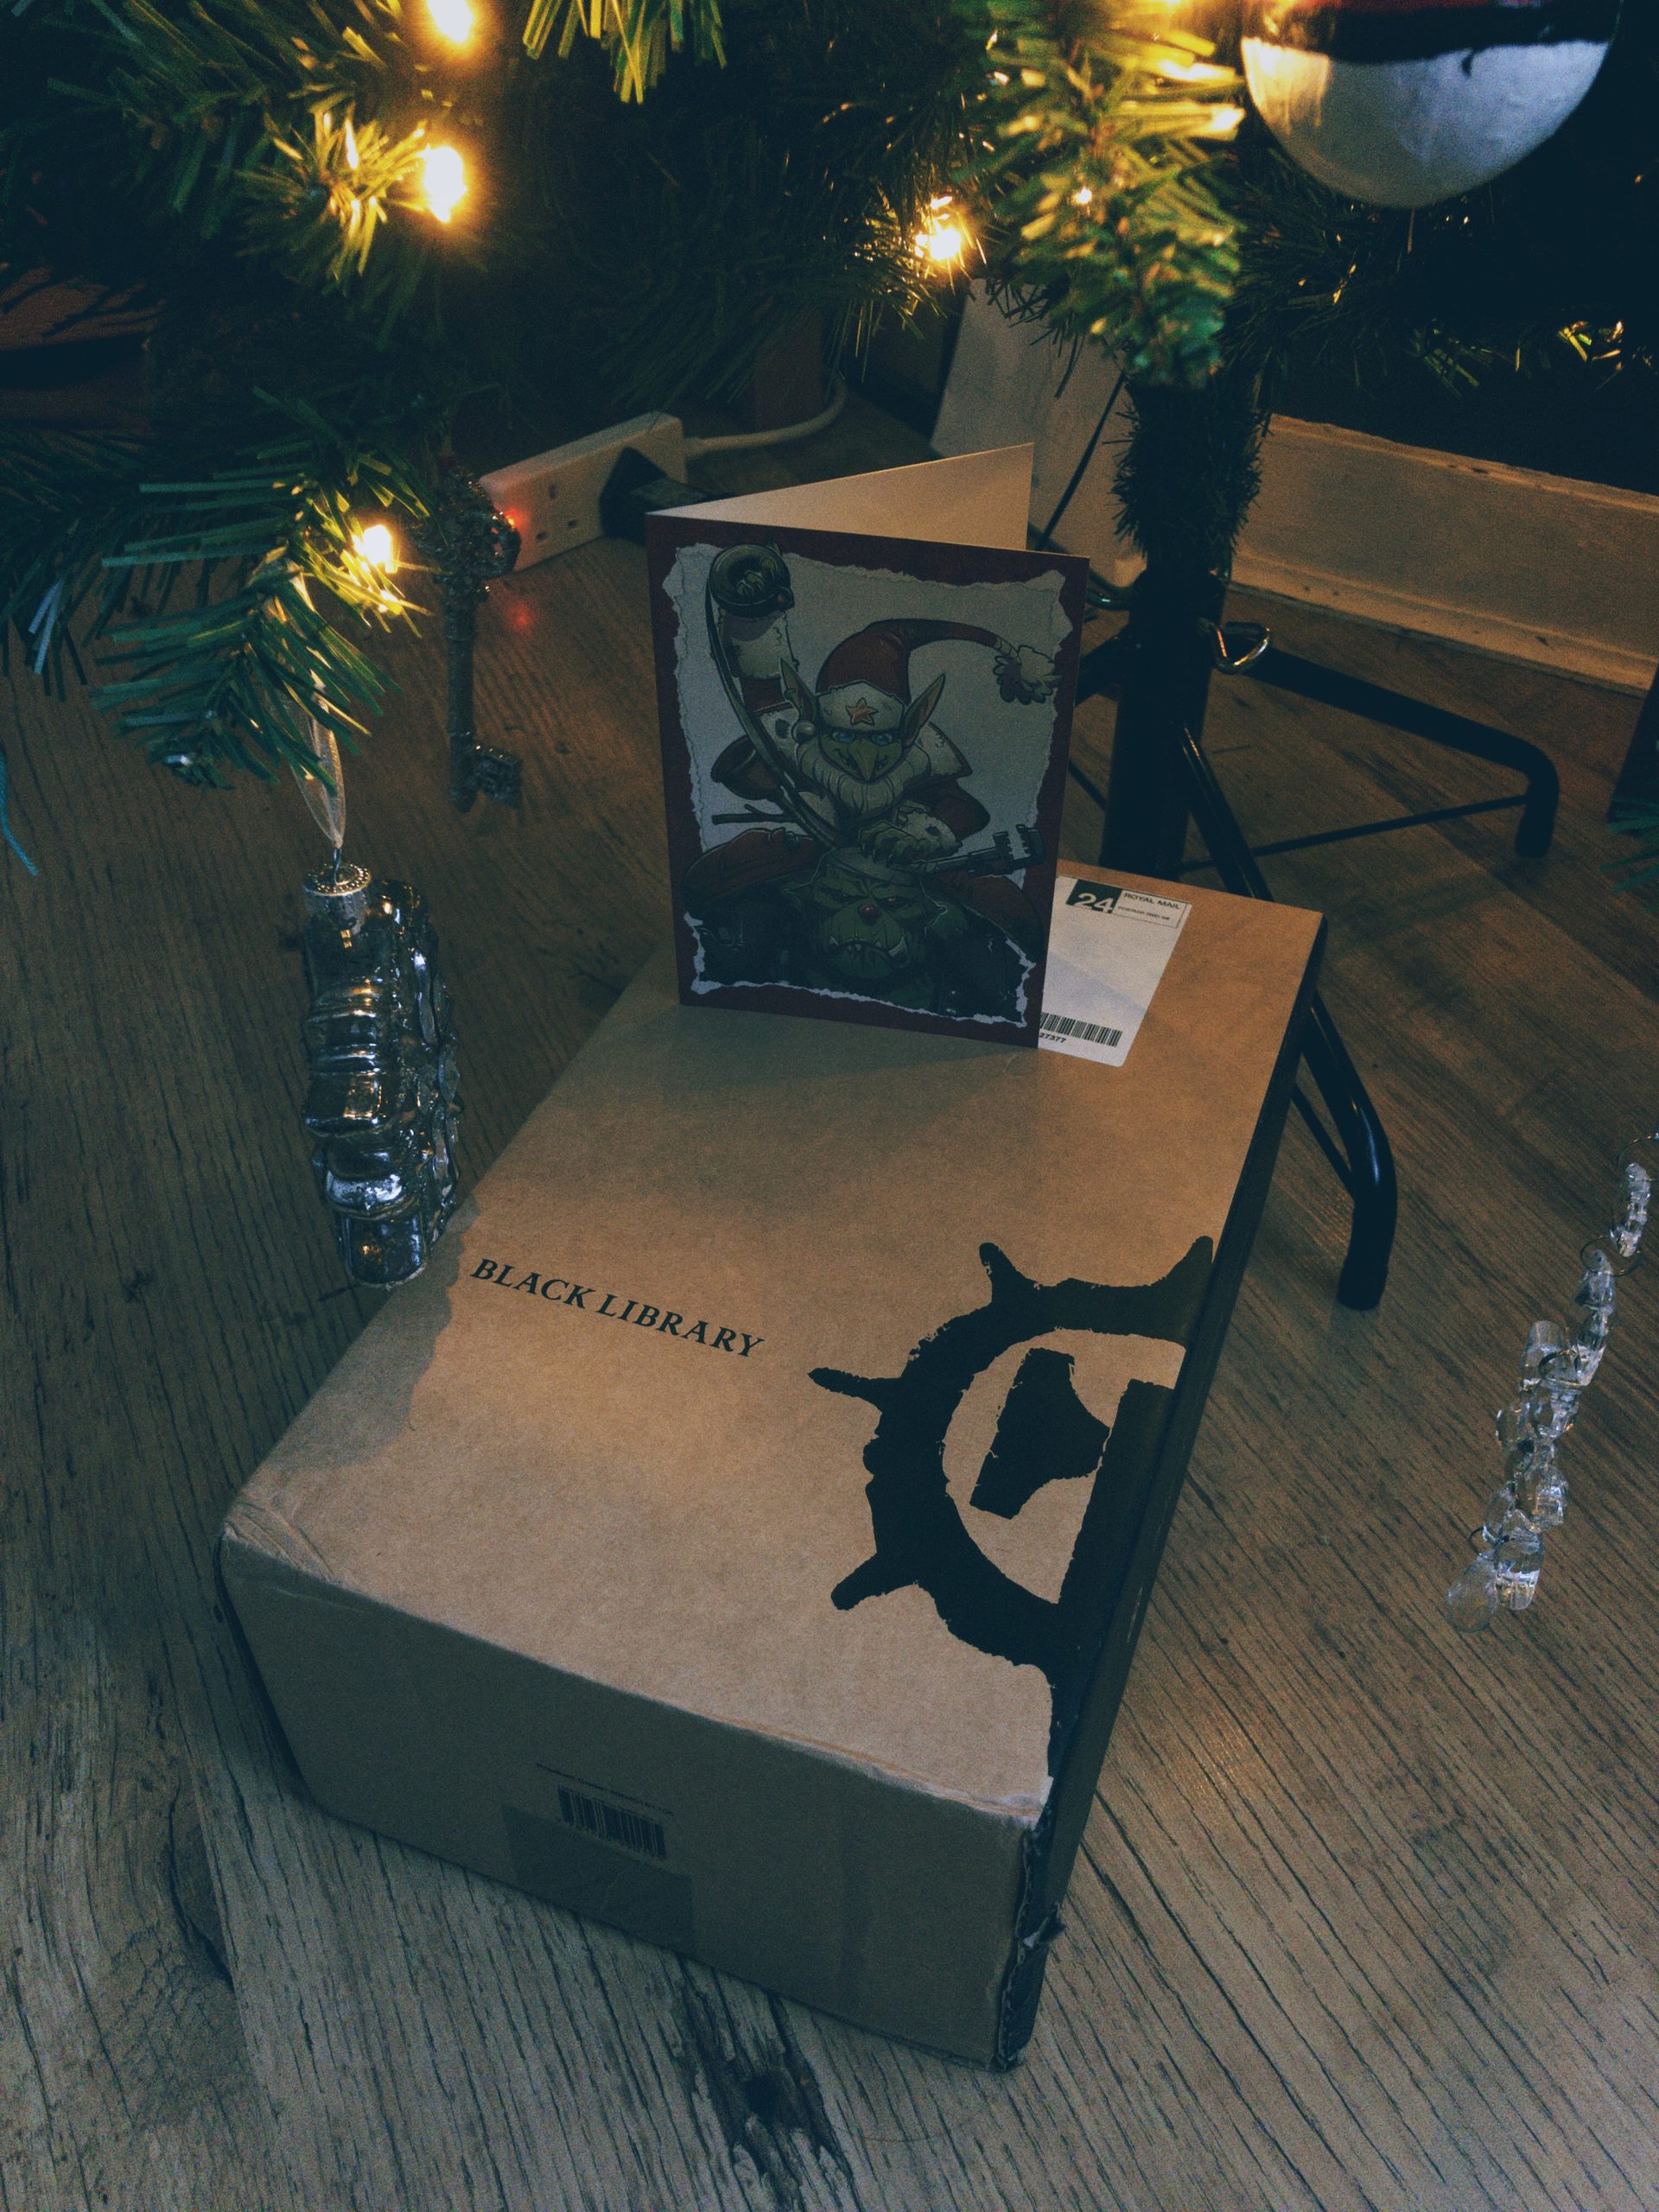
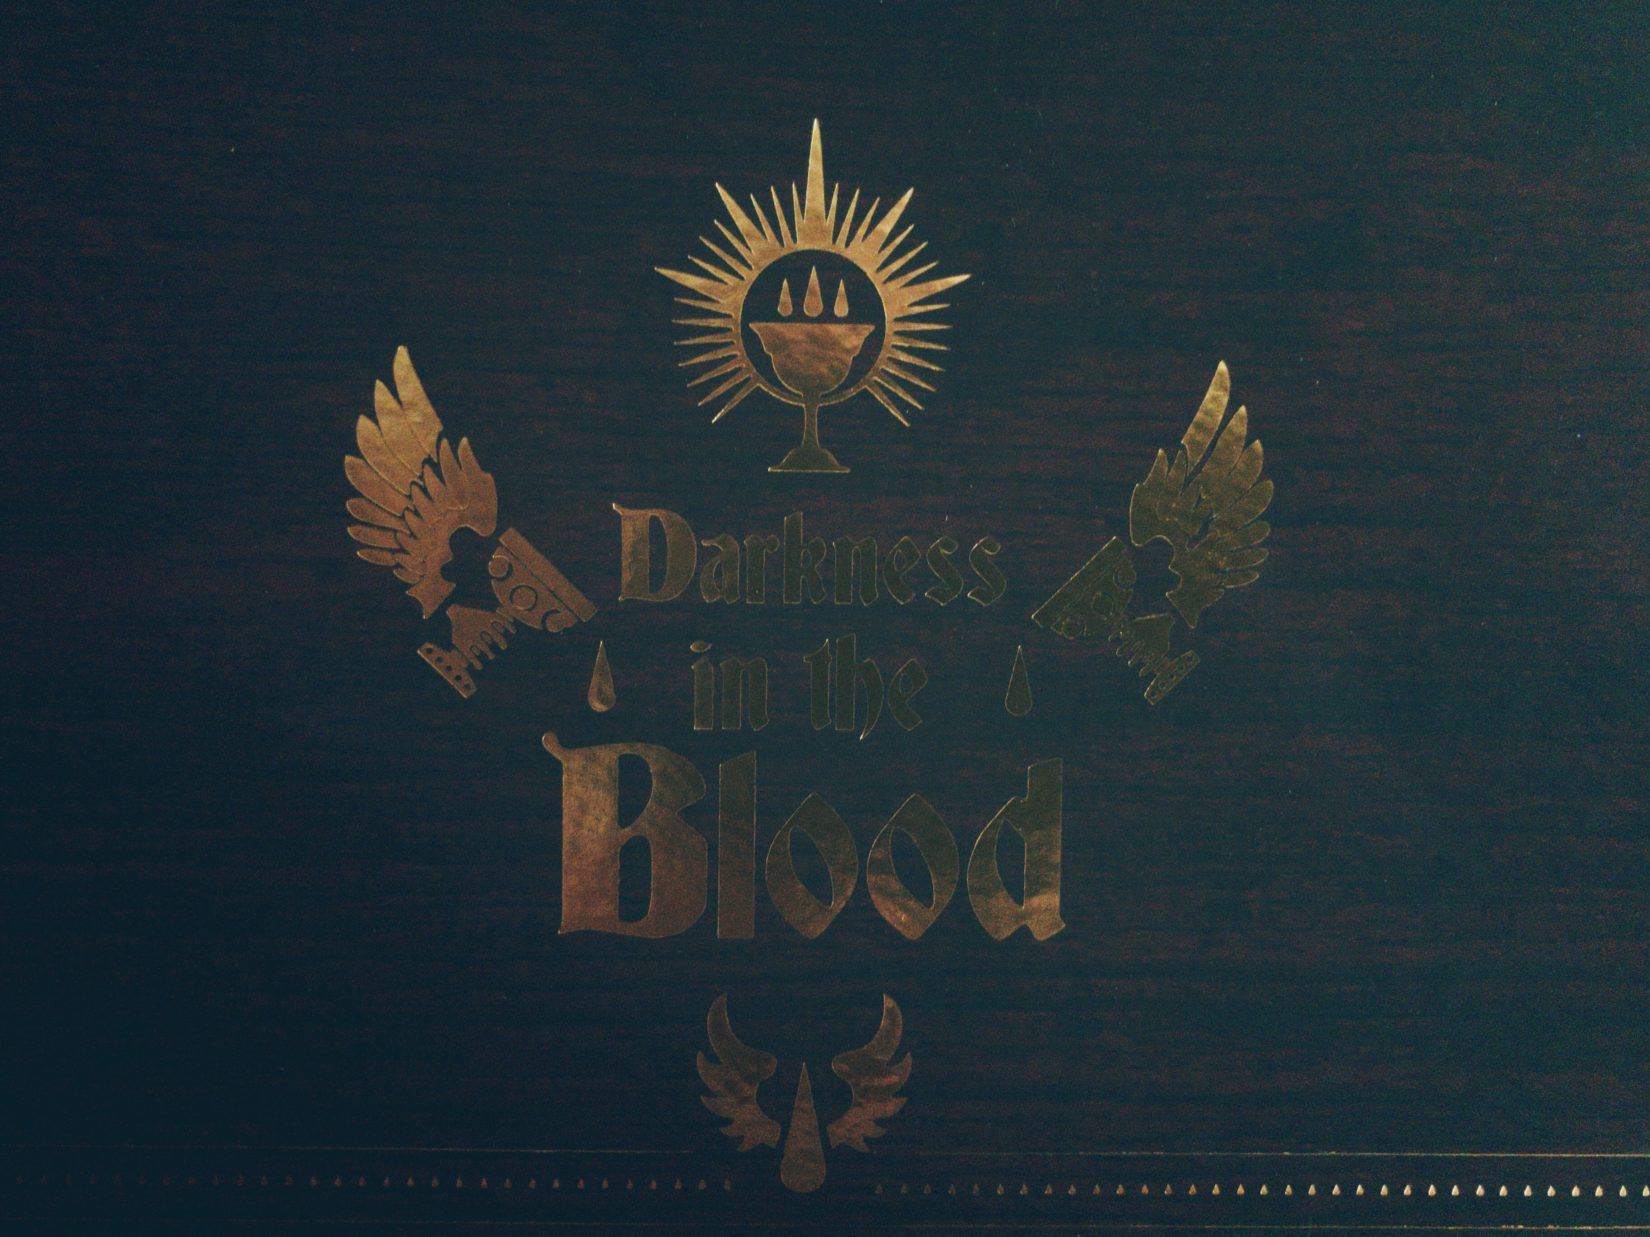
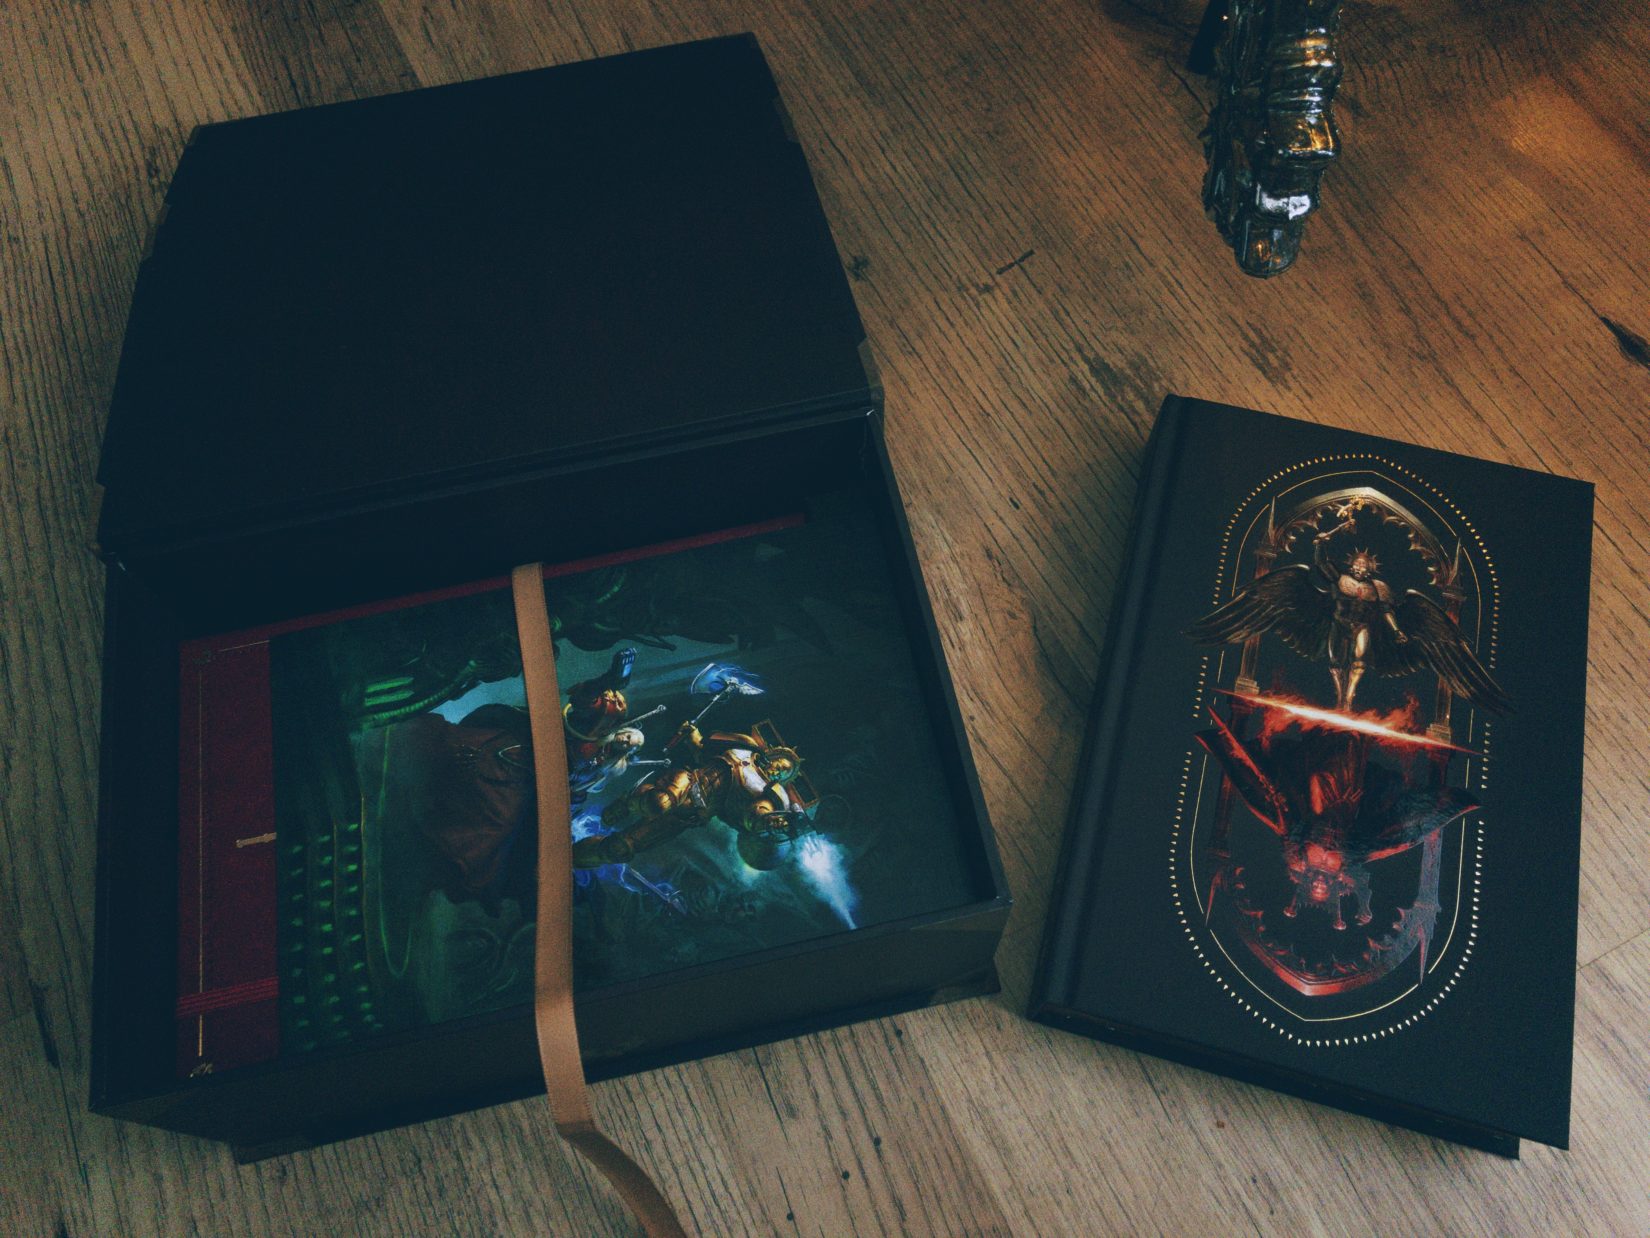
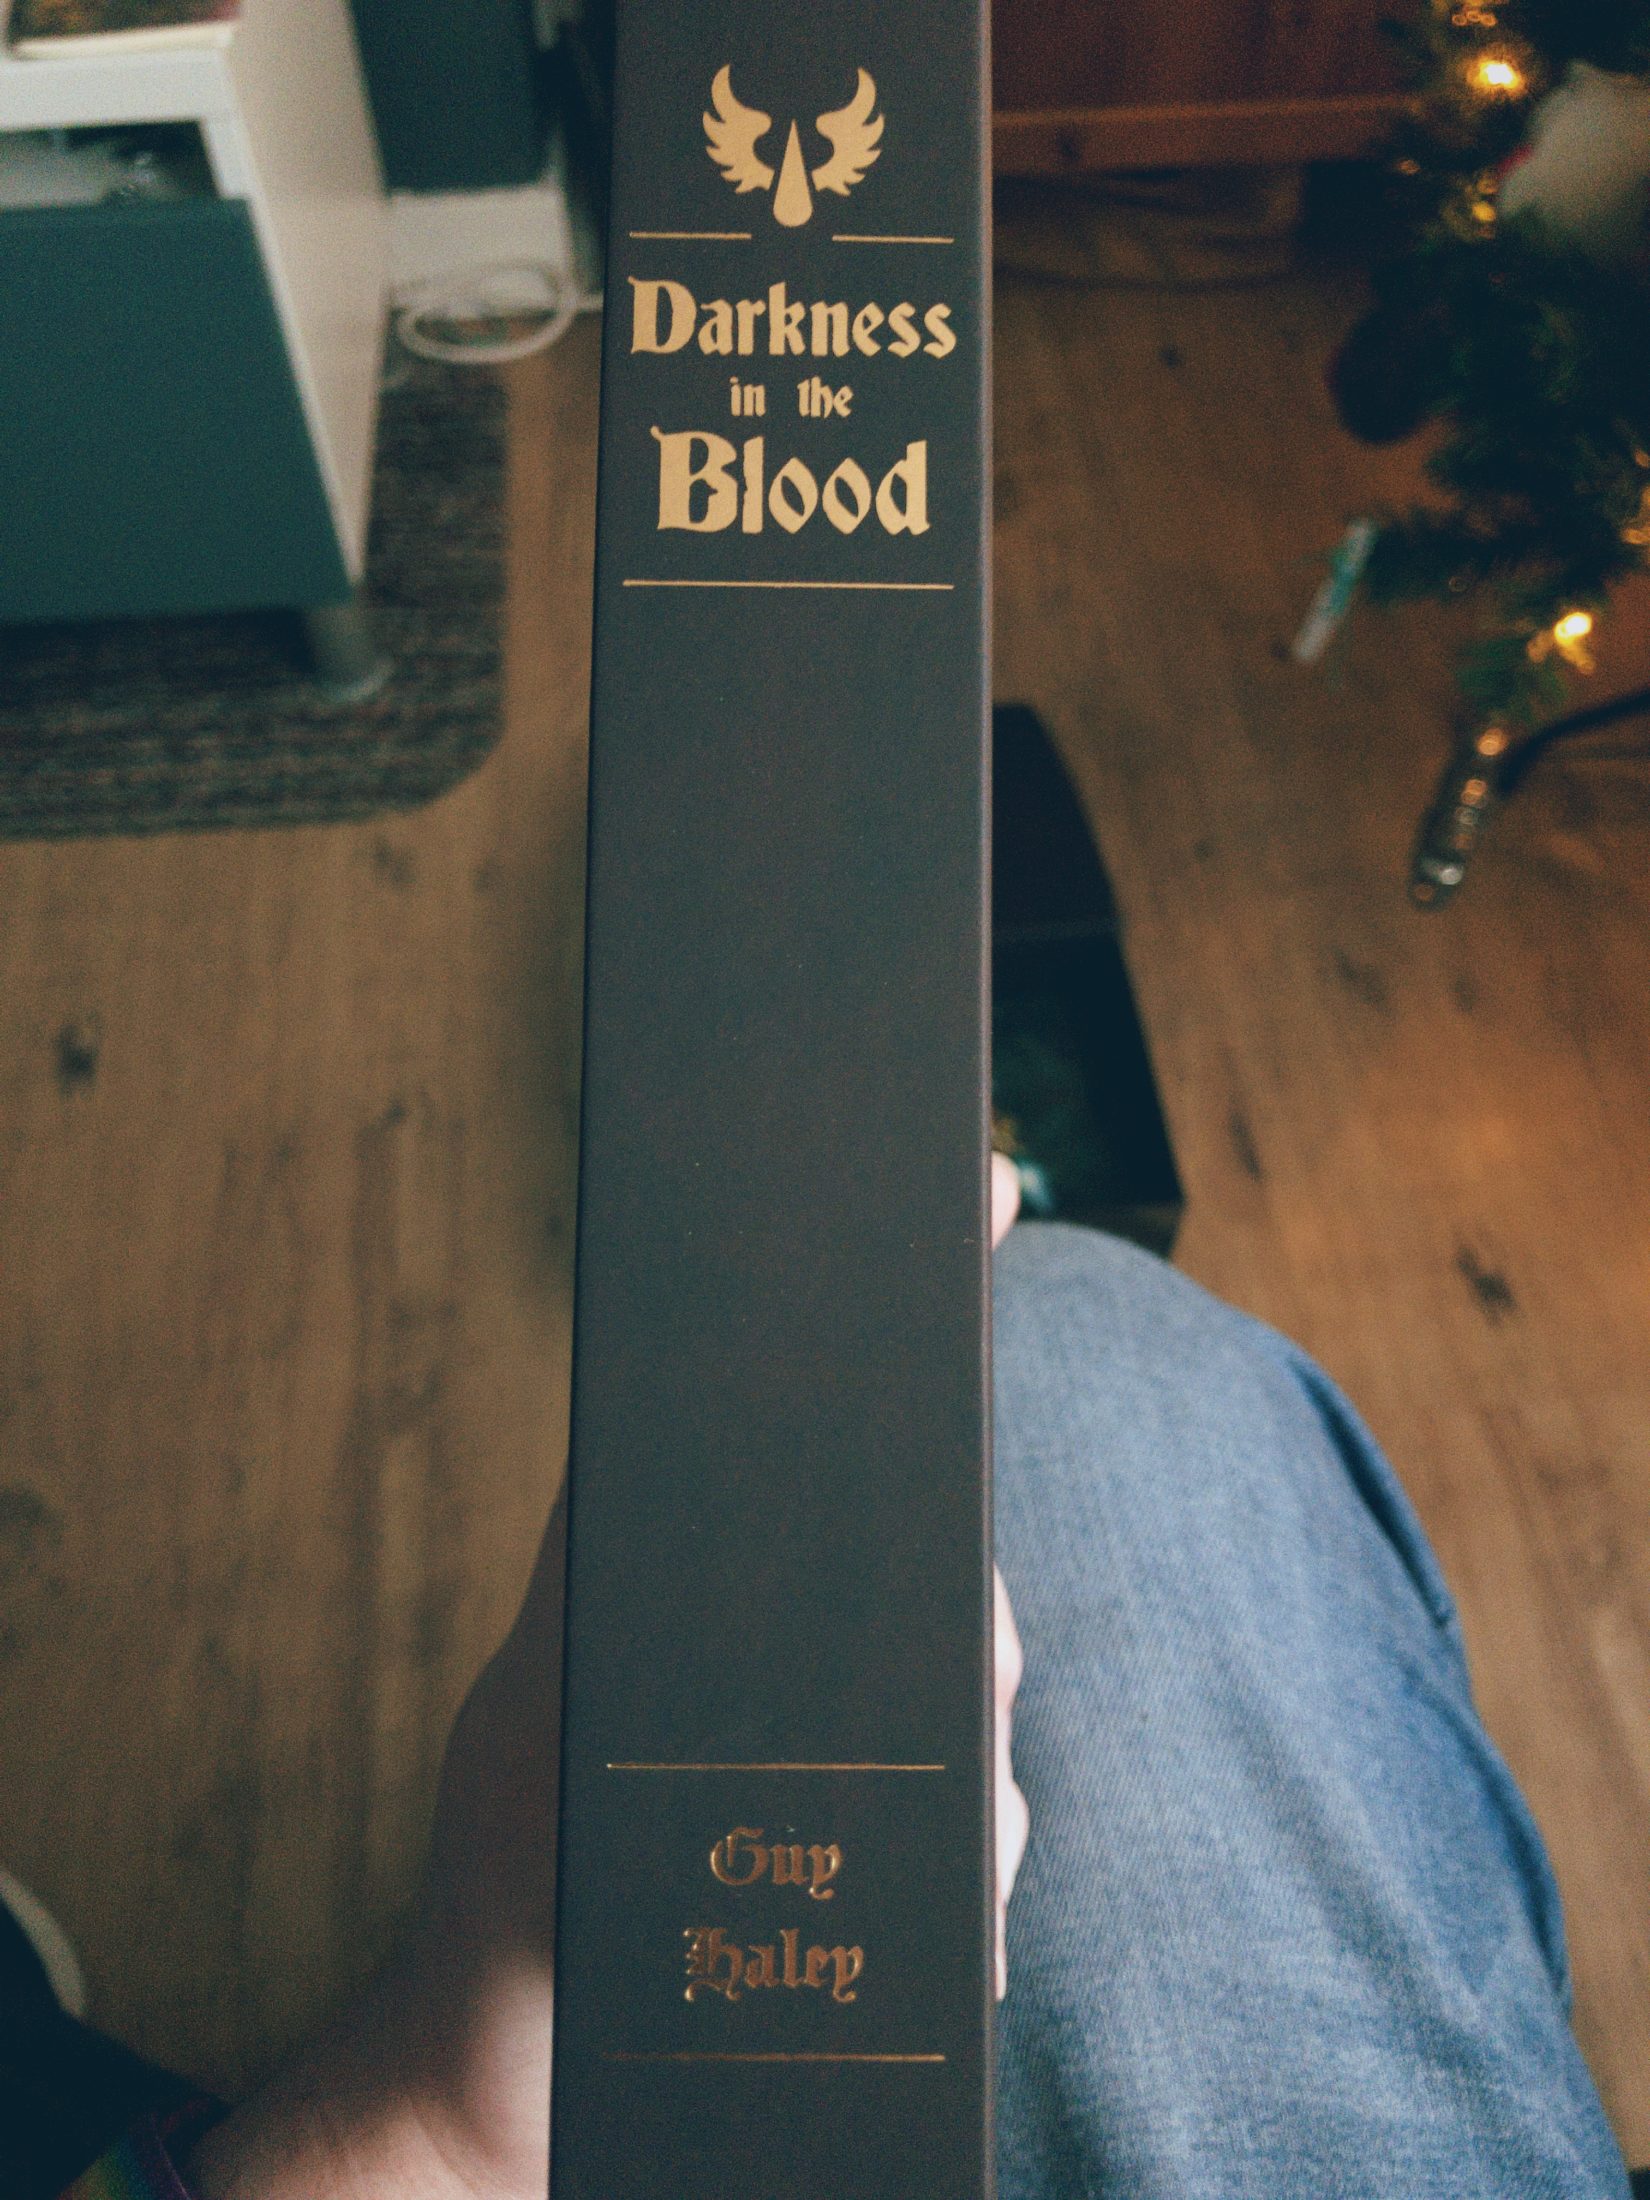
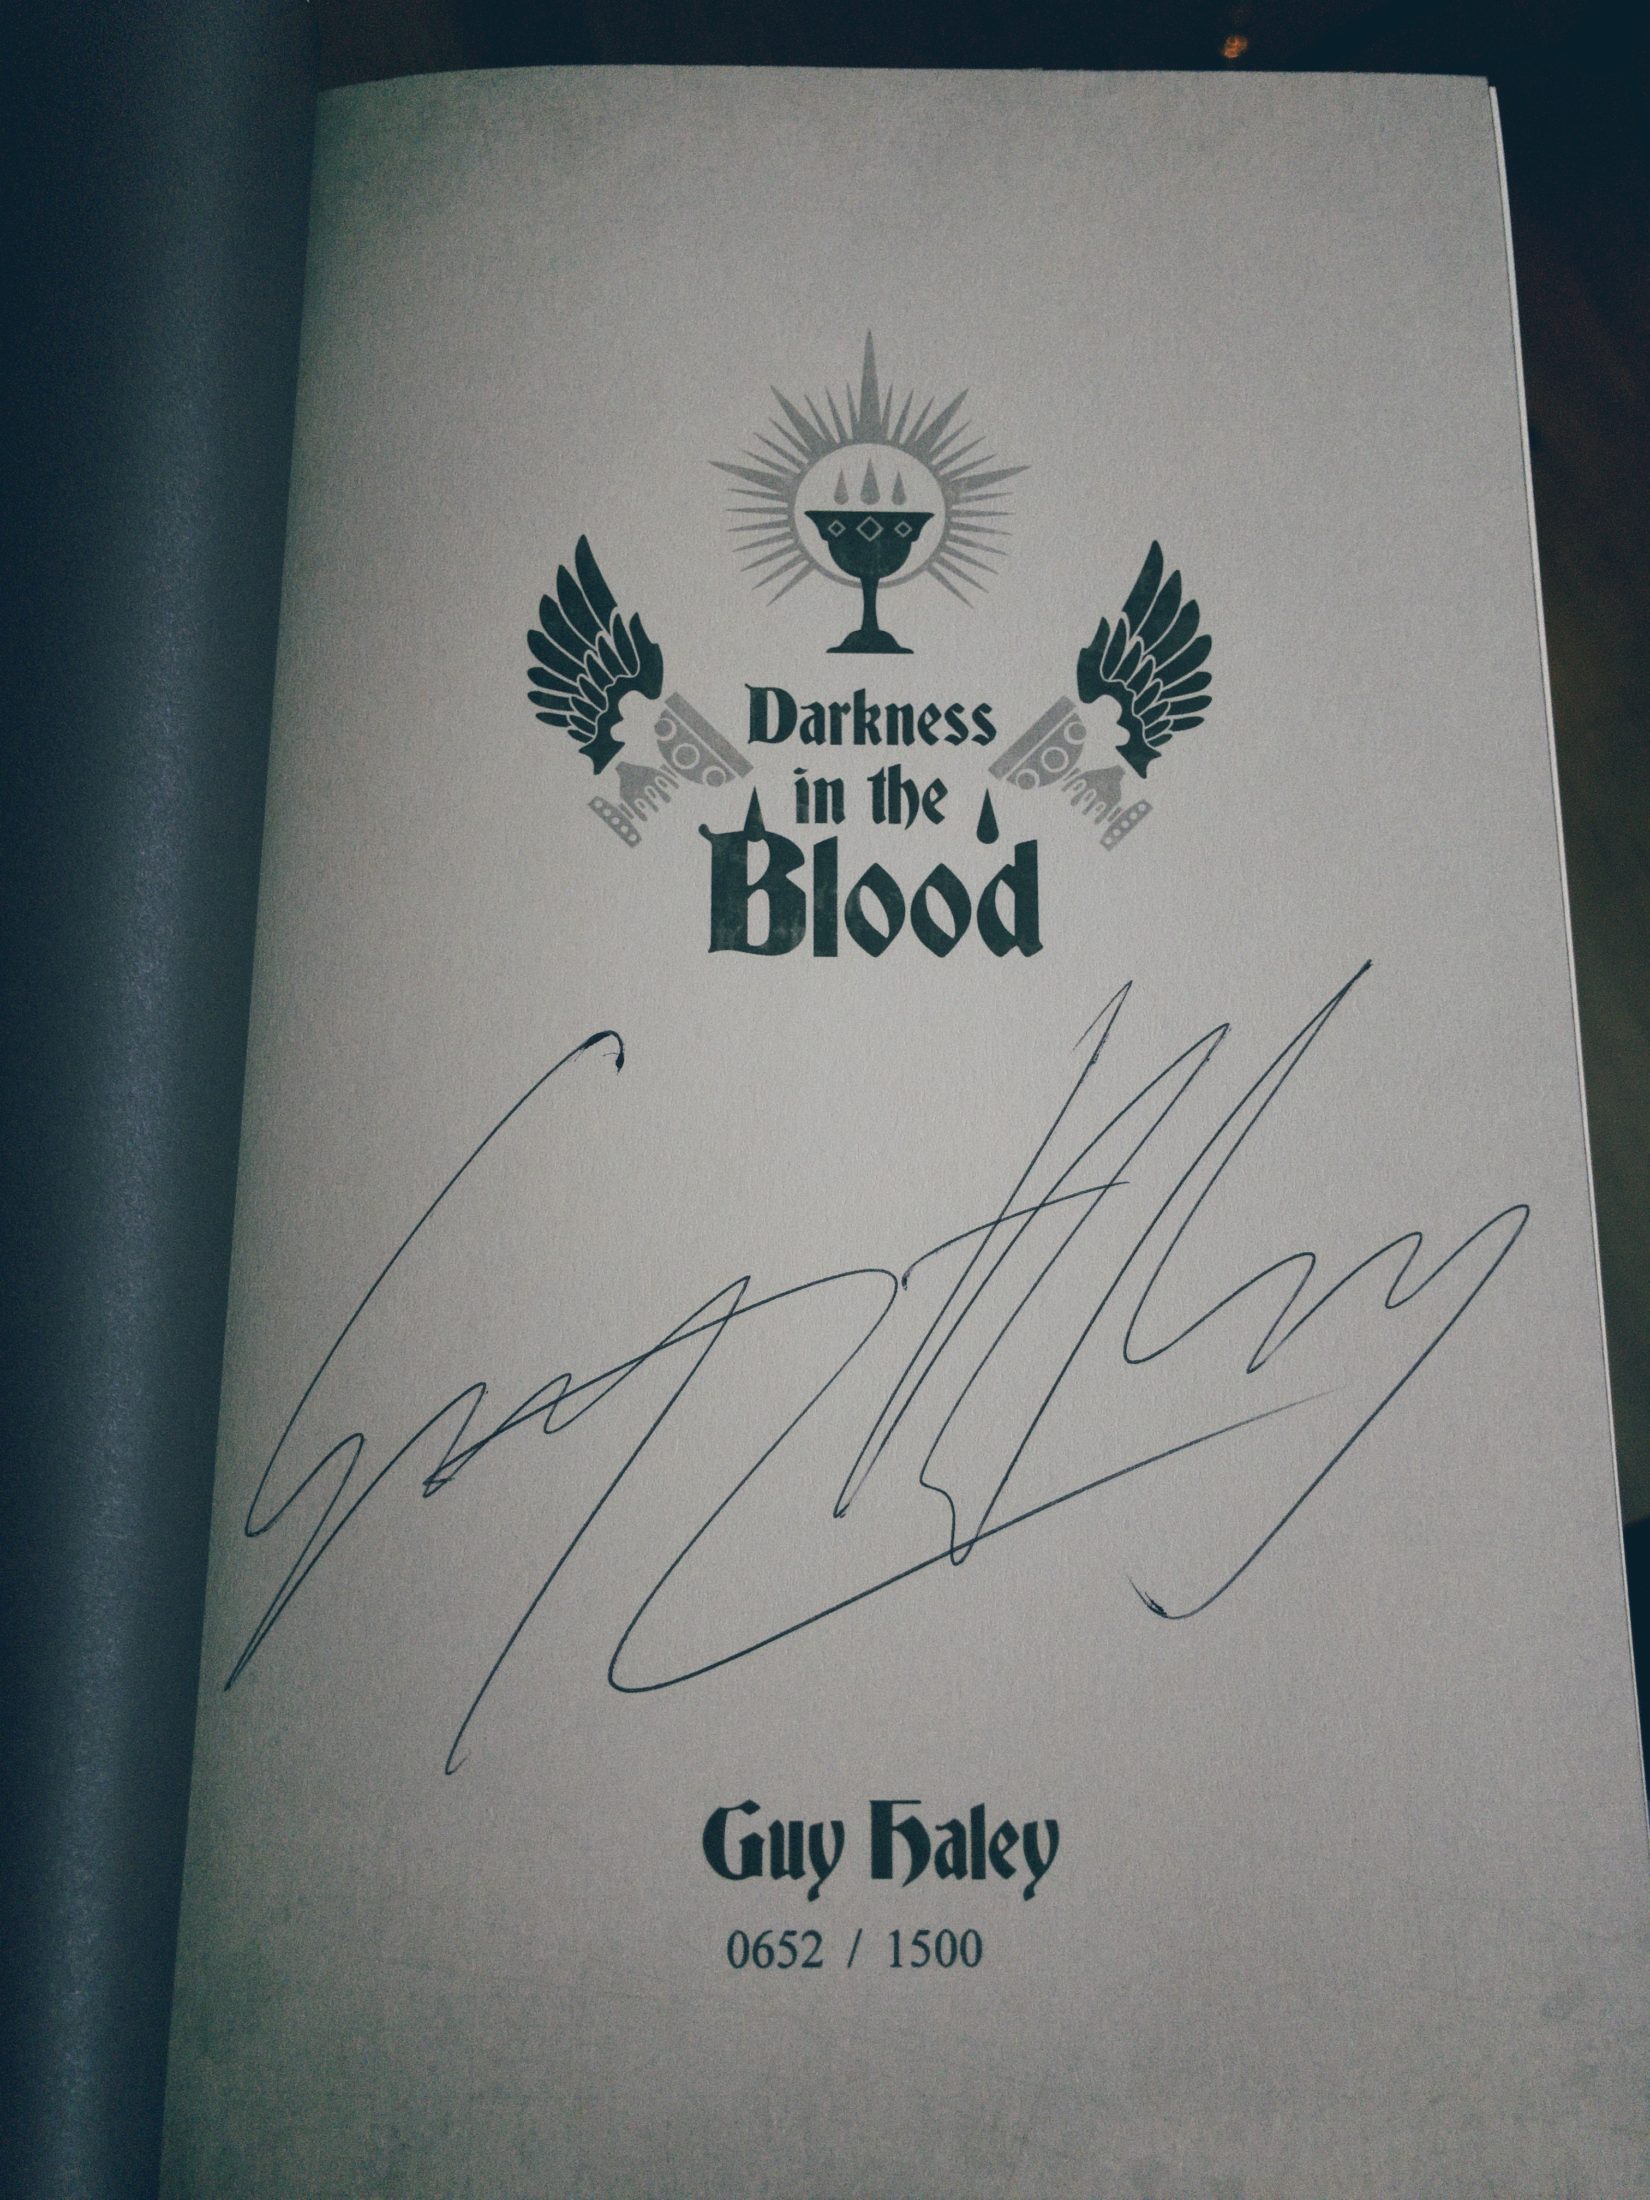
This year’s “Mega Edition” release from Black Library is the new Blood Angels novel from Guy Haley, Darkness in the Blood. I don’t know much about the plot yet (the book flew under my radar until very recently), other than it follows on from Dante and the events of Devastation of Baal, and features both Dante and Mephiston – two of my all-time favourite Warhammer 40,000 characters.
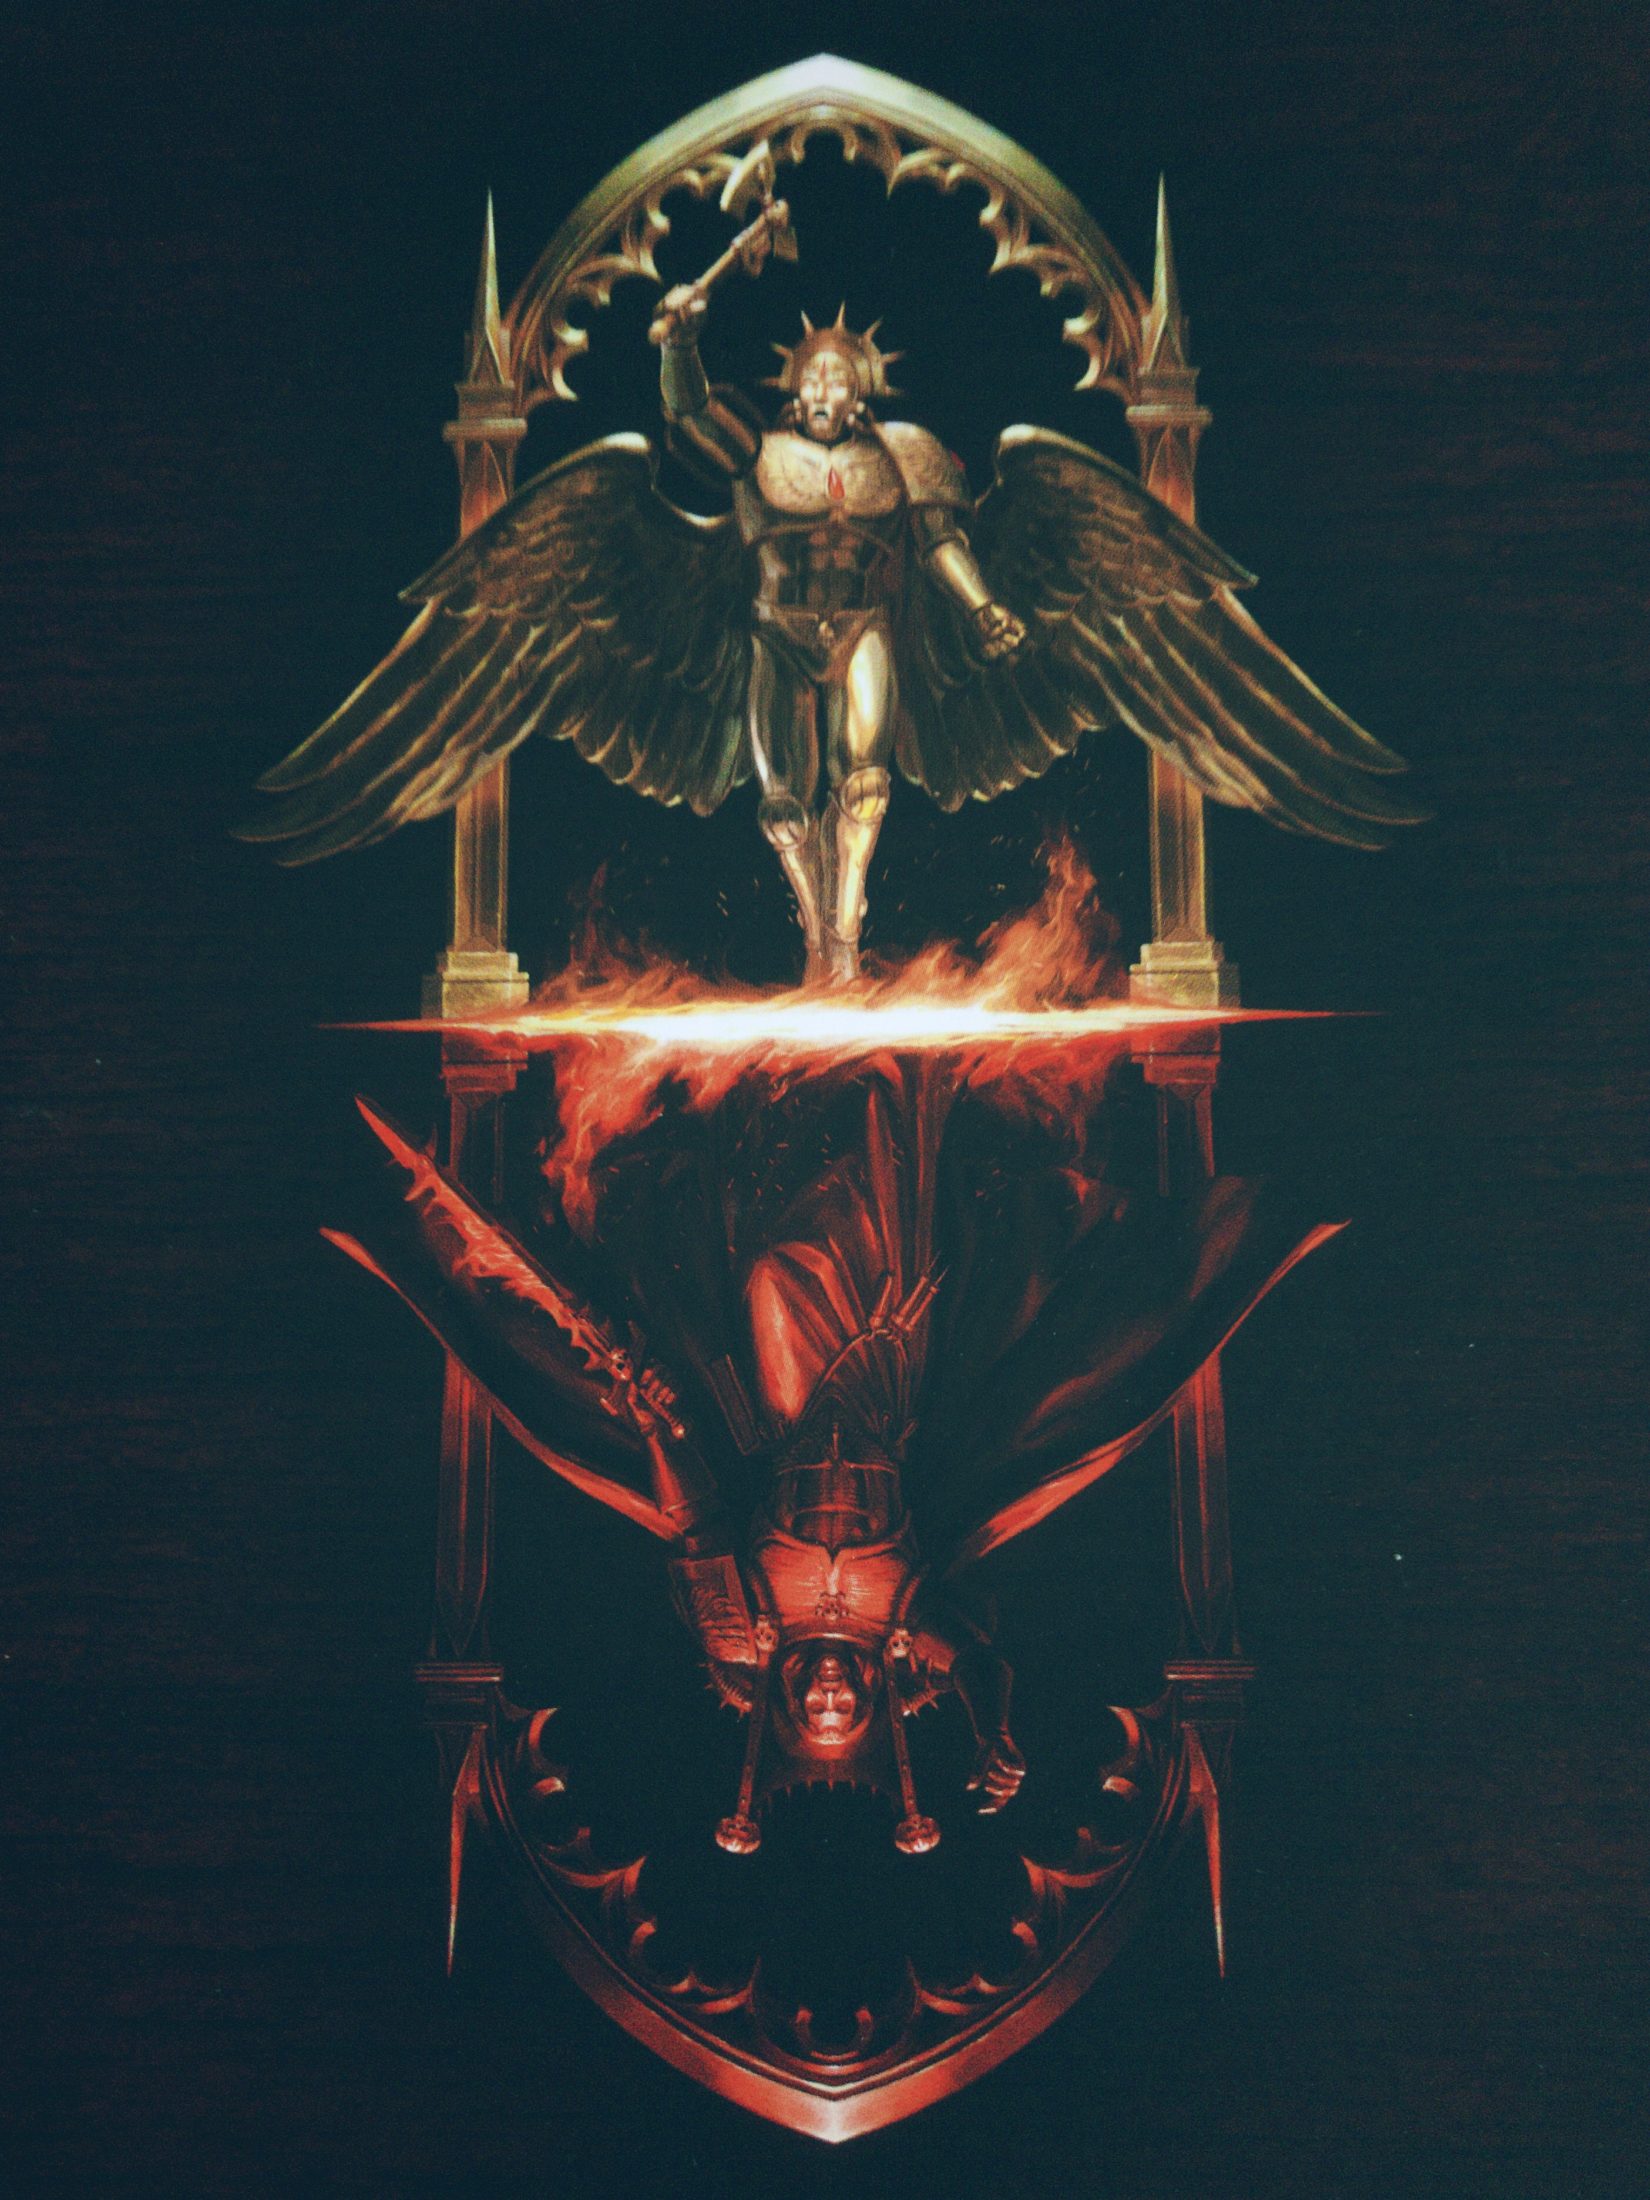
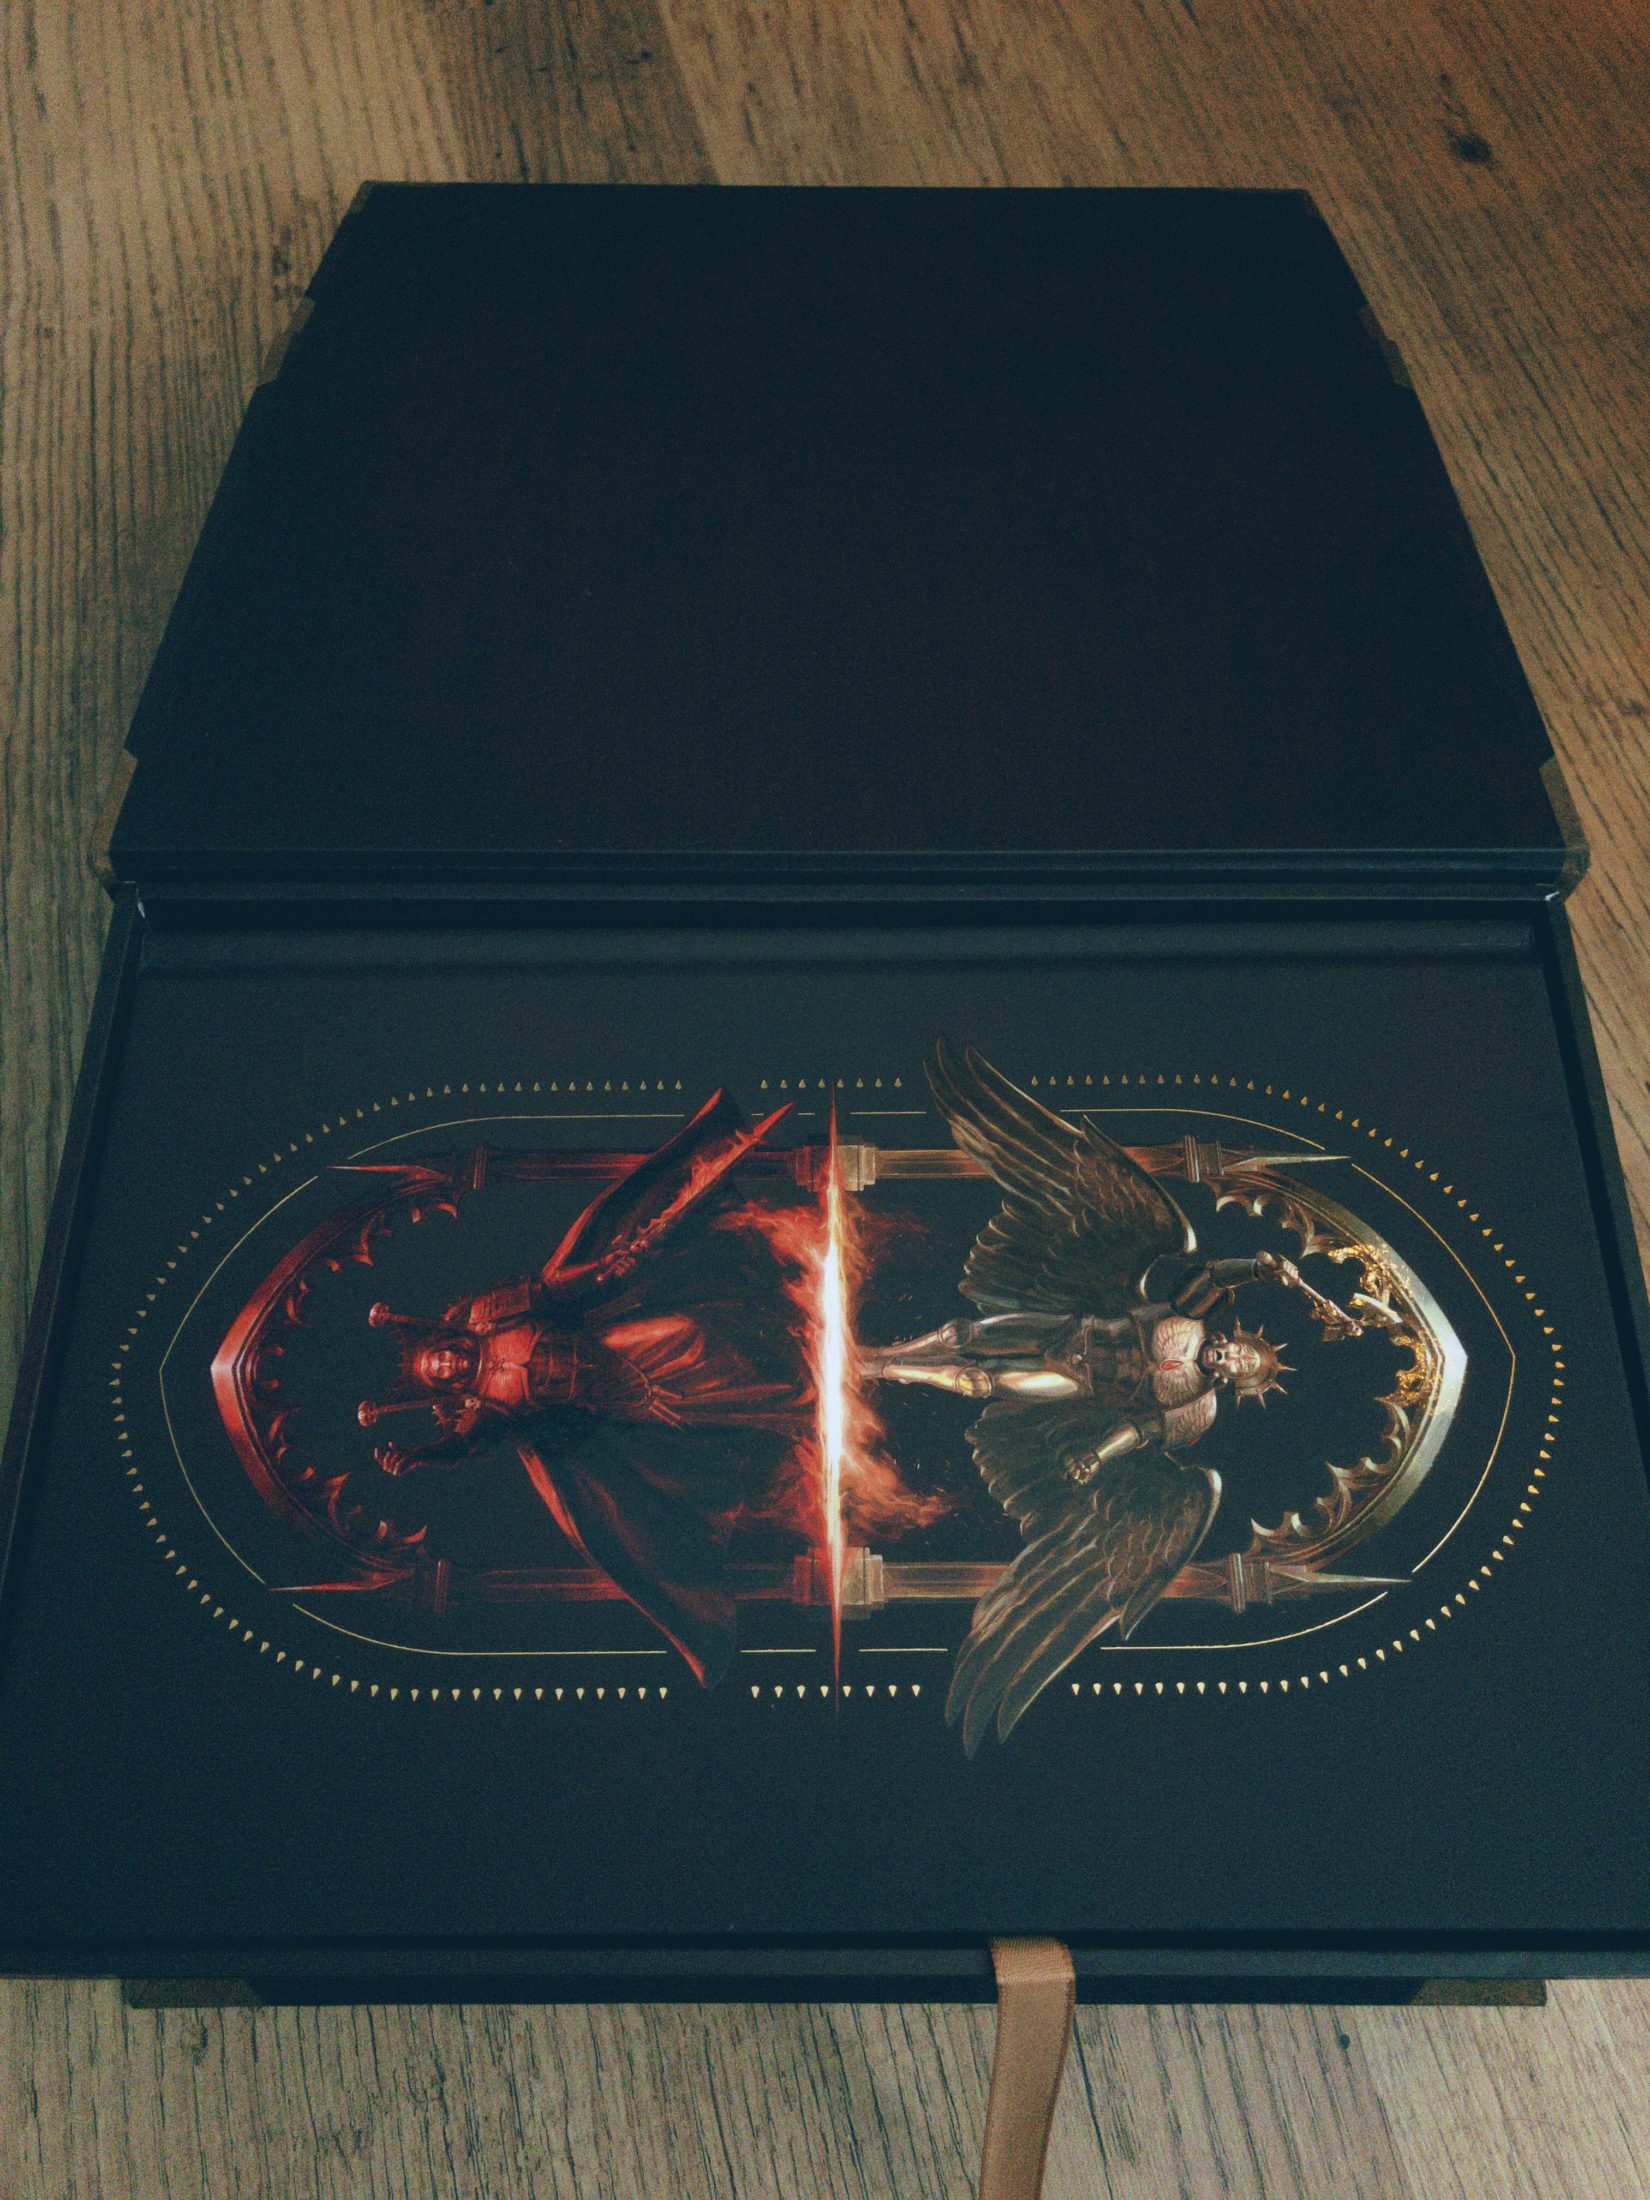
The Mega Edition is very reminiscent of last year’s Spear of the Emperor1: a sturdy, themed, presentation box contains a gorgeous hardback copy of the book, and packed in under the book is a whole set of goodies. From the design printed on both the box and the book cover, the main theme is of Dante and Mephiston as reflections of each other (or them representing the two sides of the Blood Angels themselves?) – Dante is the virtuous, golden-lit angel, while Mephiston is dark, sinister, and somewhat daemonic. Either way, it looks cool.
As far as extras go, I personally think this year has even more value than last:
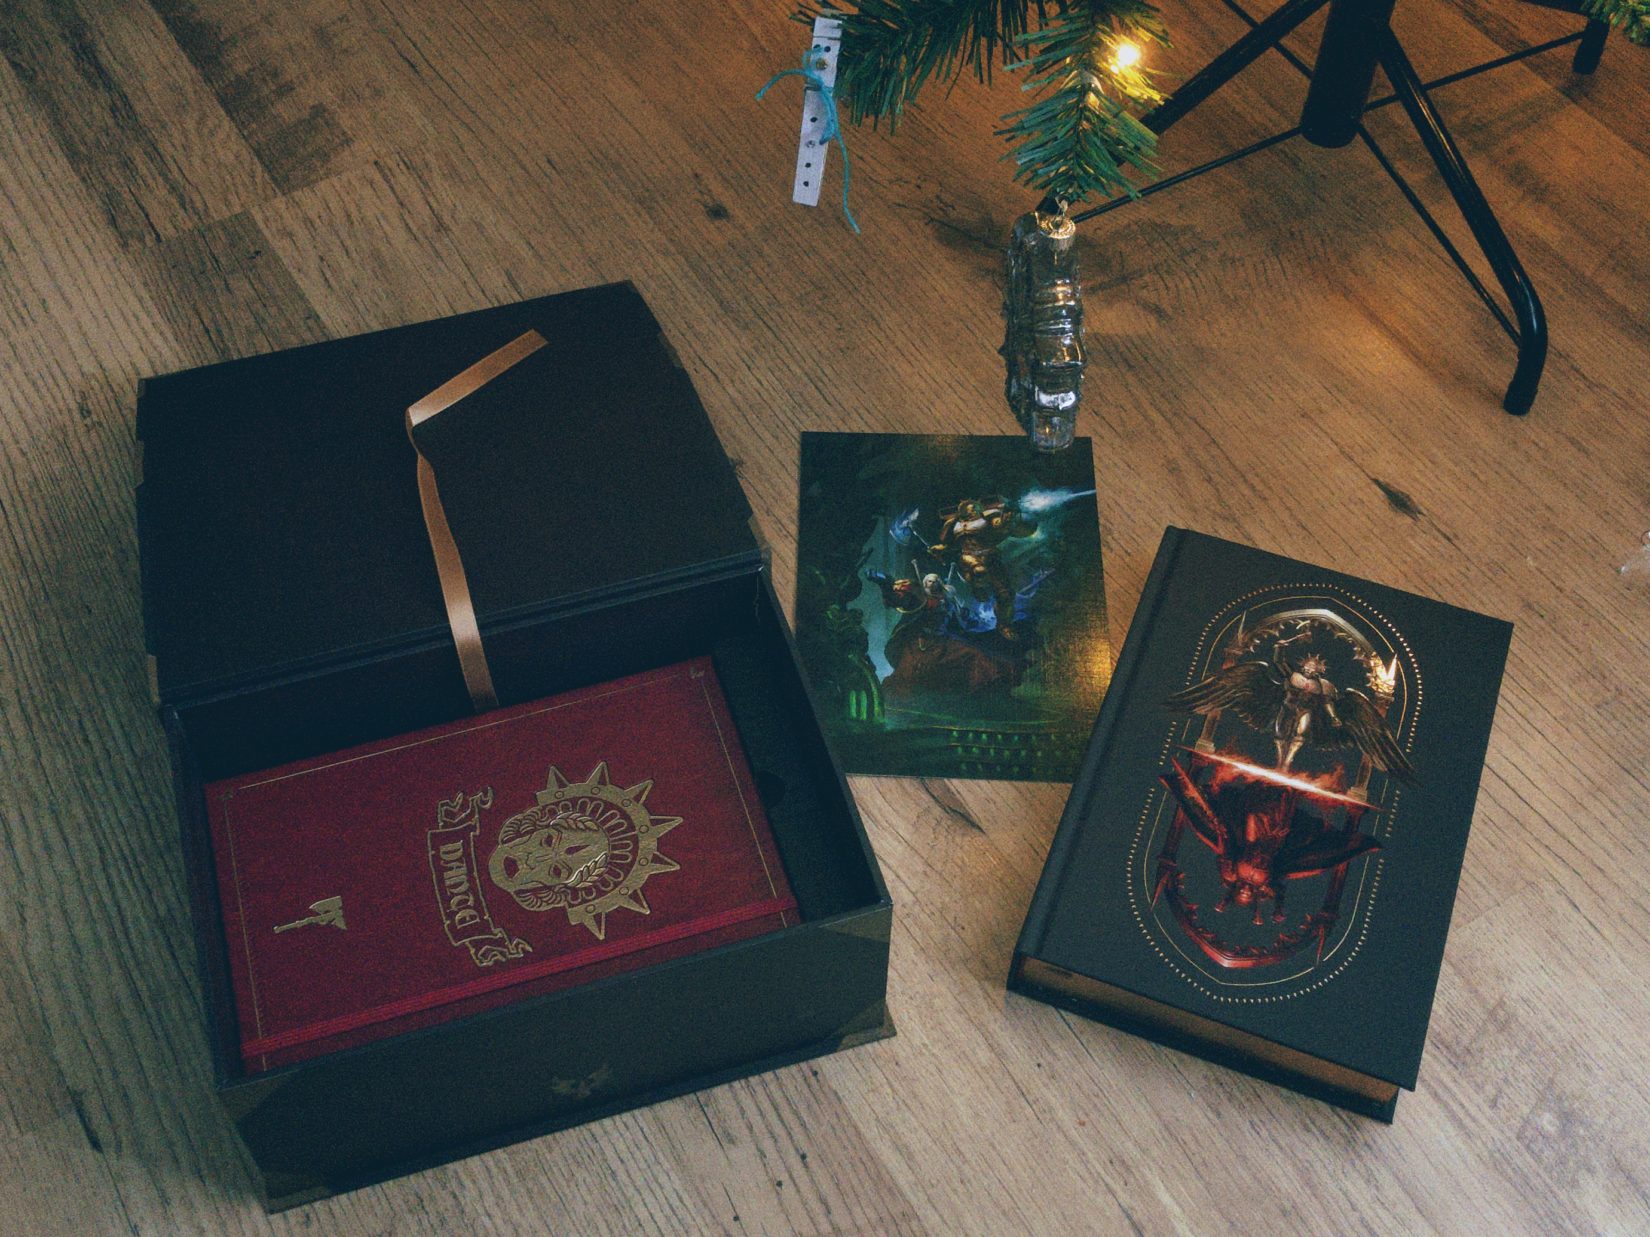
There’s a thick, hardback, leather-bound journal, featuring a similar cover to the Limited Edition version of Dante.
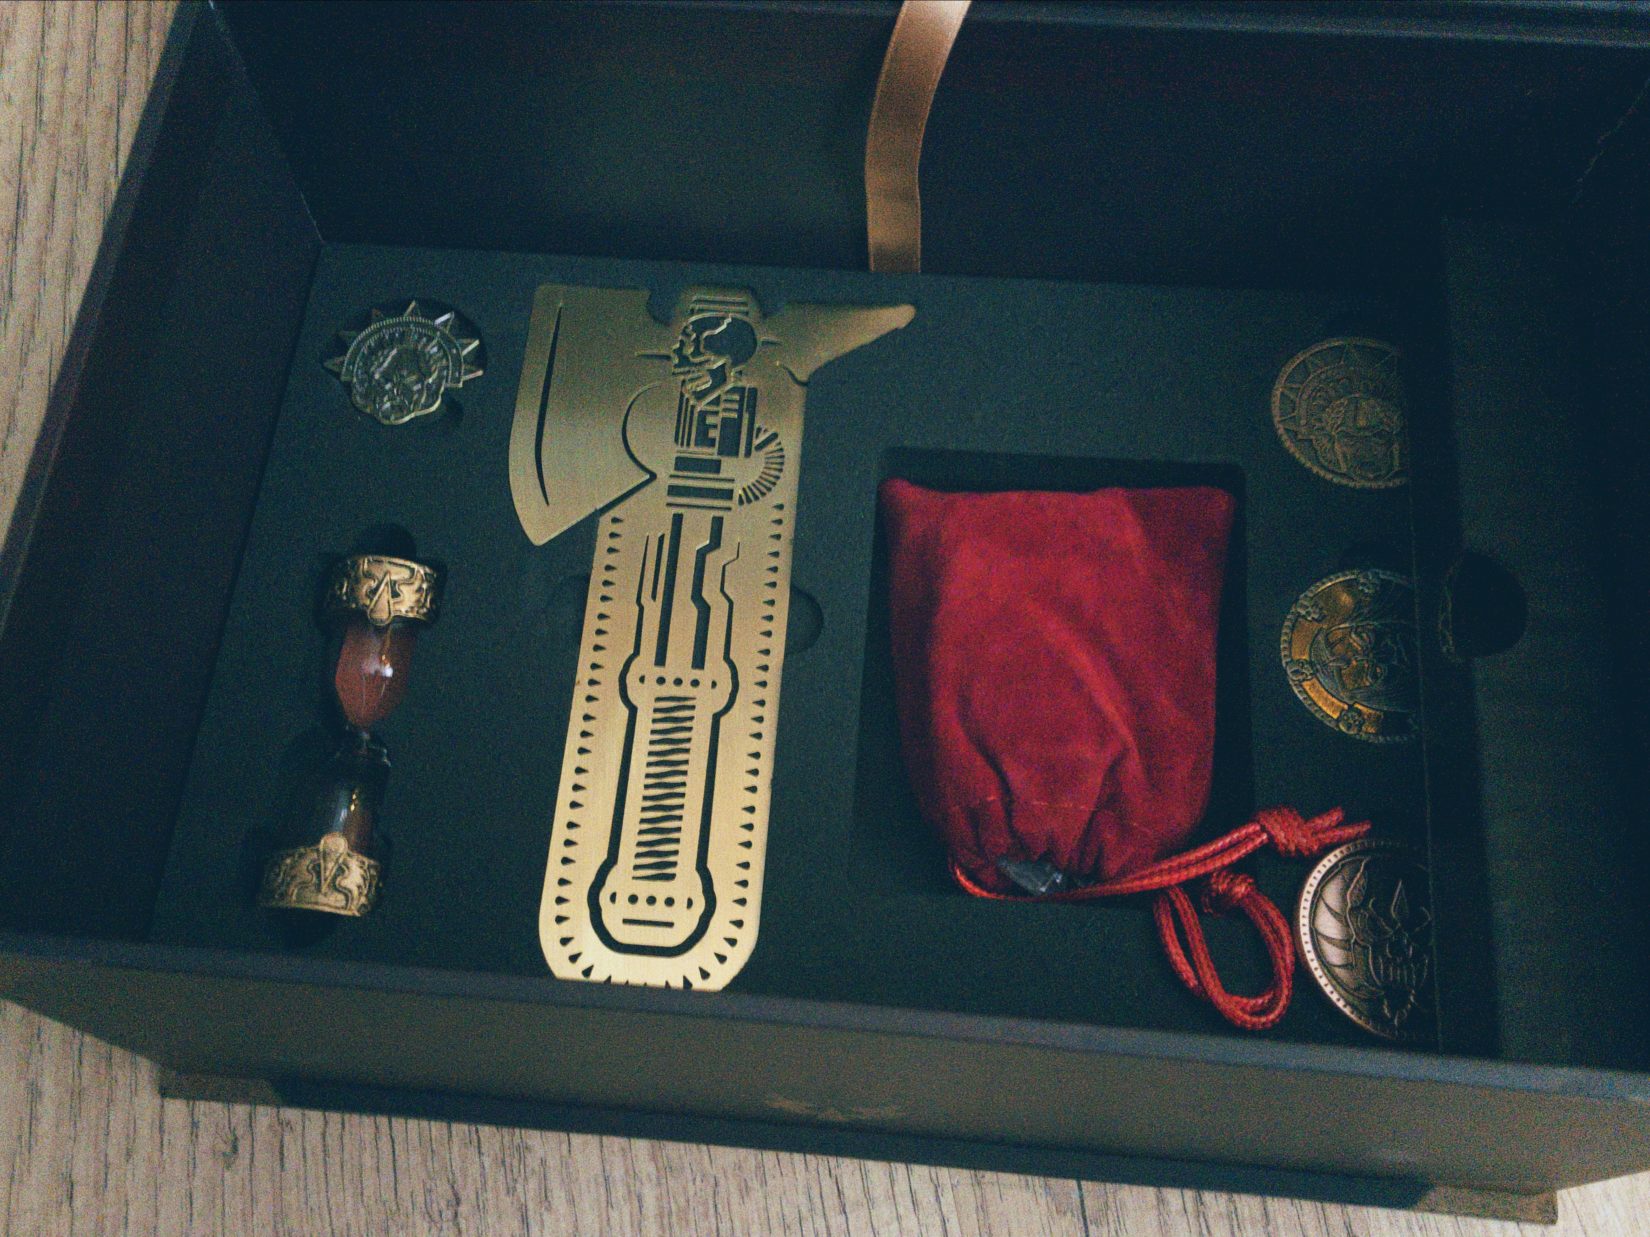
A badge in the image of Dante’s death mask.
Bronze, silver, and gold coins (perfect for in-game objective markers). There’s a different design on each.
Some very pretty Blood Angels-themed dice in a small bag.
A big, metal, bookmark in the image of Dante’s Axe Mortalis. I think this might be more effective at it’s job than last year’s purity seal bookmark.
A sand timer for some reason? I haven’t timed it yet to see how long it runs for, but it’s pretty and ornate, featuring chapter badges and red sand. Part of me wonders if it shows up in the story.
An art card, featuring the cover art from the regular edition of the book (which will be available in a few month’s time)
Like in all of my recent book unboxings, I’m impressed with the high quality of both the materials used, and the overall presentation from Black Library. This box set feels special in a way that a lot of “special editions” across most media don’t nowadays. Everything has a weight to it, and as I mentioned in my Solar War unboxing, it’s all very “tactile”. Take a look at the pictures below for an idea of everything crammed into the box. Unfortunately the photos don’t convey just how nice all this stuff is to hold.
I can’t wait to dive into the story now!
It appears I haven’t uploaded the photos from that particular unboxing. I should fix that – it was lovely. ⤴️
Inspired/spurred by gRegor’s post, I finally posted on Facebook something that’s been on my mind for a long time. Like, years long:
I’m going to be deleting my accounts on all Facebook-owned apps/websites on the 31st December. Facebook, Instagram, Messenger/WhatsApp… the whole shebang. I encourage you to do the same, but realise many people have compelling reasons to stay. You do you.
The downside to this is that some of you I don’t have any other way of keeping in touch/up to date with (not that I’m a particularly chatty person…), but at the same time, I don’t want to assume you’d like to continue to have a way of doing so outside the Facebook ecosystem. Unlike Facebook’s surveillance of you, here you can opt-in.
So, if do you want to stay in touch – however infrequently – drop me a message before the 31st with another way to contact/keep up with you – email, alternative social media, blog/newsletter, or whatever. If appropriate, I’ll send you a response so you’ll have my details. If you have an old profile/email/whatever of mine, don’t assume it still works.
I’ve been putting off getting rid of Facebook for so long… mainly from a mixture of laziness, complacency, and FOMO. But with the start of a new year/decade approaching, something in me decided it was now or never. Now I have a set timeline to stick to, and public posts to help keep me accountable to it.
My employer has started blocking 1Password.com recently, breaking my ability to access my passwords and Two-Factor Authentication (2FA) details using the browser extension. I can still get these details on my phone, but typing a completely random 22-character password by hand is far from ideal, and a bit of a pain in the rump, to be honest. This isn’t their most egregious “security theatre” policy, but it is one of the most impactful (to me).
Cards on the table, I 💖 1Password, and have been a paying customer for several years. If my access and ability to securely login/sign-up to stuff wasn’t being impeded by another party, I’d happily keep chugging away without much further thought. Their software has been super useful, convenient, and improved how I approach my personal online security.
As it is though, I started thinking about migrating from 1Password to Bitwarden; the ability to easily self-host Bitwarden being the main attraction in this scenario. Between hosting costs and upgrading to a “Pro” tier account for in-app 2FA generation, it would work out about $15-20 a year more expensive than I pay for 1Password, but that’s not a huge amount in the grand scheme of things.
However.
The most immediate concern would be rebuilding my password vault accurately, complete with all the 2FA details I need – which is a lot. That’s going to take a lot of time and effort to move across, even with an export recreating everything – at the very least I’m going to have to check and verify everything imported correctly and that I’m not locked out of anything. And my digging into this hasn’t confirmed that all item types I use in 1Password can be exported across to Bitwarden.
However, part two.
Unless you happen to have an installation of the native applications for macOS or Windows (say, because corporate policy prohibits and prevents it, and you no longer run either of those OS’s at home…), there’s no way to export your data. At all. 1Password then becomes a silo you can’t easily get out of. The only way out is to manually recreate all of your data elsewhere. When your vault starts getting above more than a few dozen items, that’s a lot of work. Mine stretches into the hundreds.
It’s something I hadn’t really thought about before I started the thought exercise around potentially moving away. When we talk about silos, normally we’re talking about social media locking your posts and user data inside their networks. An everyday utility like a highly-convenient password manager rarely factors into it. And yet, here I am. I guess I forgot my initial misgivings about 1Password.com, and didn’t check ahead for an exit strategy.
I’m not certain how I’m going to proceed from here. 1Password themselves haven’t given me a reason to quit their service, but I’d be lying if I said this realisation of how “locked in” I am didn’t bug me and push me to migrating as an it’s-the-principle-of-the-thing “eff you” moment.
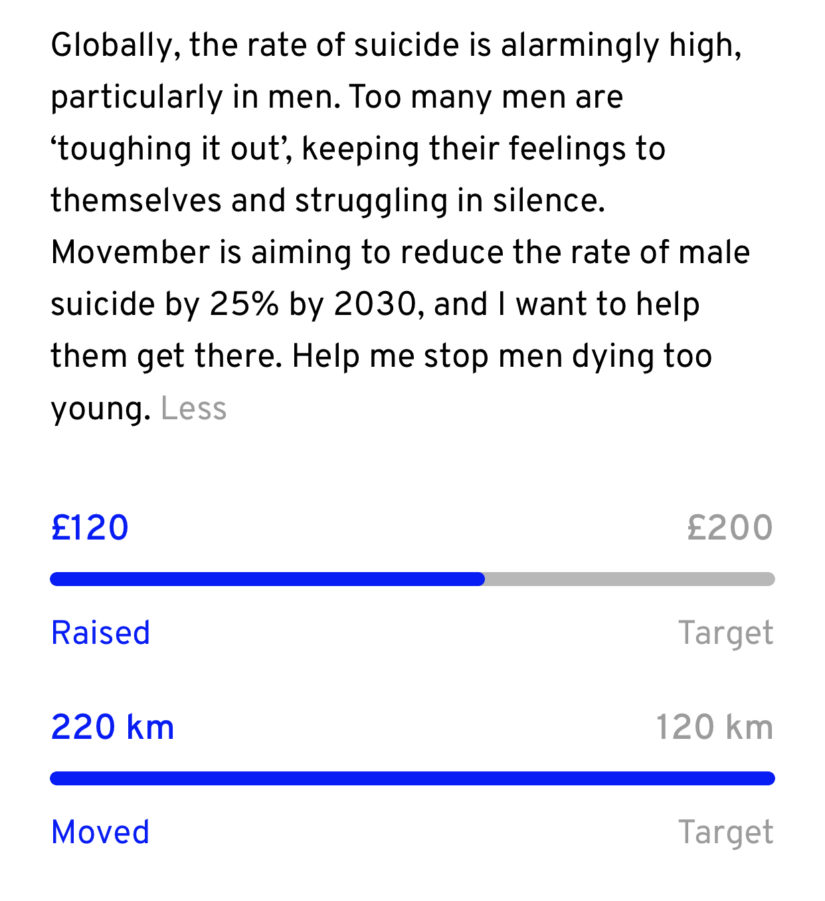
For the last 27 days I’ve been taking part in the Movember “Mo-ve Challenge” (it’s not all about growing facial hair!), in aid of promoting better conversations around men’s health. In particular, my motivation revolves around mental health and suicide prevention, which are topics close to my heart:
Globally, the rate of suicide is alarmingly high, particularly in men. Too many men are ‘toughing it out’, keeping their feelings to themselves and struggling in silence. Movember is aiming to reduce the rate of male suicide by 25% by 2030, and I want to help them get there. Help me stop men dying too young.
There’s still a few days left in the month, but so far I’ve walked over 220km. I’d originally set a goal of 120km, but I’m aiming for 240km by the end of the week (the official challenge is for 60km). For that, I’ve raised £120 at the time of writing.
And that’s where you come in, Dear Reader. I’d very much like to meet my fundraising goal of £200 by the end of the month, or exceed it if I can. If you are able to, please consider donating even a small amount on my MoSpace page: https://uk.movember.com/mospace/14053989. Every little bit would help, and I’d appreciate it more than you’d know.
My two youngest kids have recently discovered Avatar: The Last Airbender. I’d forgotten how good a tv series it is. Definitely one I don’t mind them binge watching on a cold, wet, weekend.
Some of the trees across from my office window look like they’re being blown horizontal by the wind, which is going to make the walking part of my trip to the dentist fun.
The new tenants in the office opposite ours have been building a single IKEA shelving unit for the last 3 hours. I considered offering my help as I’ve put together so many of them I can put together most standard IKEA units inside of an hour. But they seemed to be getting a bit heated, so I won’t poke the bear.
I’m working on a legacy app which still needs to support IE11. There’s one screen (a search window in a pop-up) which intermittently triggers the XSS filter, depending on values in the URL — despite everything being encoded properly. When this happens the entire screen is prevented from drawing. It’s driving me mad, and to top it off, once it triggers it starts triggering on values which didn’t previously cause the XSS filter to fire.
Edit to add: turning off the XSS filter by setting the header is not allowed.
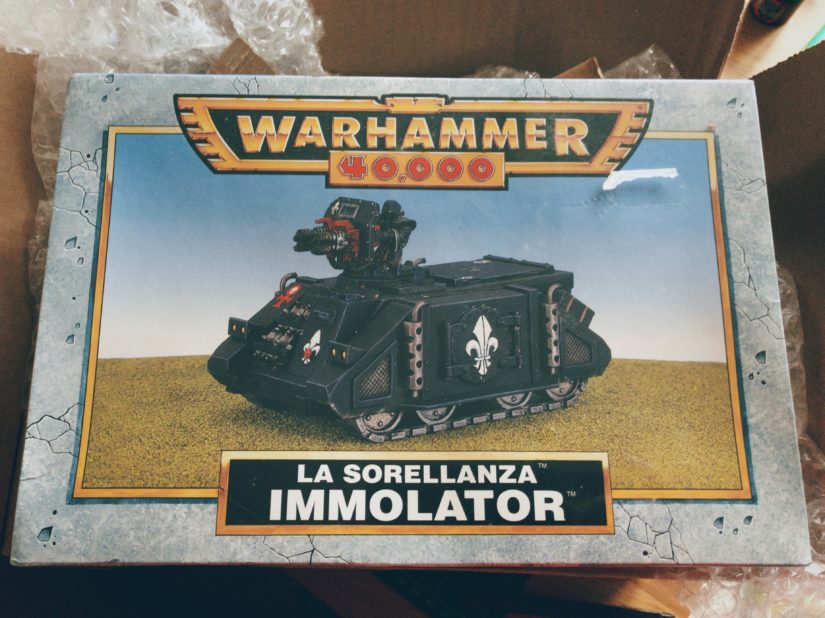
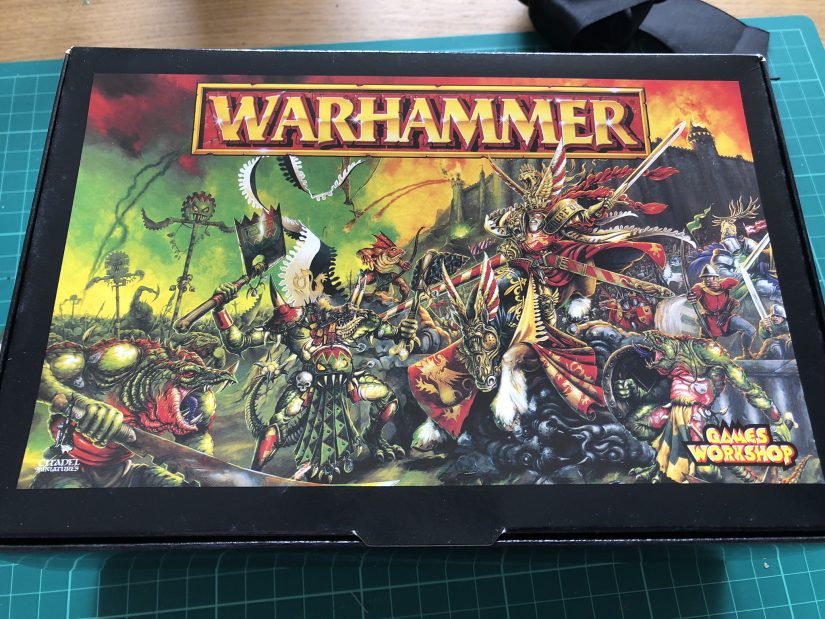
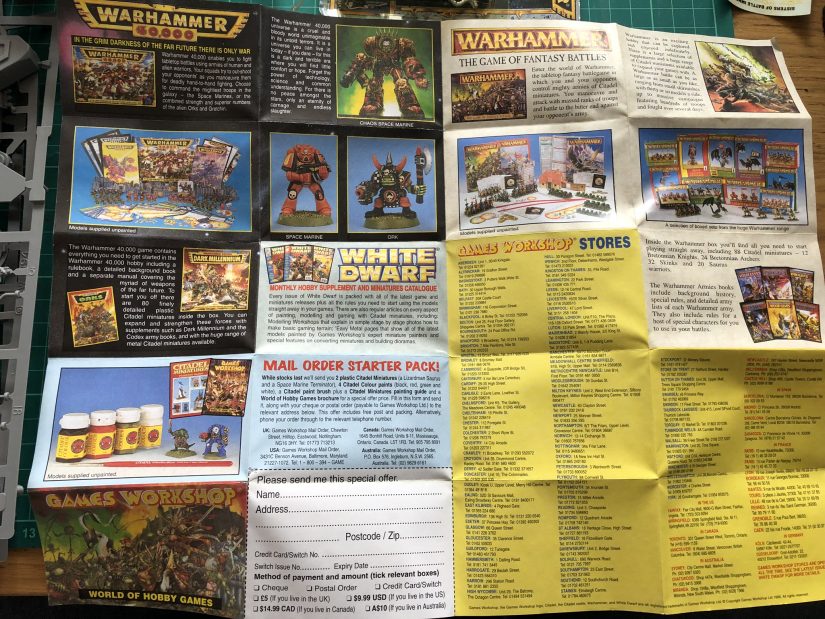
The box itself has a card sleeve with the product photo over the main box, which features the artwork from Warhammer Fantasy Battle 5th Edition (the best edition, don’t @ me)
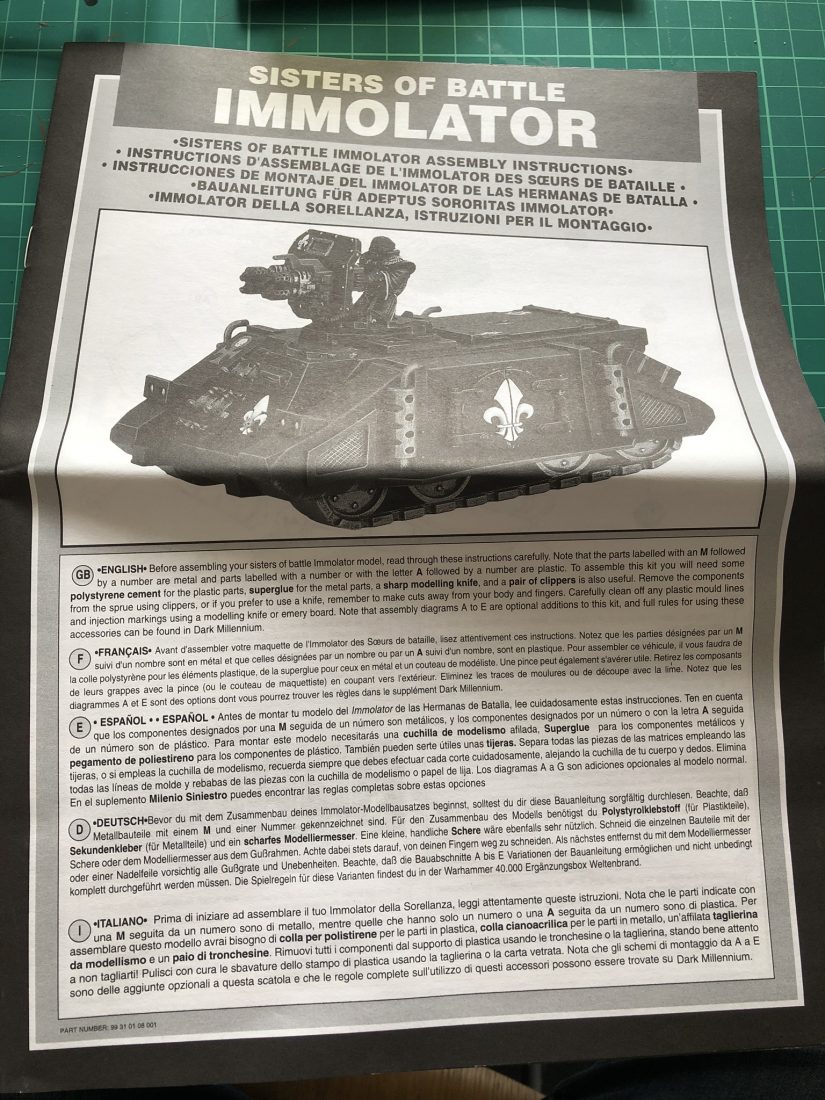
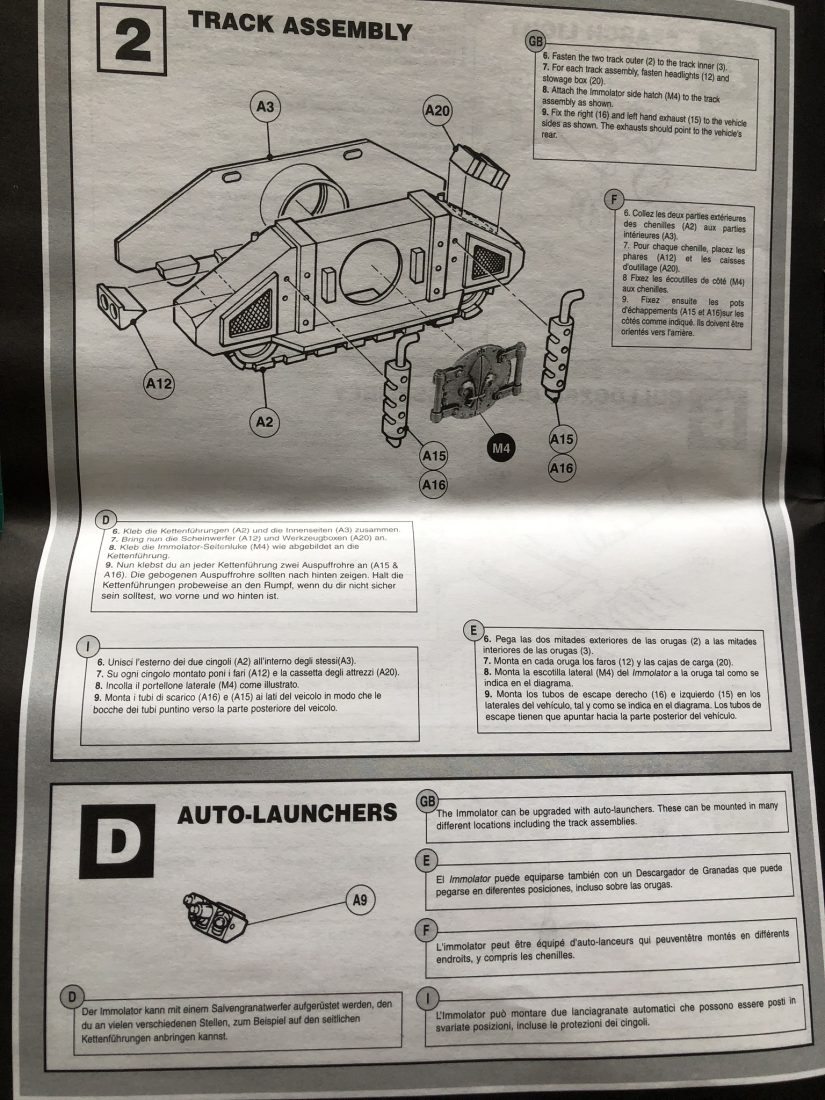
Instructions
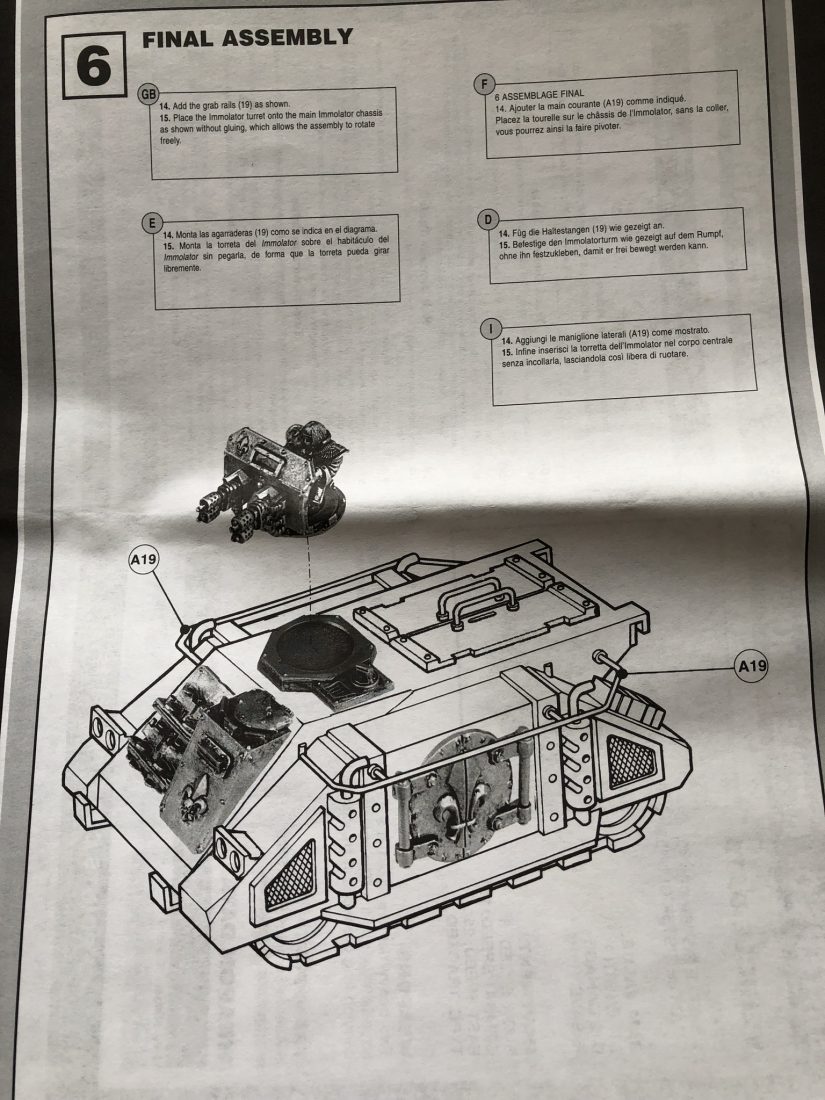
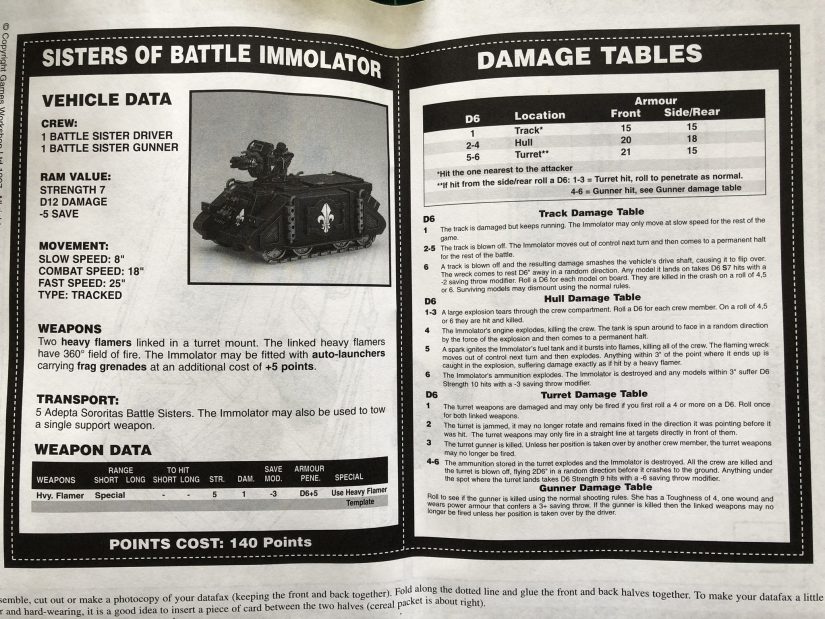
I didn’t really need these, but it was fun to flick through the instructions, for old times’ sake. For those unaware, the last picture is of a “datafax” – every vehicle in 2nd Edition had one of these, which gave the profile, armour values, and damage charts.
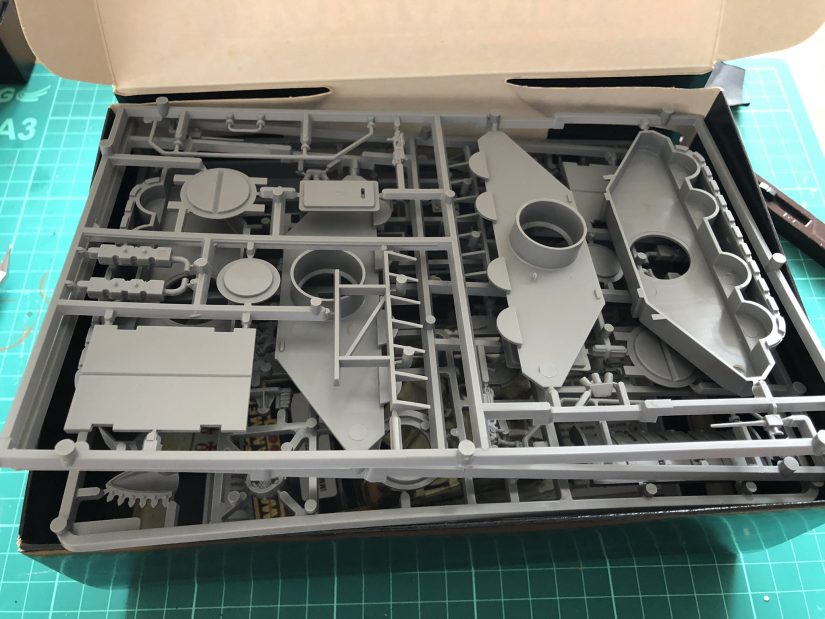
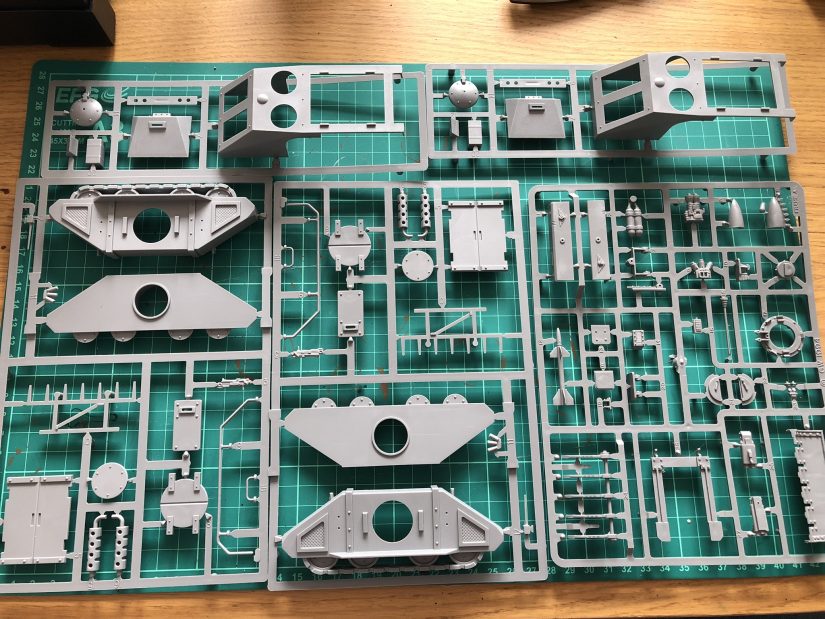
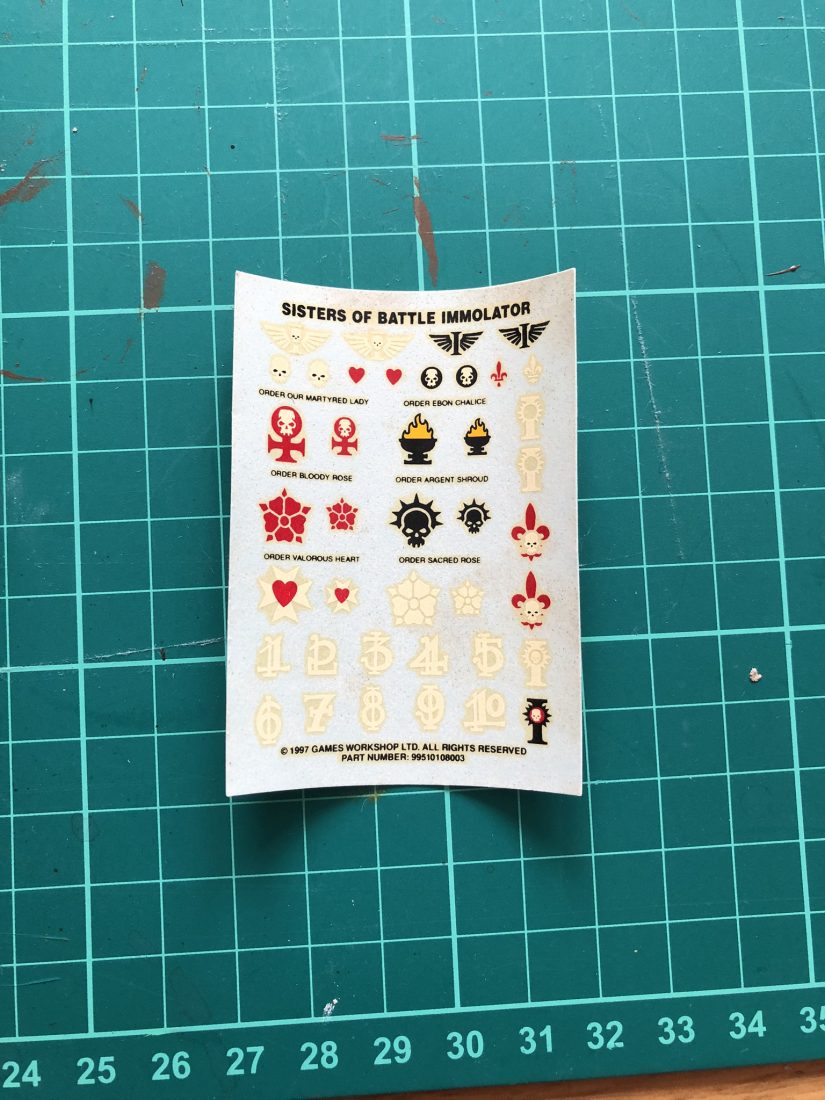
Parts and Contents
The parts I received were in good condition – which I expected, as this was a still-sealed, never-been-opened box! The blister pack and transfer sheet both showed a lot of discolouration, beyond what I’d expect for the age and unopened state, and more than shows up in the pictures; I suspect at least one previous owner smoked. As I was about to assemble everything, I wasn’t concerned by this.
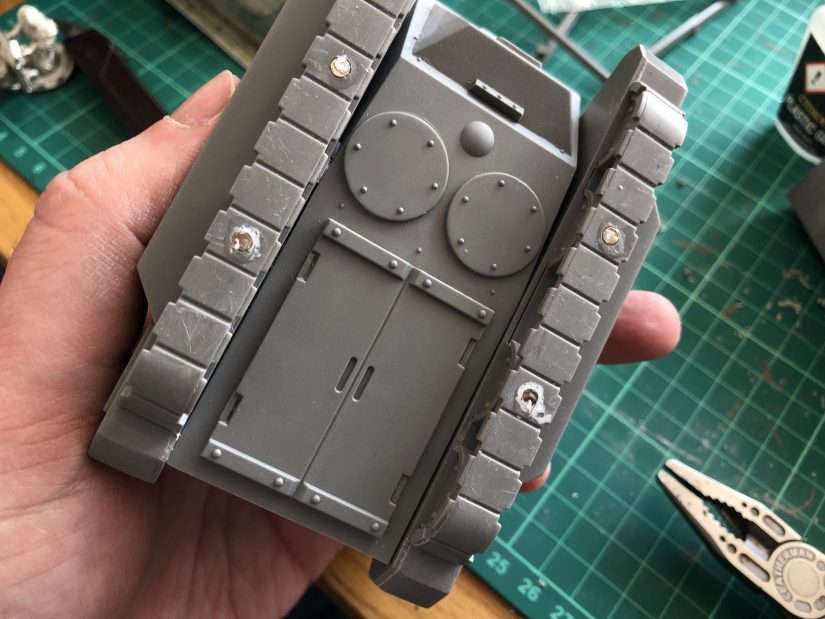
Mould lines weren’t really an issue on the plastic parts. There are a couple of regular problem areas on this kit – the grab rails, and the exhausts – but most other parts were fine. The metal parts had the usual assortment of metal tags and casting imperfections, but nothing out of the ordinary or problem-causing. I’ve had more issues with 2019 GW metal castings than I had with this kit.
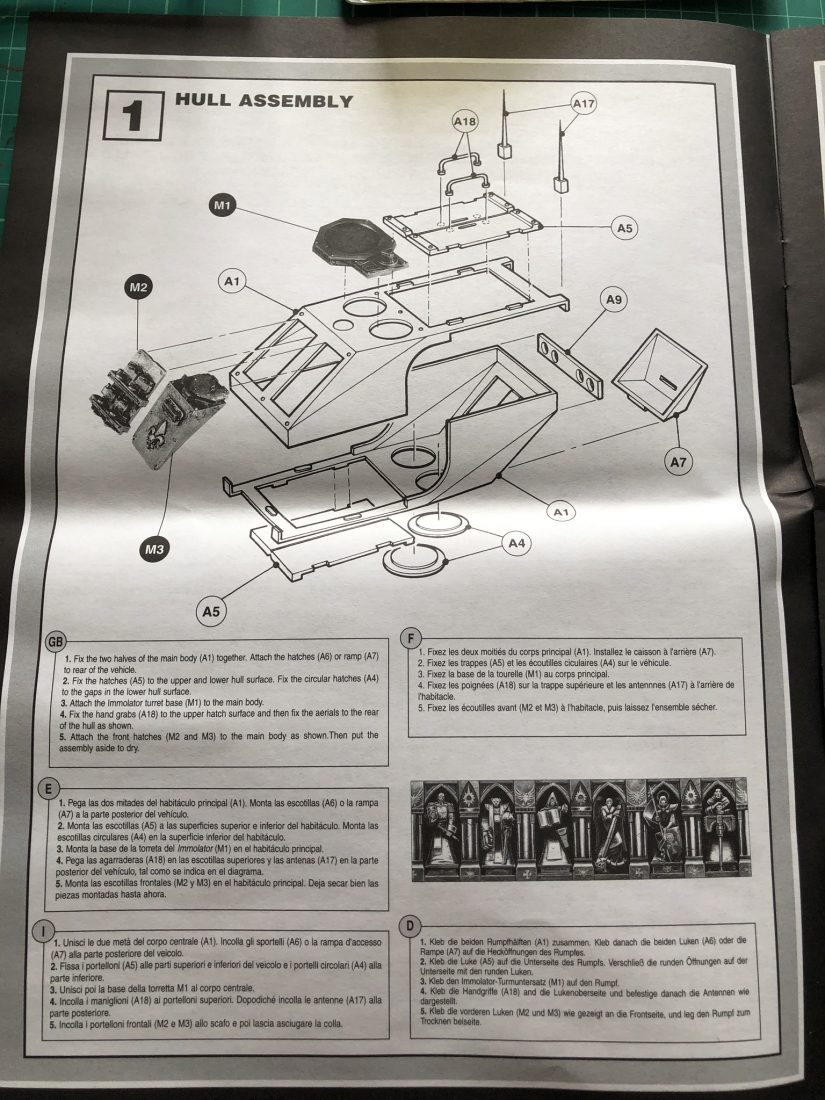
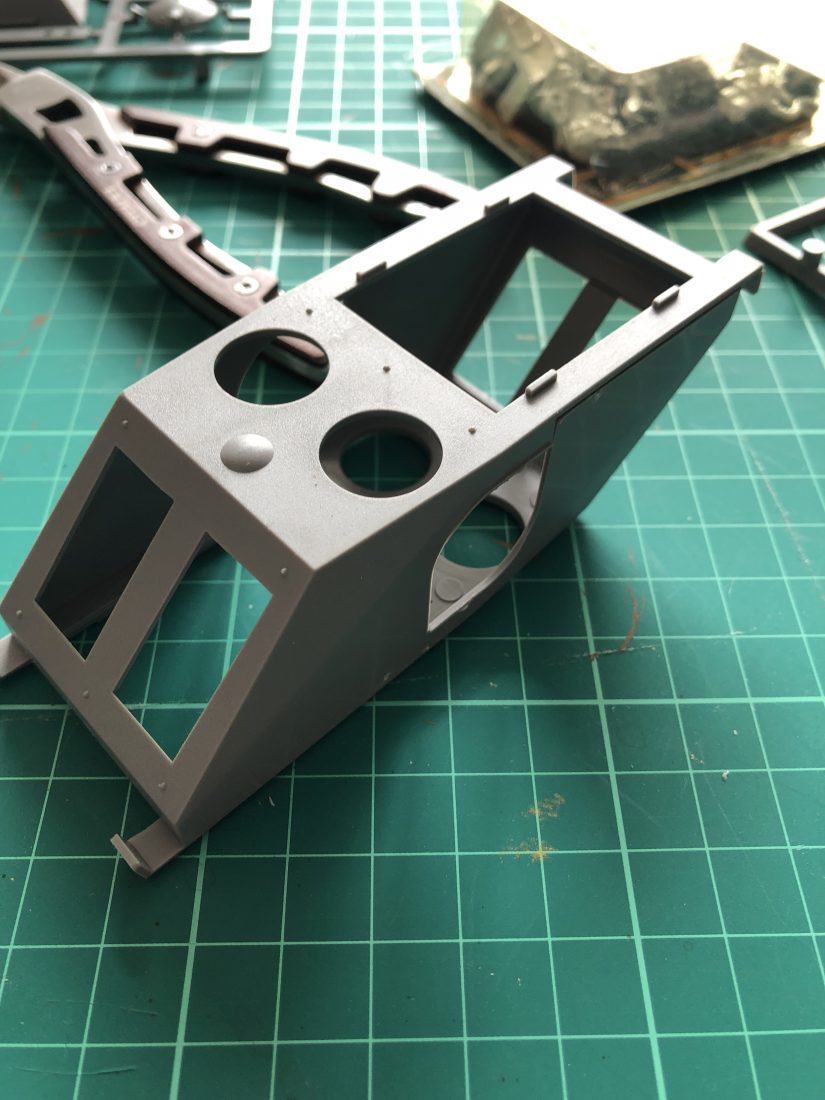
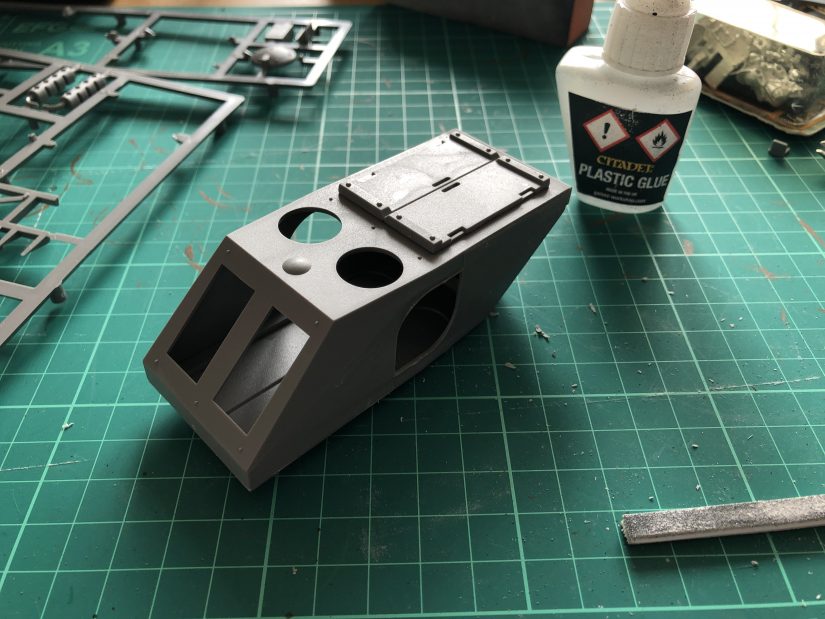
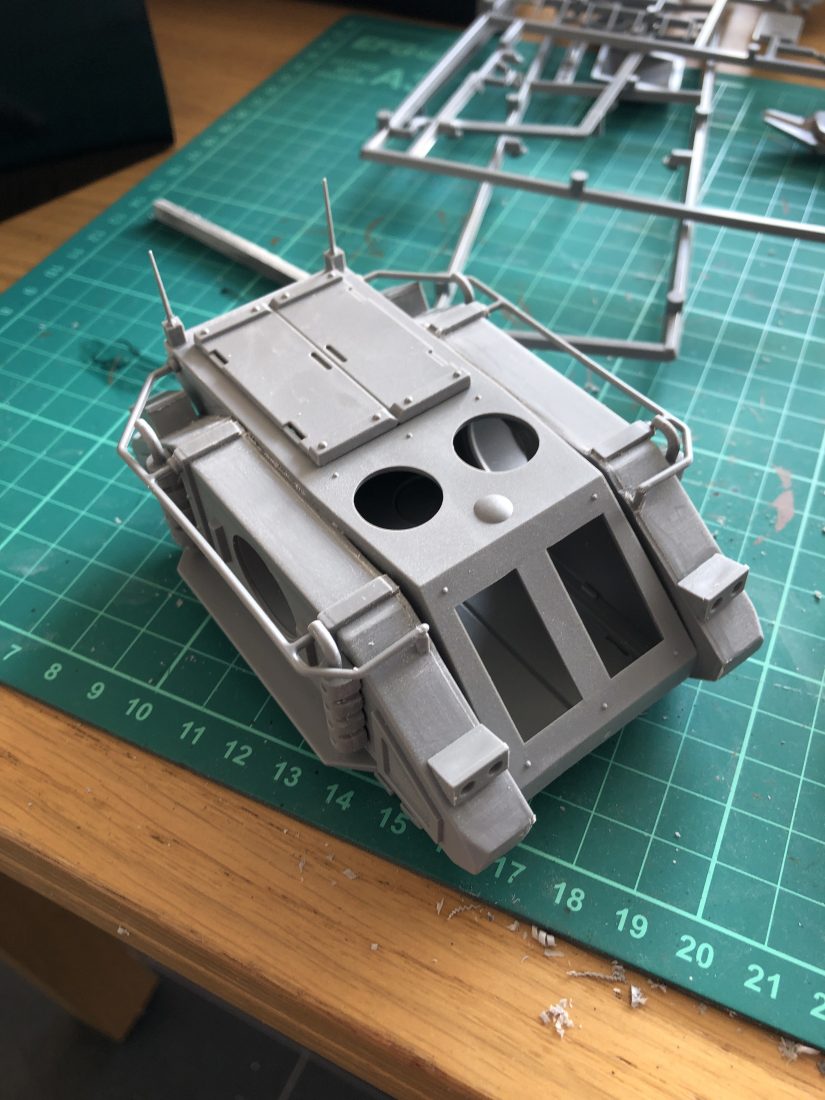
Assembly
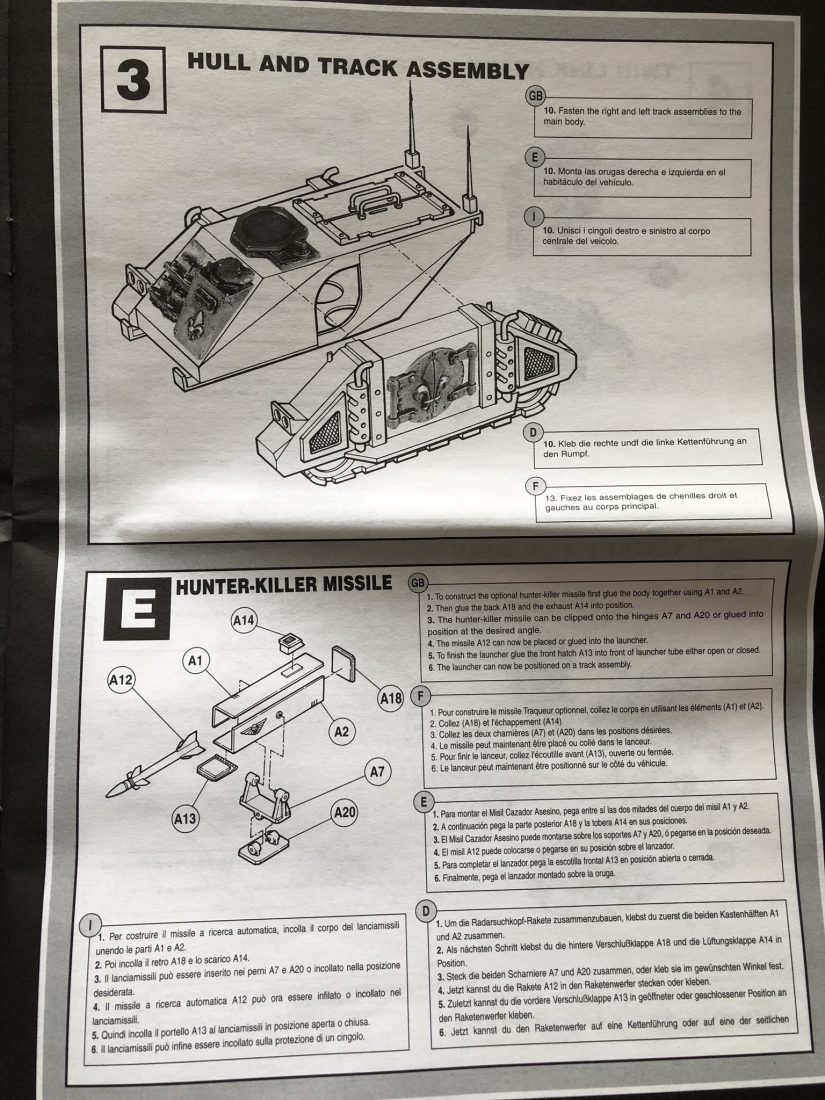
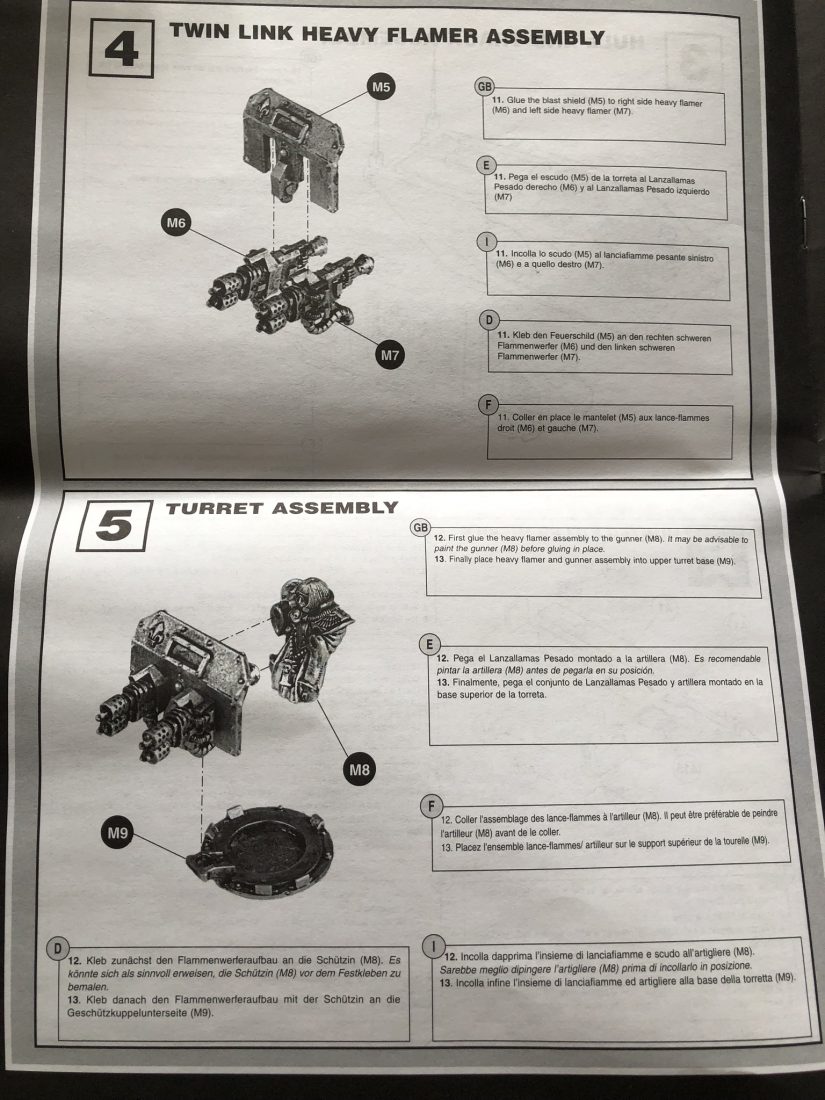
The original Rhino chassis, which forms the basis of the Immolator kit, is so simple and straightforward to put together. Glue the two halves of the hull together, add the hatches and track sections, and you’re pretty much done. The only thing you have to be mindful of, is some of the parts and connection points are small and/or fragile. I broke one of the top hatch handles just by holding it too tight between my forefinger and thumb, and had to carefully glue it back together before assembly. I did quite a bit more clean-up than 14 year-old me would have, to take care of gaps and mould lines. Modelling knives, clippers, and sanding blocks will be your friends if you ever have to build this kit yourself!
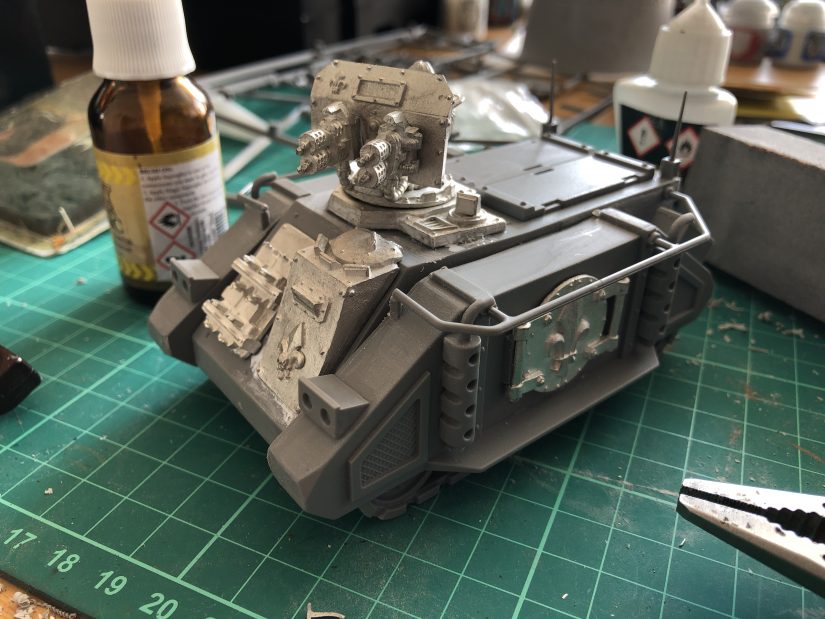
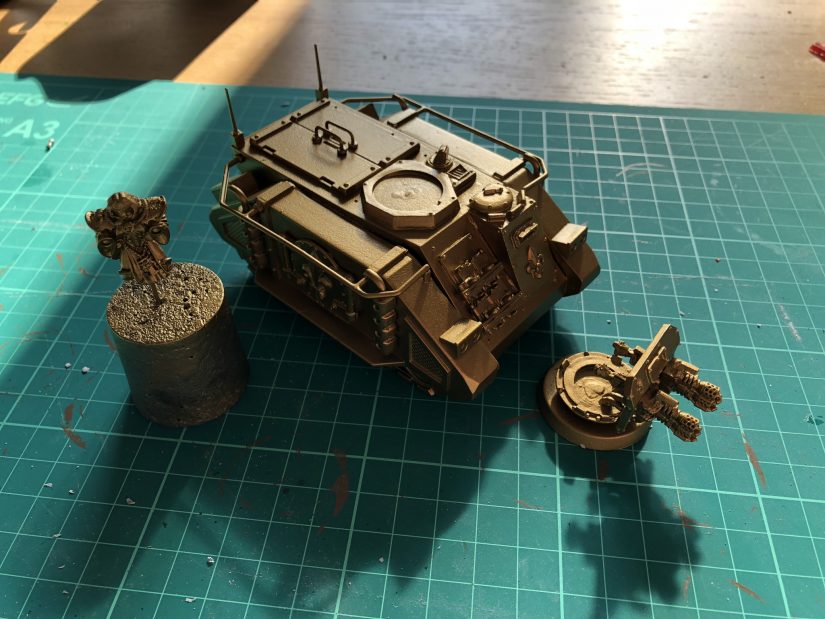
The metal parts of the kit were always a little annoying to work with. The tolerances and variance are much bigger in a spin-cast part than injection moulded plastic, so things don’t quite line-up or fit right. I did as best I could, with a bit of filing, bending, and using some superglue to gap fill where needed. I completely forgot to take pictures of the turret assembly!
I did allow myself a couple of nods to modernity – I added 3mm x 2mm magnets to the tracks and turret, to make transportation easier and stop the turret falling off all the time. To speed things along I used my power drill on the slowest setting, rather than my pin vice.
Finishing Up
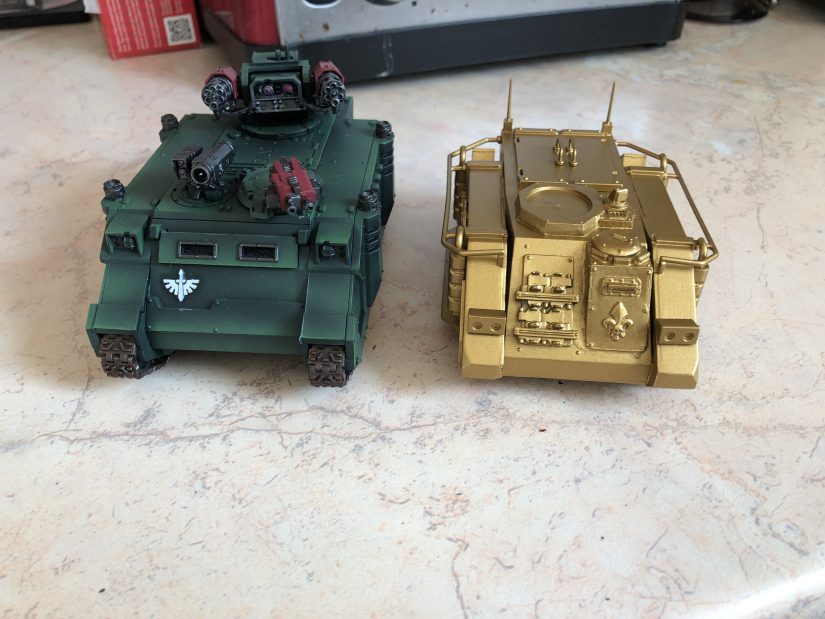
After building the Immolator I sprayed it with with Halfords Grey Car Body primer to make sure paint would stick to the metal areas as well as the plastic. Once the primer was dry, I sprayed it with a couple of thin coats of Retributor Armour to match the rest of my Sororitas.
I knew the old Rhino kit was smaller than the current kit, but I hadn’t realised by how much until I put the Immolator next to a Razorback. It’s easily 25% smaller.
When I started opening the box for the Immolator, I was a little intimidated… mainly because I’d never find another in this good a condition if I messed up! By the end though I’d enjoyed myself so much I scoured eBay to find a retro Rhino kit to work on next!
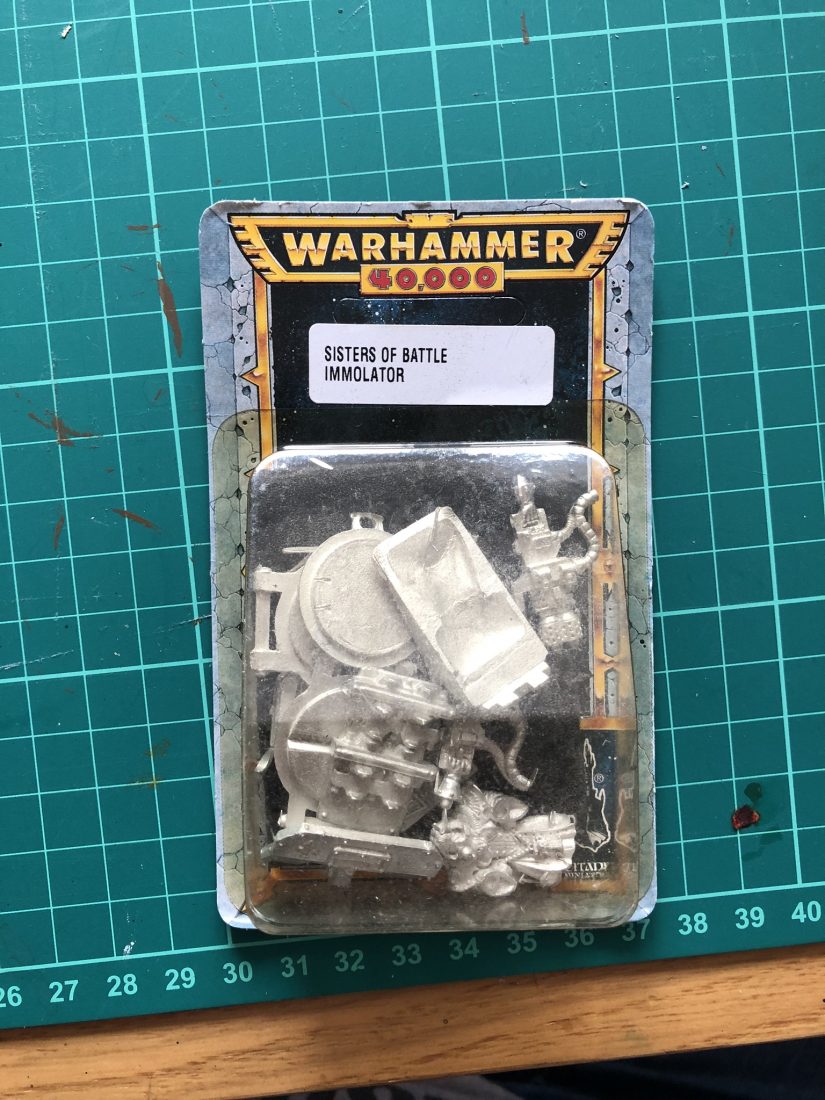
For the last 24-18 months or so I’ve had a background project to recreate my original Adepta Sororitas (nee: “Sisters of Battle“) army, in advance of the new codex and plastic release. With that release looking more and more imminent, I really need to get my skates on! By my reckoning I’ve got roughly three months to finish up, maybe less!
The original army was purchased by fourteen year-old me on release day in 1997. I’d saved up my paper round money for several weeks to afford it, after falling in love with what had been previewed in White Dwarf the month before. It’s a tiny army by modern standards (roughly 545 points in a Patrol Detachment), but it was a decent sized force in Second Edition, and I loved playing it. Anyway, to cut a long story short, the army was given away by my mum a few years later, once I’d moved out for university and had fallen out of the hobby. Since coming back to the fold, it’s been the one army I’ve really regretted not having any more.
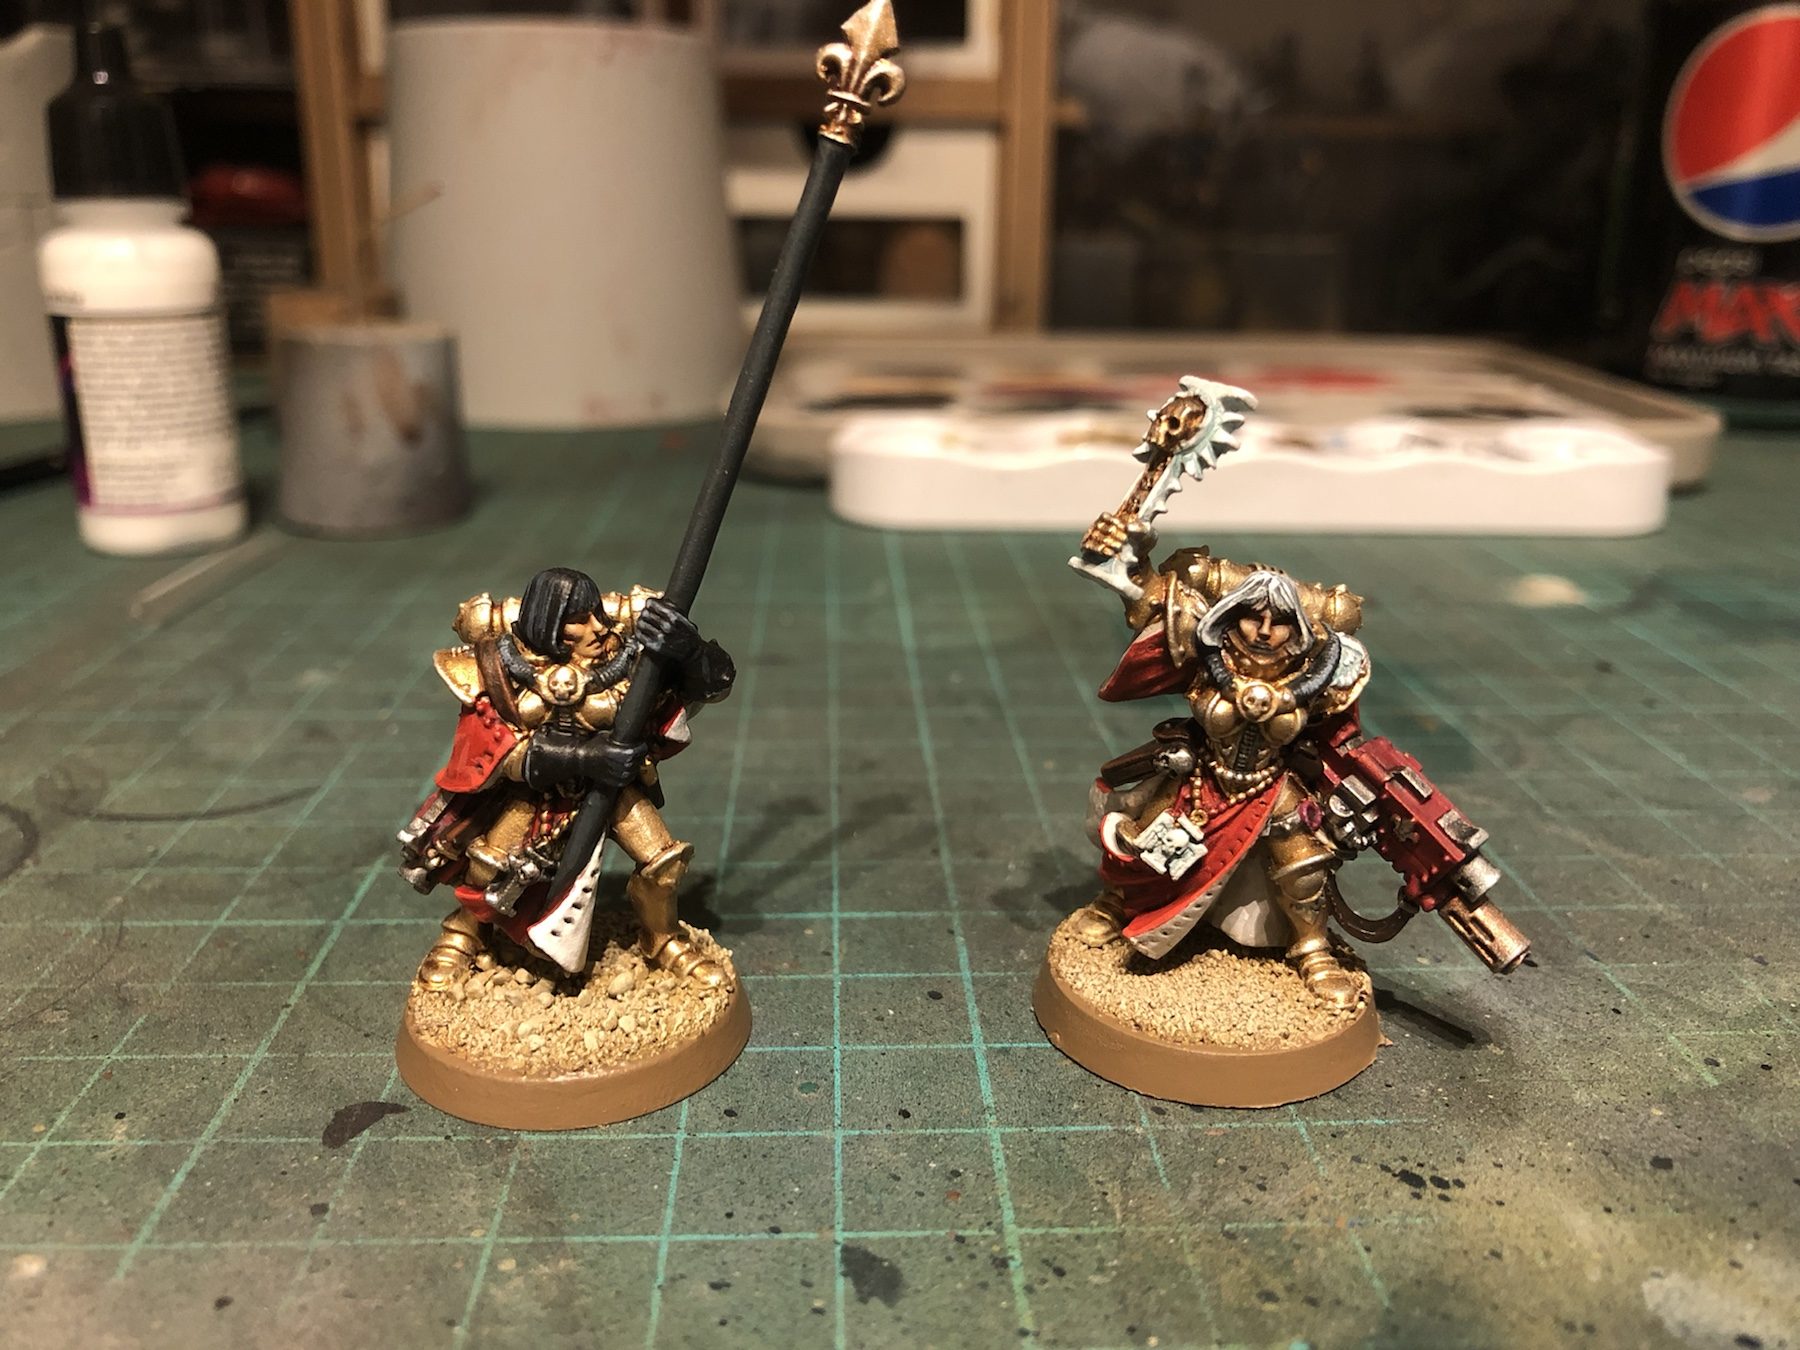
I’ve already collected and painted the two Sororitas character models from the original army – a Canoness and Standard Bearer (now called an Imagifier), and I’ve started painting the two squads I’ve acquired so far: a ten-woman Battle Sister squad, and five Seraphim. I also need to paint a banner for the Standard Bearer, to truly finish it off. Long-time readers will know I have finished painting some Battle Sister squads this year, but those were bought to bulk the collection up to a “full size” Eighth Edition army, and aren’t part of the core project.
There’s still a five-strong Retributor squad to get hold of, but the problem I have here is I can’t for the life of me remember exactly what I armed them with twenty-two years ago! I’m pretty sure it was four of one weapon type – either Multi-Meltas or Heavy Flamers – but given the time period it could well have been a mix of all three. I think I’m going to go with four Heavy Flamers, as I remember I painted at least one of these “back in the day,” and I’m certain it wasn’t for the Battle Sister squad (which had a Heavy Bolter). Plus, I’ve never really liked the “Sabbat” helmet shown on some of the Sisters models, which is why I’m reasonably sure it wasn’t the Multi-Meltas.
When I started the project I knew that some of the models were going to be really hard to get hold of in a usable condition, and for a reasonable price. While many are still available from Games Workshop, several are long out of print: namely the Canoness, Standard Bearer, Immolator, and an “Imperial Missionary with Plasma Gun”. Of these, I thought the Immolator was going to be the hardest to acquire, but I found one on Saturday. Now I just need to get the Missionary. They occasionally pop-up on eBay, but usually in a bad condition, and for a higher price than I’m willing to pay for that condition. It wouldn’t be the end of the world if I can’t get hold of one at this time – it’s no longer a game-legal choice, and I’m concentrating on the Sororitas – but it would be nice for completion’s sake!
Got one of these to sell? Let me know!
So, roughly 21/22 models to paint in the next couple of months, with a currently unknown target date for completion? Sounds doable, right? Well, yeah, if you’re not as slow a painter as me, and hadn’t started a Genestealer Cults army in the meantime which needs cleared from the painting desk… If the codex is due in October, I’m reasonably confident I can make it; coming sooner and I’m less so. If anyone in the Warhammer Community team who might happen to read this wants to give me a subtle hint, that would be helpful! 😉 (Also, I’d love to write about the project as an article on the community site, once I have some more finished models to show off!)
With all that said, whether the new models are coming in 3 months, or 3 weeks, first I need to stock up on more Retributer Armour spray paint!
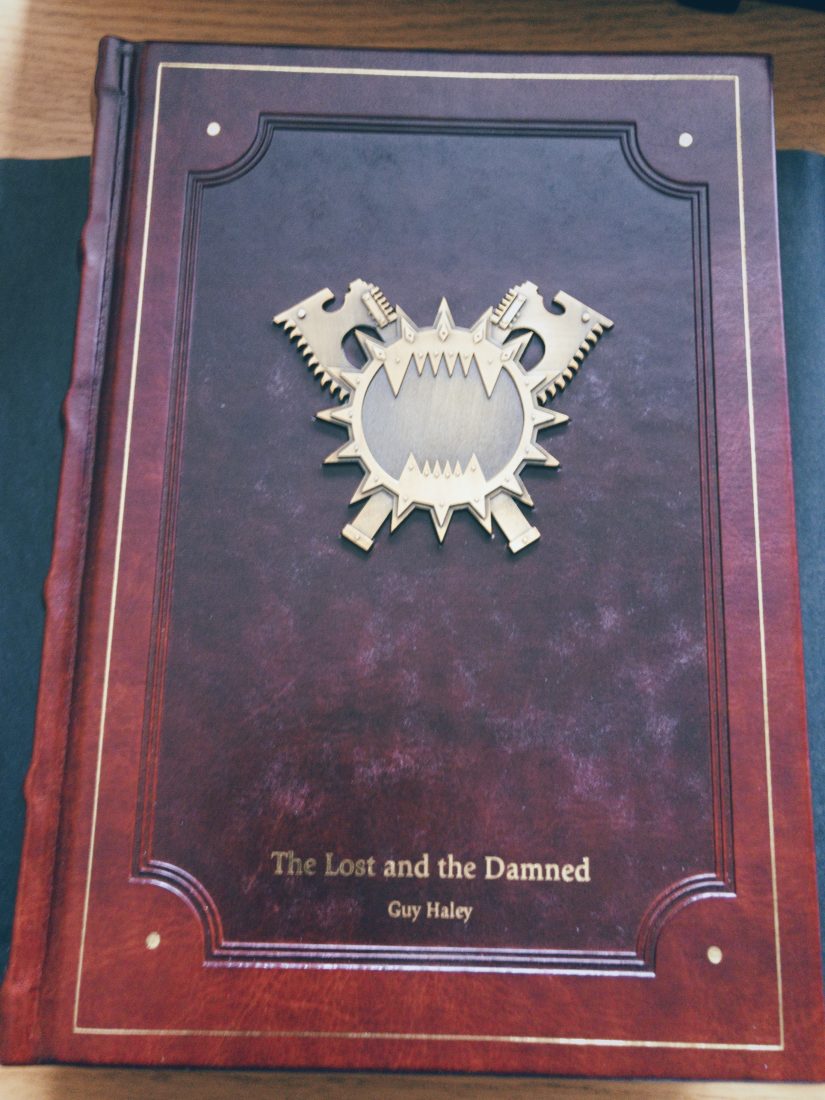
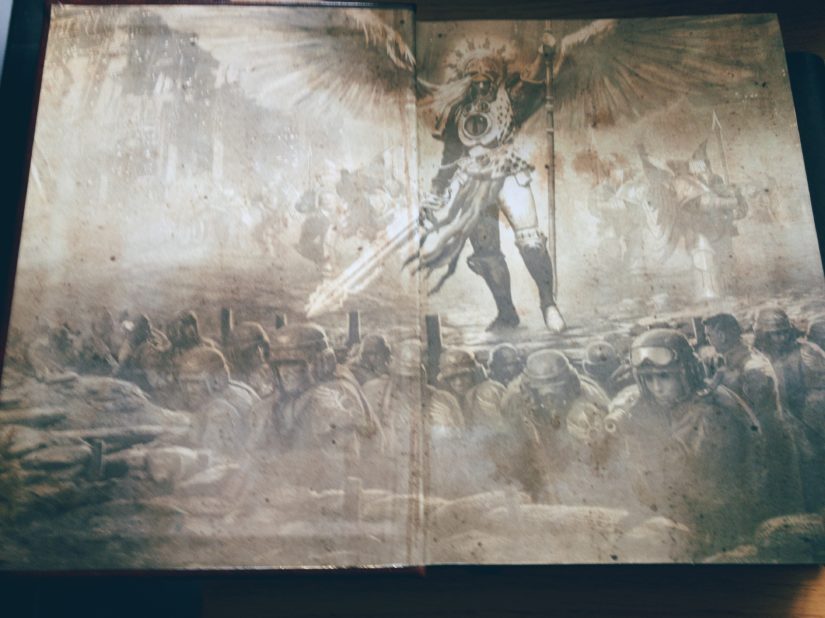
The Lost and the Damned is the follow up to The Solar War, and second book in the eight-part The Siege of Terra series. The collector’s Edition is every bit as gorgeous as the first book. I can’t wait to get stuck in!
I mentioned last week I had setup iOS Shortcuts to post Likes, Reposts, and Bookmarks to my website, and automatically syndicate those posts to Twitter. This solved a particular pain point in my “workflow,” where I’d share something to my website with Indigenous, but then have to go in to the WordPress editor through a browser to get the post to share back to Twitter. This was enough of a pain I avoided it where possible. With the new shortcuts I don’t have to worry about that. A couple of taps, and everything “Just Works”(tm).
This post is an attempt to document how I have my shortcuts setup, so you can make some of your own. I’ve tried to keep things as jargon free as possible, but the instructions do assume the following:
optionally, your website can syndicate to other sites through Micropub syndication target. WordPress users can use the Syndication Links plugin.
My own setup uses WordPress with all of the IndieWeb plugin pack, so that is what this guide has been tested with, but everything here should be universal to any Micropub server. To get started, you will first need to install a pre-requisite shortcut.
Install the IndieAuth Shortcut.
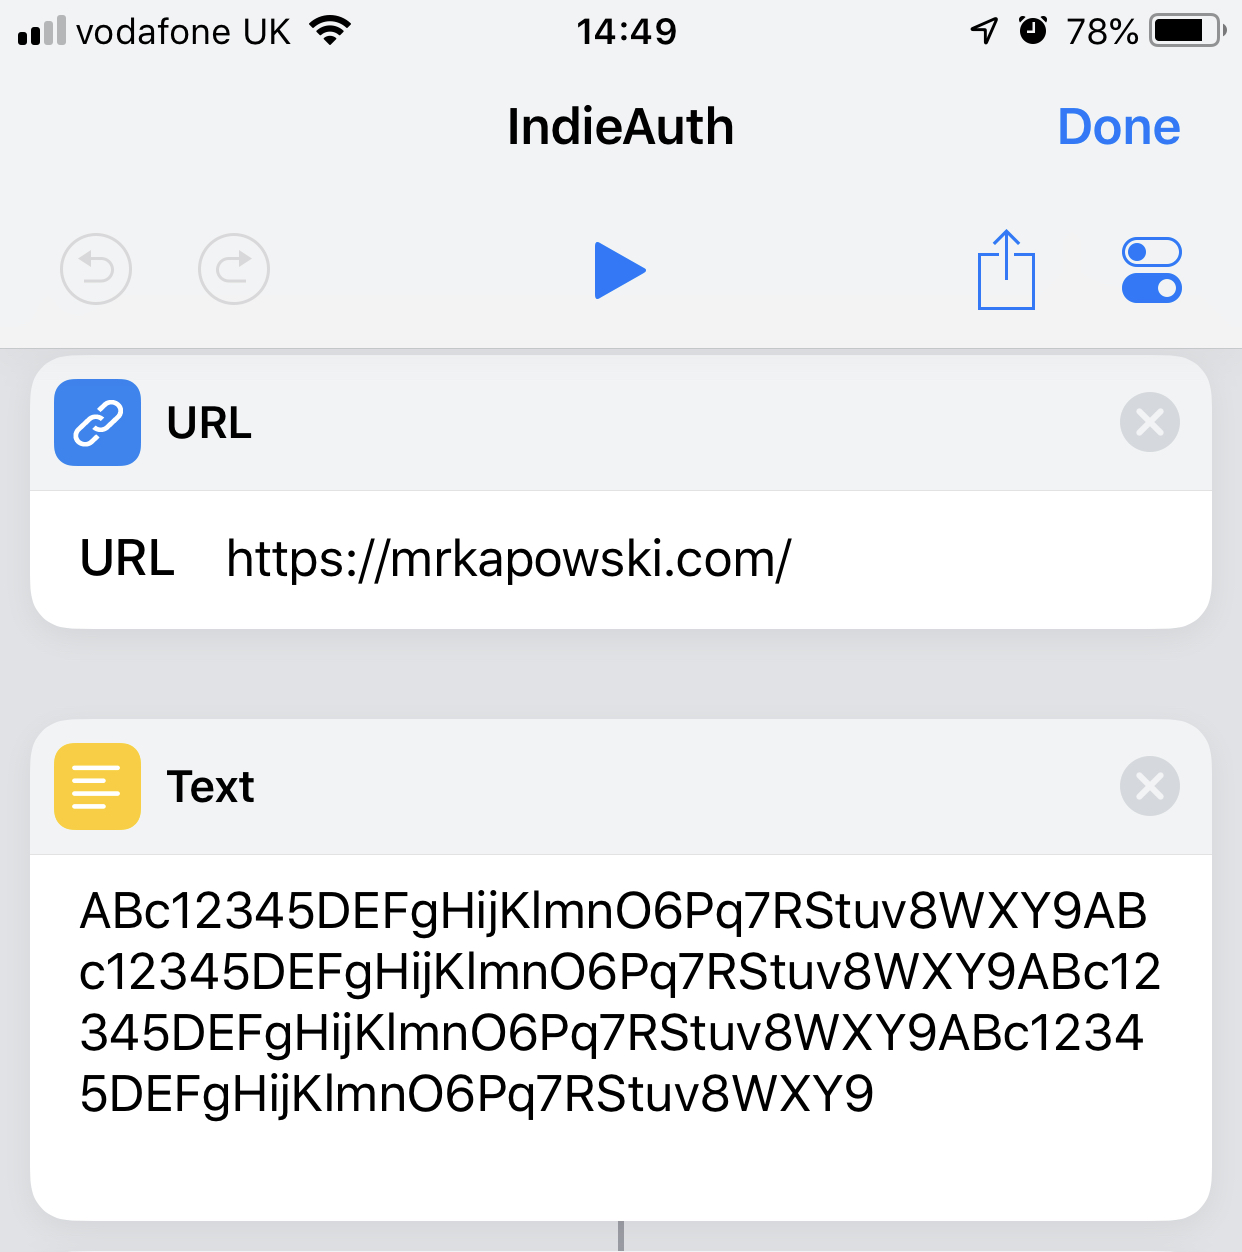
This is the foundation for the other shortcuts. With out this, your shortcuts cant authenticate with your site. It can be found here, with some more notes found on this IndieWeb wiki page about Shortcuts. While installing it, you can configure it with the URL of your site and run through the authentication process to get a token, or enter a pre-existing token. Alternatively, if you already have a valid token from somewhere, you can enter that into the shortcut for it to use.
Note for WordPress users.
I ran into an issue with the IndieAuth shortcut, where WordPress didn’t interpret the authentication scopes properly, meaning the generated token wouldn’t work. I didn’t spend much time debugging this, so I don’t know if the issue is in the plugin or how Shortcuts sends the request. Thankfully, there’s a workaround. Go to your WordPress admin area > Users > Manage Tokens. At the bottom of the screen will be a form where you can generate an appropriate token. You’ll want to select at least the “create” scope. Do this, then copy and paste the token code in to the text field at the top of the shortcut, like this:
With our authentication mechanism setup, it’s time to build the shortcut proper.
Building the Shortcut.
Initial Setup.
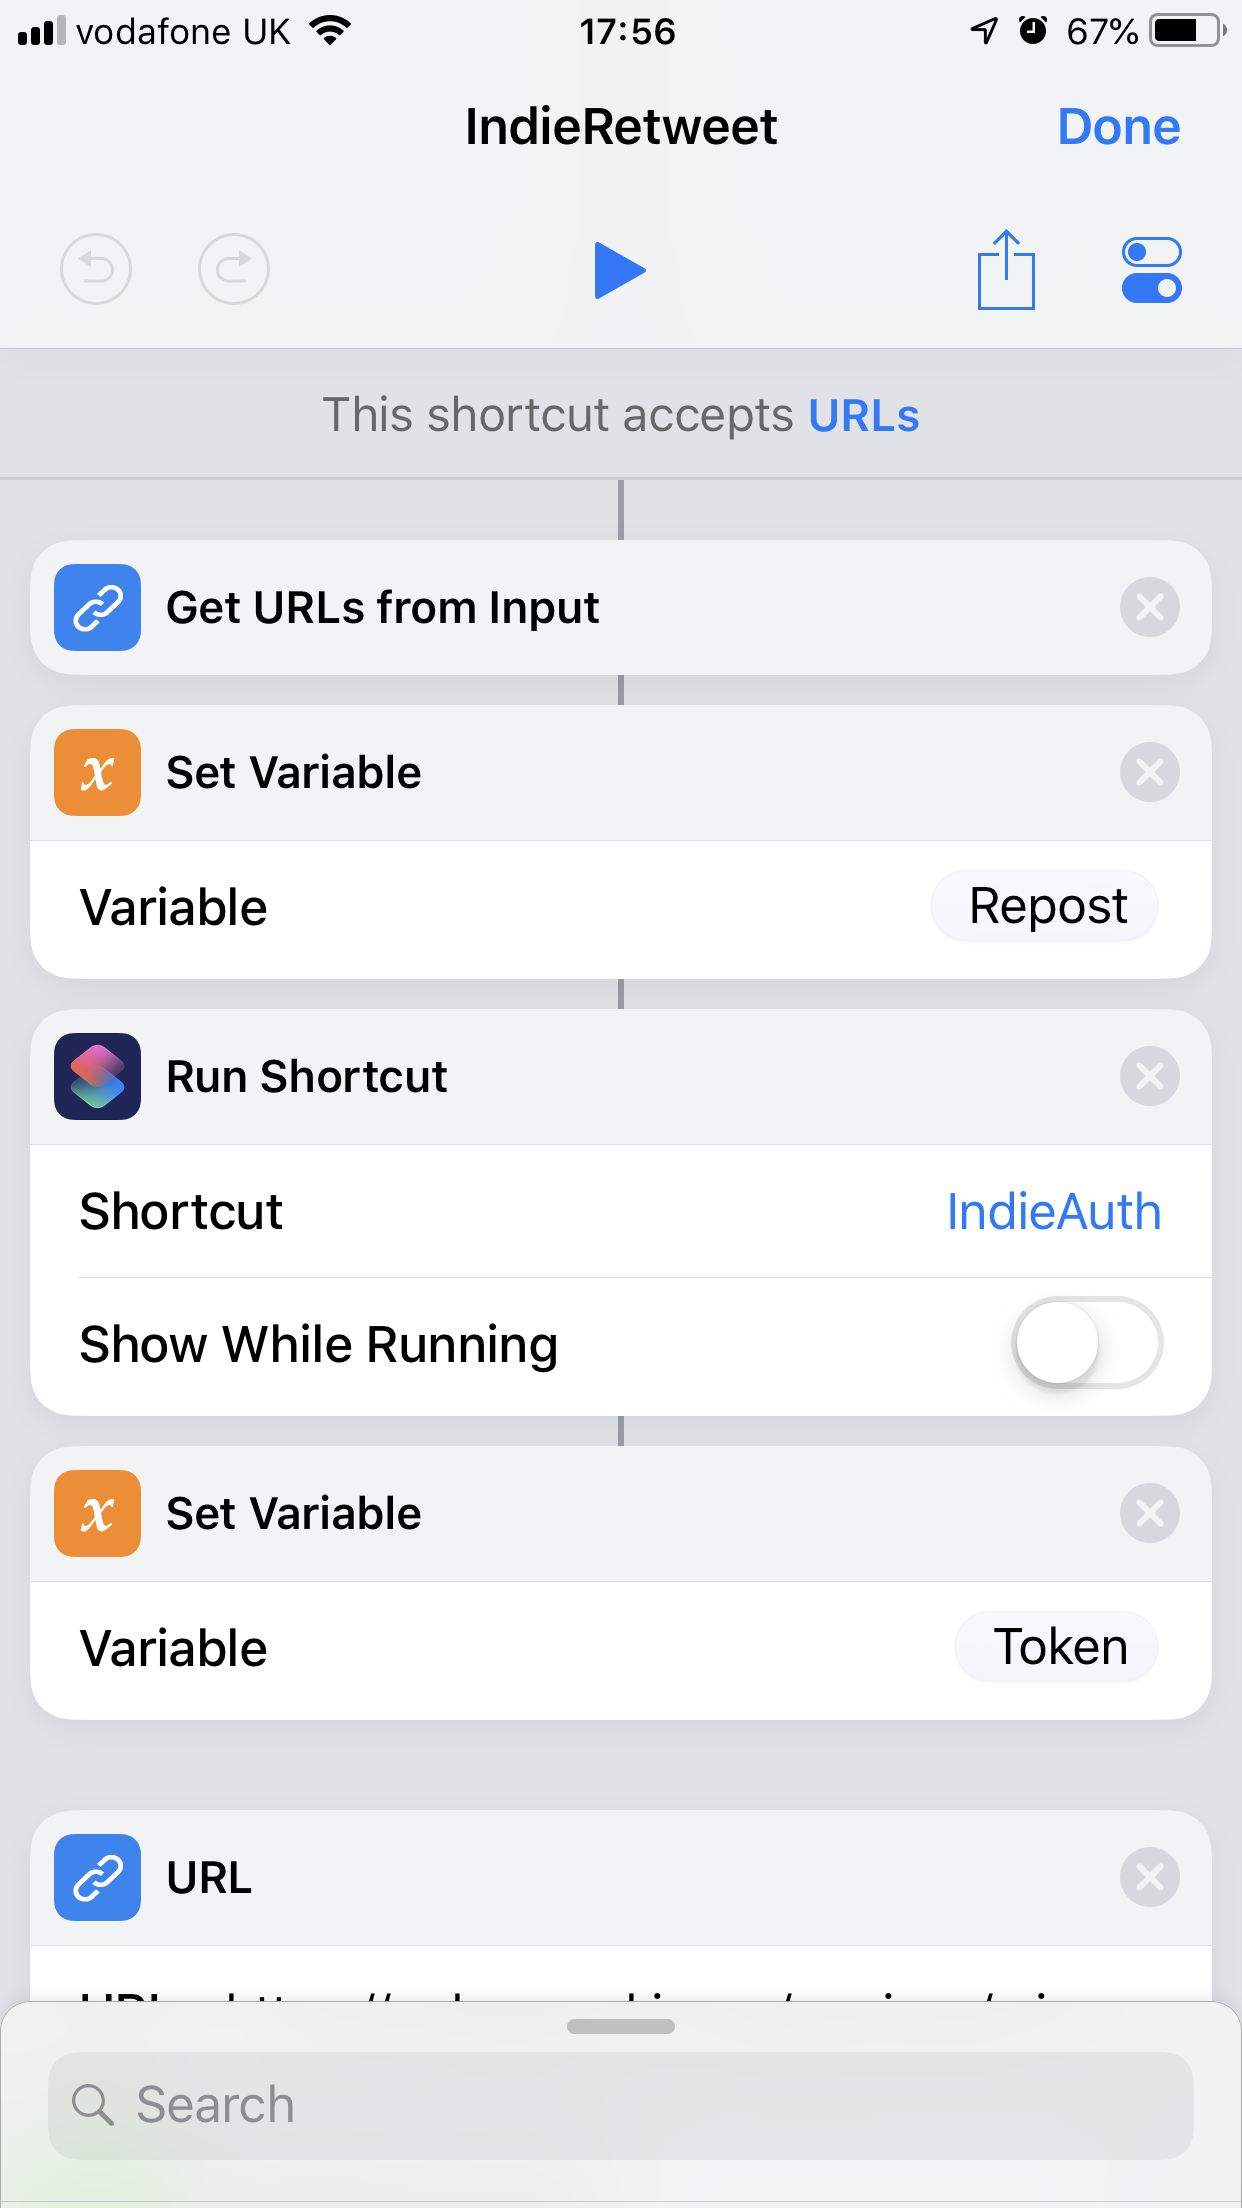
In the Shortcuts app, create a new shortcut. The first thing we need is a “Get URLs from Input” block, then a “Set Variable” block. Name the variable something memorable, as we’ll be using it in a couple of places. I called mine “repost” in my Retweet shortcut.
Next, add a “Run Shortcut” block, and another “Set Variable” block after it. The shortcut block should be set to run your IndieAuth shortcut, and you can turn off “Show While Running”. Set the variable name to “token.” Once done, you should have something like this:
Posting to Your Site.
This is “where the magic happens.” In broad terms, the next few blocks will:
Be configured with the Micropub endpoint of your site,
Craft a POST request to your endpoint, with the following pieces of information:
Your authentication token
The type of Micropub post we’re creating (“entry”)
The URL we’re sharing, as a “repost-of”, “like-of”, or whatever
Set a syndication target.
With these steps in mind, onward we go!
Add a URL block to your site. Enter the URL of your Micropub endpoint. If you’re not sure exactly what this is, check the source of your site. Look for a link tag with rel=“micropub”. Alternatively, I’ve written another shortcut which will try to detect an endpoint for a given domain. You can find it here. Note that I’ve not tested this shortcut on any device but my own, so there may be bugs. The Get Endpoint shortcut will check if the endpoint variable is set, and if not, ask for a domain to parse for the endpoint. Once parsed, the endpoint URL will be copied to the device clipboard for pasting elsewhere, and return a URL.
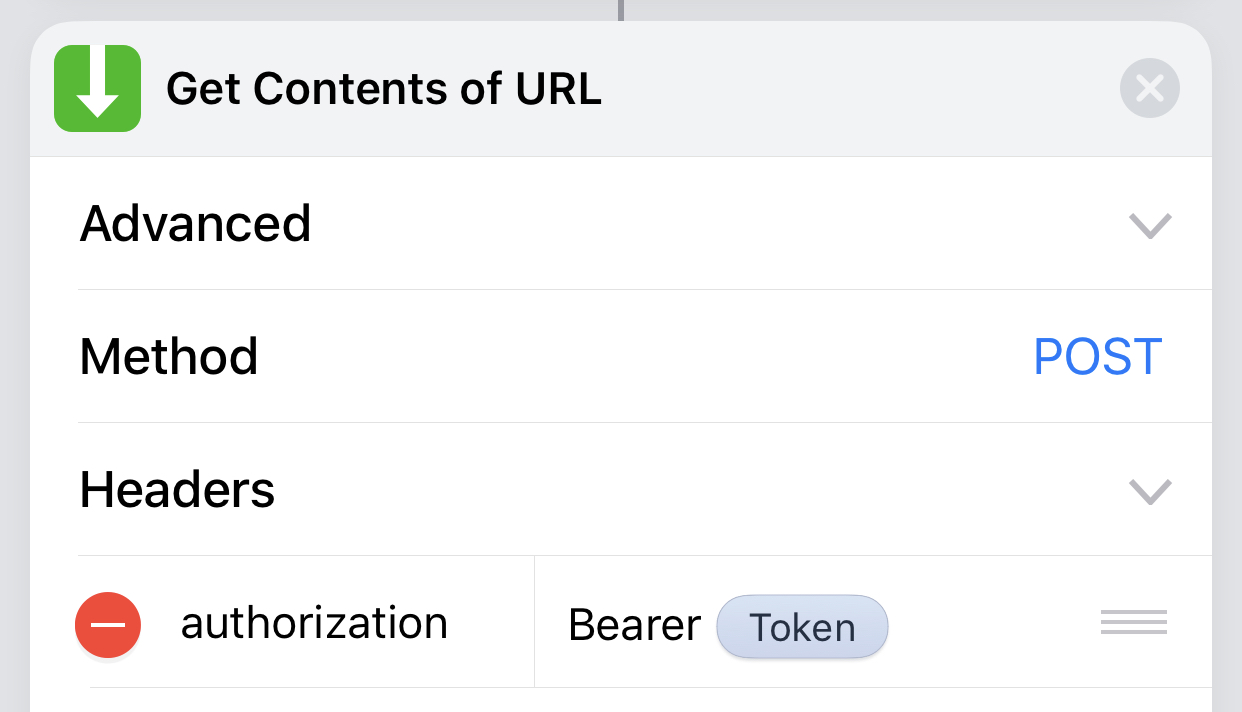
Back in the sharing shortcut, add a “Get Contents of URL” block. Tap on “Advanced,” then set the Method to POST. Tap on “Headers.” Add a header called “authorization” (note the US spelling, if you’re using a UK keyboard or similar). Set the value of this header to “Bearer ” – with the space at the end – then insert the token variable created earlier.
Next, in the Request Body section, set it to Form. If you’re replicating my setup, add three new fields: h, repost-of (or like-of, etc.), and mp-syndicate-to. Set the value of h to entry. Set repost-of to the variable you created from your input URL, right back at the start.
Finally, set mp-syndicate-to to the UID of the syndication target you want to share to. In my WordPress setup, this is twitter-bridgy. Your system may vary, if you’re not using WordPress + the Syndication Links plugin. If you’re not sure what your UID might be, you can try running another shortcut I’ve created, which will query your site to find all the places you can syndicate to. The shortcut requires the “Get Endpoint” shortcut linked above, and will return text listing all UIDs configured for your site. As an example, the output for me looks like this:
{"name":"XYZ IndieWeb","uid":"xyz-indieweb"}
{"name":"XYZ Linking","uid":"xyz-linking"}
{"name":"IndieNews En","uid":"indienews-en"}
{"name":"XYZ Books","uid":"xyz-books"}
{"name":"Twitter via Bridgy","uid":"twitter-bridgy"}
{"name":"Github via Bridgy","uid":"github-bridgy"}
If you don’t want to syndicate your post, remove the mp-syndicate-to field entirely – don’t just leave it blank, or you might run into issues.
Once all fields in your Like/Repost shortcut have been filled in, you should have something like this:
You can leave things here, if you want, or you can add something like a Notification block to show you the returned response from your site, for debugging purposes. Unfortunately, the current limitations of Shortcuts mean we can’t get the URL to our new post from the results. Maybe that will change in iOS 13.
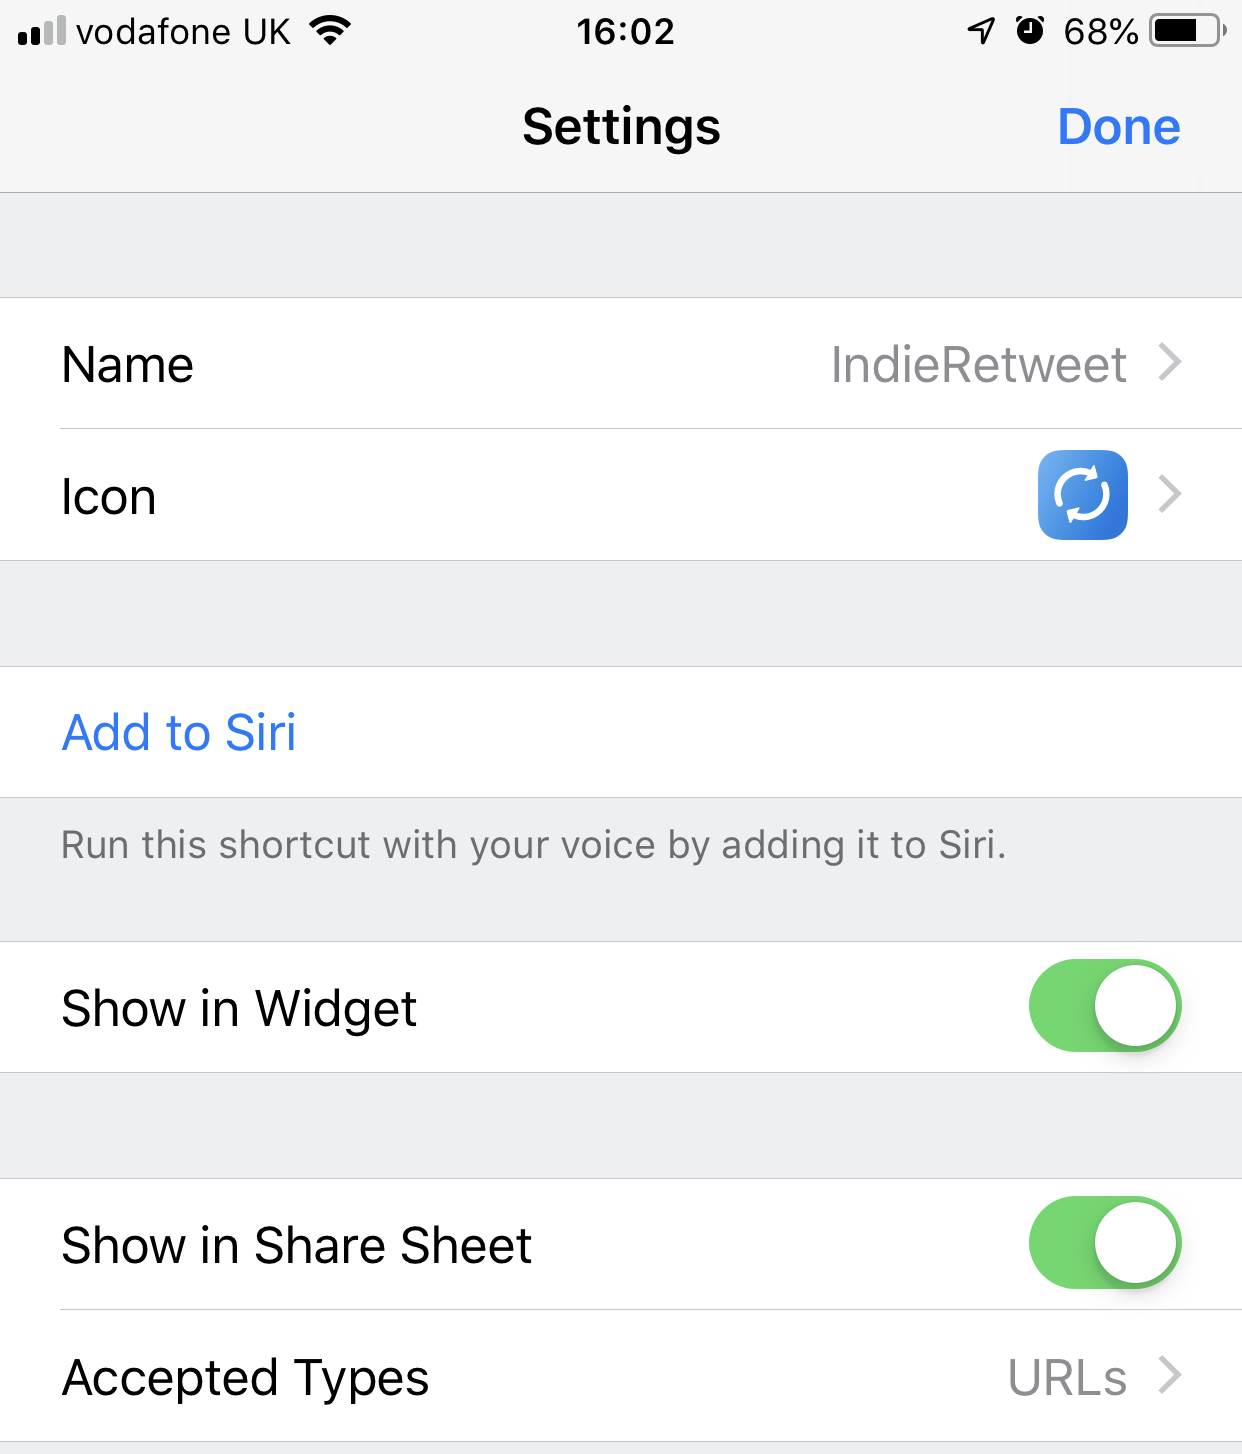
Set your new shortcut with an appropriate name and icon. Turn on the option “Show in Share Sheet,” and optionally set the “Accepted Types” to “URLs.” Tap Done a couple of times, and your shortcut should be complete! The best bit is, you can duplicate the shortcut, change repost-of to like-of (or viceversa), and you’ll have a working Like shortcut too 😃
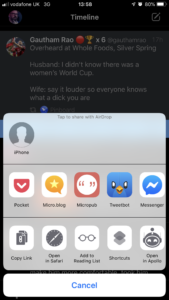
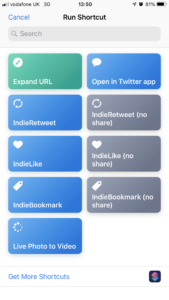
Now, you can use the iOS share sheet for any URL to run your shortcut. Tap the share icon, tap Shortcuts, then tap the relevant shortcut from the list:
As a bonus, here’s a couple of short clips of the Like shortcut in action:
If you run into any issues getting the shortcut created, please do let me know through a comment or Webmention, and I’ll try to help where I can.
I mentioned over on Micro.blog that I’d managed to get a workable edit/commit/push workflow on my iPad. Naturally, I’m now considering a keyboard to complete the setup.
Does anyone have any recommendations for a good keyboard to use with a 9.7” iPad Pro?
The last time I had a similar setup, I used an Apple Wireless Keyboard (in an Origami case/stand) as the Bluetooth keyboard + case combos available at the time all felt horrible to type on. I do have a spare ultra-compact mechanical keyboard I could try with a USB adapter, but thinking more about it, that’s probably not going to work well when I don’t have a table to work on.
So, if anyone has any suggestions, I’d love to hear them!
I mentioned yesterday my frustrations with Instagram were at an all-time high, and I wanted to “soft quit” the app by adding my follows as a source in Monocle. I didn’t find any existing guide on how to do this (sorry if I missed yours!), but I did get two usefulsuggestions about tools to enable this: Instagram Atom, and Granary.
I use Granary already, to pipe Twitter into Monocle, so that was my preferred option. The short guide below documents the steps I took to get things set up.
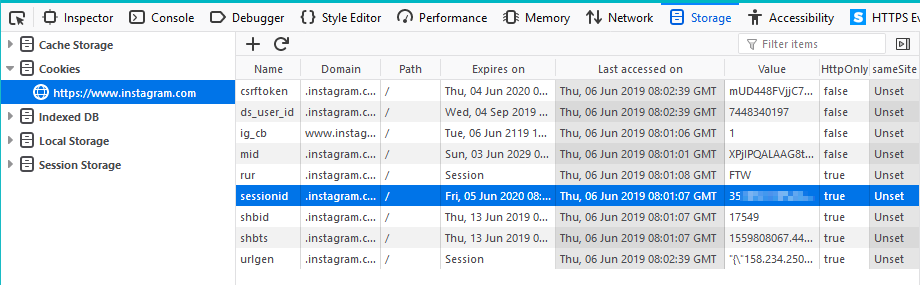
Step 1. Get your Instagram session ID
Instagram doesn’t offer much of an API anymore, so to let Granary do the magic, we need to get our Instagram session ID. To do this:
Login to Instagram through a desktop web browser
Use the developer tools to inspect the cookies set by Instagram. Look for a cookie called “sessionid” and copy the value of it:
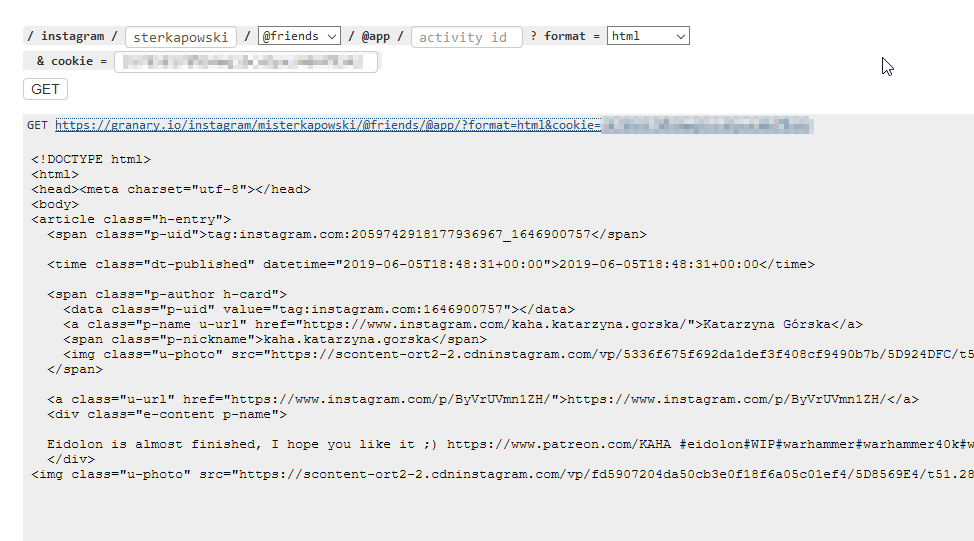
Step 2. Link up Granary
Head over to Granary. Click on the Instagram login button, and authorise Granary if you need to. When you return to Granary, there will be a couple of form fields you can fill in.
Enter your Instagram username
Select @friends from the dropdown
Change the format to html/atom/json
Enter your copied session id in the cookie field
Click “GET”, and Granary will generate a preview of your feed and give you a link:
Copy that link.
Step 3. Add to Microsub
You need to add the URL you’ve copied from Granary as a source in whatever Microsub server you use. I use Aperture, so I added a new Instagram channel with my feed as a source. I’m going to assume you know how to do this for your server of choice.
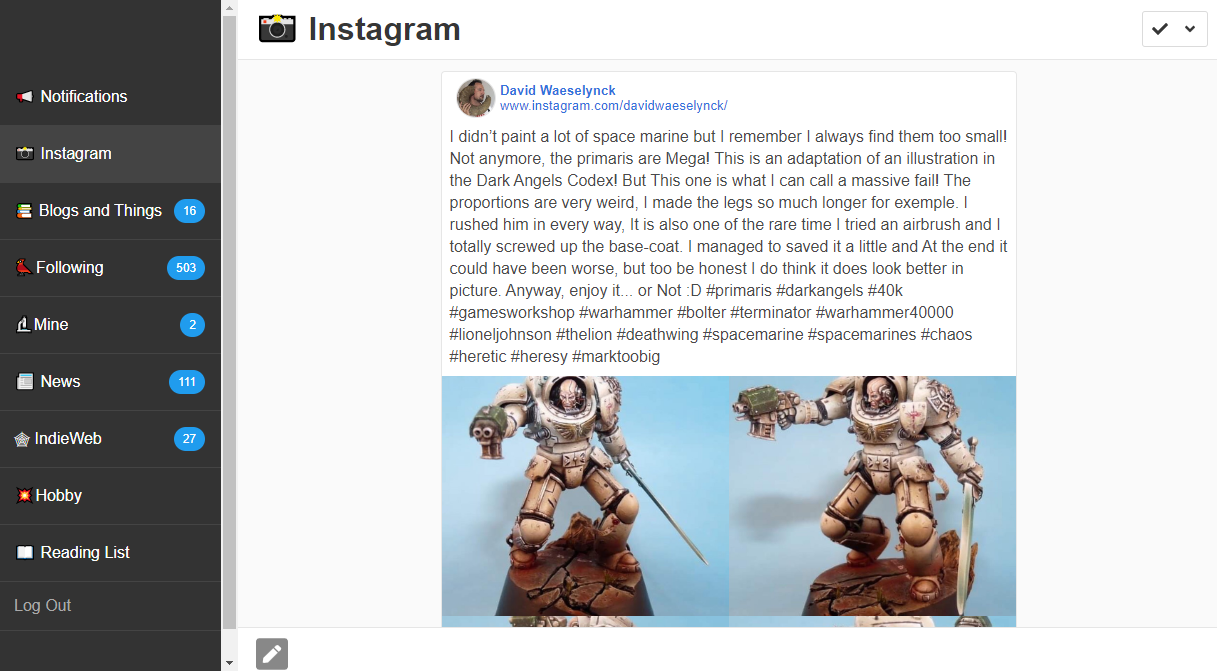
Step 4. Enjoy
All being well, you should now have an Instagram feed in Monocle/your chosen social reader.
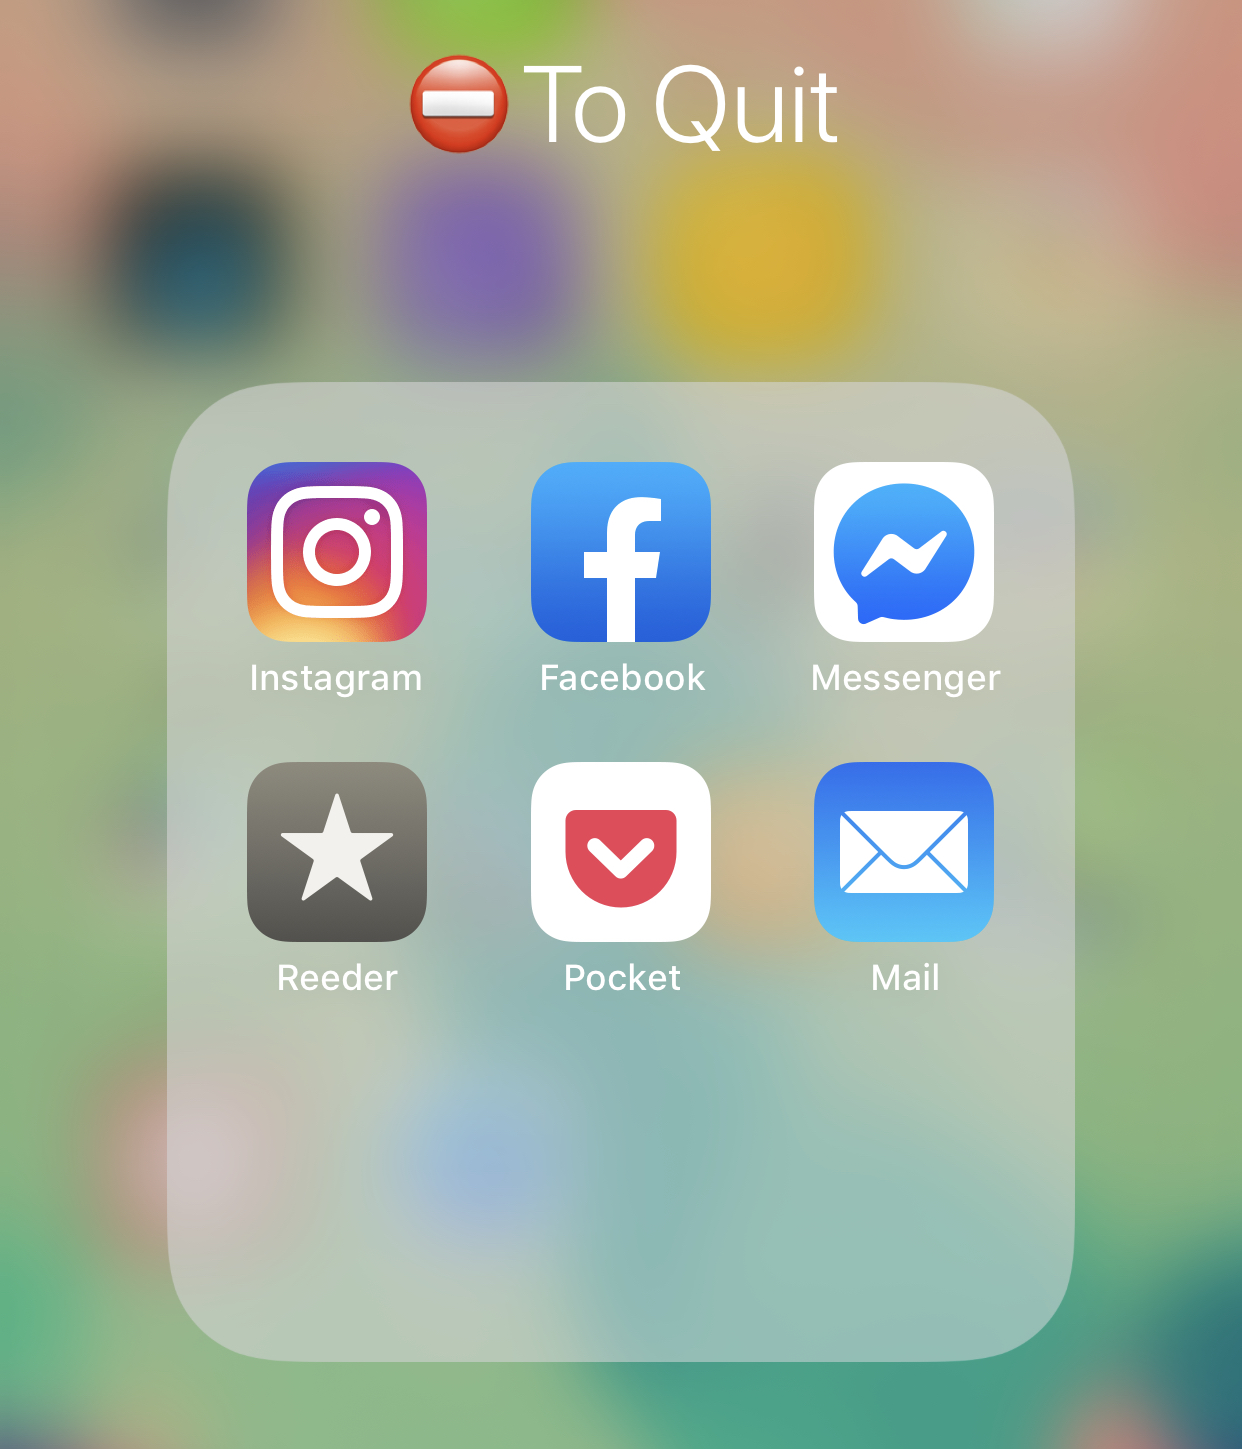
With all this set up, I can now add the Instagram app to the “To Quit” folder on my iPhone.
Caveats
There’s a couple of limitations with “using” Instagram in a reader:
No syndication – to my knowledge, it’s not possible to syndicate any of your response (likes, replies, etc) back to Instagram. So if you want to let your Instagram-only friend know you liked their photo, into the app you go.
Session expiry – I don’t know yet if the session id we got in Step 1 will expire. If it does, you’ll probably need to redo creating and adding your feed.
Multi-accounts – if, like me, you have more than one Instagram account, and want to add both, there are some hoops to jump through. I found you need to add the second account using a second browser/new private browsing session, or some wires will get crossed somewhere and you’ll need to setup both feeds all over again.
I’ve started using my new(ish) test site to build my new IndieWeb WordPress theme. It’s very early in the process, and I’m getting the markup in place first, before I go anywhere near a stylesheet – so it all looks very 1996 right now.
The lessons learned on “K” will be put into use with this theme, along with several ideas I’ve picked up along the way. I’ve already reused some of the more useful bits of K to give me a head-start, so I know that stuff like the feed and post microformats should be pretty robust (if not yet 100% complete). The main improvement I want to make over K is in flexibility – i.e. it’s not just usable by me, or locks me/the user into a particular setup.
If there is anything you would like to see in an IndieWeb WordPress theme, or any other suggestions, please file an issue in the repository. I can’t promise I’ll implement it, but at this stage, the chances are high 😉
If you’re a Monocle user, you might have noticed a new feature in your UI today. If you self-host, you’ll want to update your installation to the latest version. Two nice “quality of life” features have gone live, and I’m a little excited, because I helped build one of them 😁
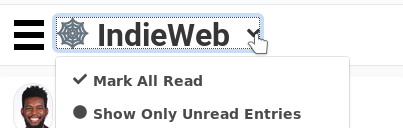
The biggest feature I’ve been missing in Monocle over, say, Feedly, is a “mark all read” button. I follow too many busy sources to be able to keep up with everything, so I frequently mark everything as read and carry on. It helps me not get overloaded.
Aaron had raised an issue to build the feature at some point, but I wanted it, and had a spare weekend, so figured I’d make myself useful!
In all, it was surprisingly straightforward. The Microsub spec is well documented, so I knew how it needed to work. All I had to figure out was how to fit that into how Monocle already did things, and there was already a “mark read” for single entries to work from.
The UI took the longest to build, mostly because I had to figure out the Bulma frontend framework. Rosemary had already come up with some ideas on how it should work, so the hard part had pretty much been done.
And with a little bit of testing, there it was – “Mark All Read” in Monocle. I’ve been running it in my install for a little over a week now, and I hope you’ll find it as useful as I have if you’re a heavy Monocle user.
I can’t take any credit for in the slightest for the new “Show Only Unread Entries” feature – to my knowledge, that was all Aaron. It was a nice surprise to find once I updated my local install from the master branch!
Between tags and post kinds/formats, are “categories” considered redundant when organising a blog? I have a bunch of legacy posts which have some high-level categories assigned, but the vast majority of posts end up in the default category (notes), and I can’t remember the last time I went out of my way to set the category on anything (other than this post) – because most of the time I’m quick-posting from a tool which doesn’t even have the option to set categories.
Categories seem to be very much de-emphasised these days.
But then I come back to a time before we had tags, before post types, and when categories were all we had. They were useful and helped us structure our blogs so visitors could find stuff they’d be interested in. Serious planning was sometimes put into a categorisation scheme. I think of how I would use categories to label “asides” before there was an Aside post format (or even an <aside> HTML tag), “bookmarks” before there was a Bookmark post kind. Then I wonder if they’re worth maintaining as the “lowest common denominator” of organisation and data portability. Another blogging tool might not have native support for “post kinds” – but it’s almost certainly got some sort of category system.
I’m also trying to think about this from an aspect of theming WordPress. How much space or emphasis should be placed on each of the ways of describing a particular post? Should they be listed in some contexts, but not others? Autonomie only shows the post kind in list pages, but adds in category and tags on the the post’s page. K showed only an icon for the type, and tags if they were set.
Even as I’m thinking and writing this out, I’m not sure if I’m talking myself into or out of going through and properly categorising ~1400 blog posts (850 published, the rest pending review). Do I move everything into the default bucket? Or do I create and assign a robust categorisation scheme? What would that scheme look like?
I’ve been running my own instance of Aaron’s excellent Monocle microsub client for a while now. I think it’s time I take the leap and run my own instance of Aperture microsub server as well (and its associatedservices), just so I don’t have to rely on any services hosted elsewhere.
I just need to figure out if I need to give Aperture its’ own server, rather than run it alongside everything else on my existing VM.