I mentioned last week I had setup iOS Shortcuts to post Likes, Reposts, and Bookmarks to my website, and automatically syndicate those posts to Twitter. This solved a particular pain point in my “workflow,” where I’d share something to my website with Indigenous, but then have to go in to the WordPress editor through a browser to get the post to share back to Twitter. This was enough of a pain I avoided it where possible. With the new shortcuts I don’t have to worry about that. A couple of taps, and everything “Just Works”(tm).
This post is an attempt to document how I have my shortcuts setup, so you can make some of your own. I’ve tried to keep things as jargon free as possible, but the instructions do assume the following:
- you have a website of your own,
- that website has a Micropub-compatible endpoint, such as self-hosted WordPress with the Micropub plugin,
- your iPhone or iPad is running iOS 12 or above,
- optionally, your website can syndicate to other sites through Micropub syndication target. WordPress users can use the Syndication Links plugin.
My own setup uses WordPress with all of the IndieWeb plugin pack, so that is what this guide has been tested with, but everything here should be universal to any Micropub server. To get started, you will first need to install a pre-requisite shortcut.
Install the IndieAuth Shortcut.
This is the foundation for the other shortcuts. With out this, your shortcuts cant authenticate with your site. It can be found here, with some more notes found on this IndieWeb wiki page about Shortcuts. While installing it, you can configure it with the URL of your site and run through the authentication process to get a token, or enter a pre-existing token. Alternatively, if you already have a valid token from somewhere, you can enter that into the shortcut for it to use.
Note for WordPress users.
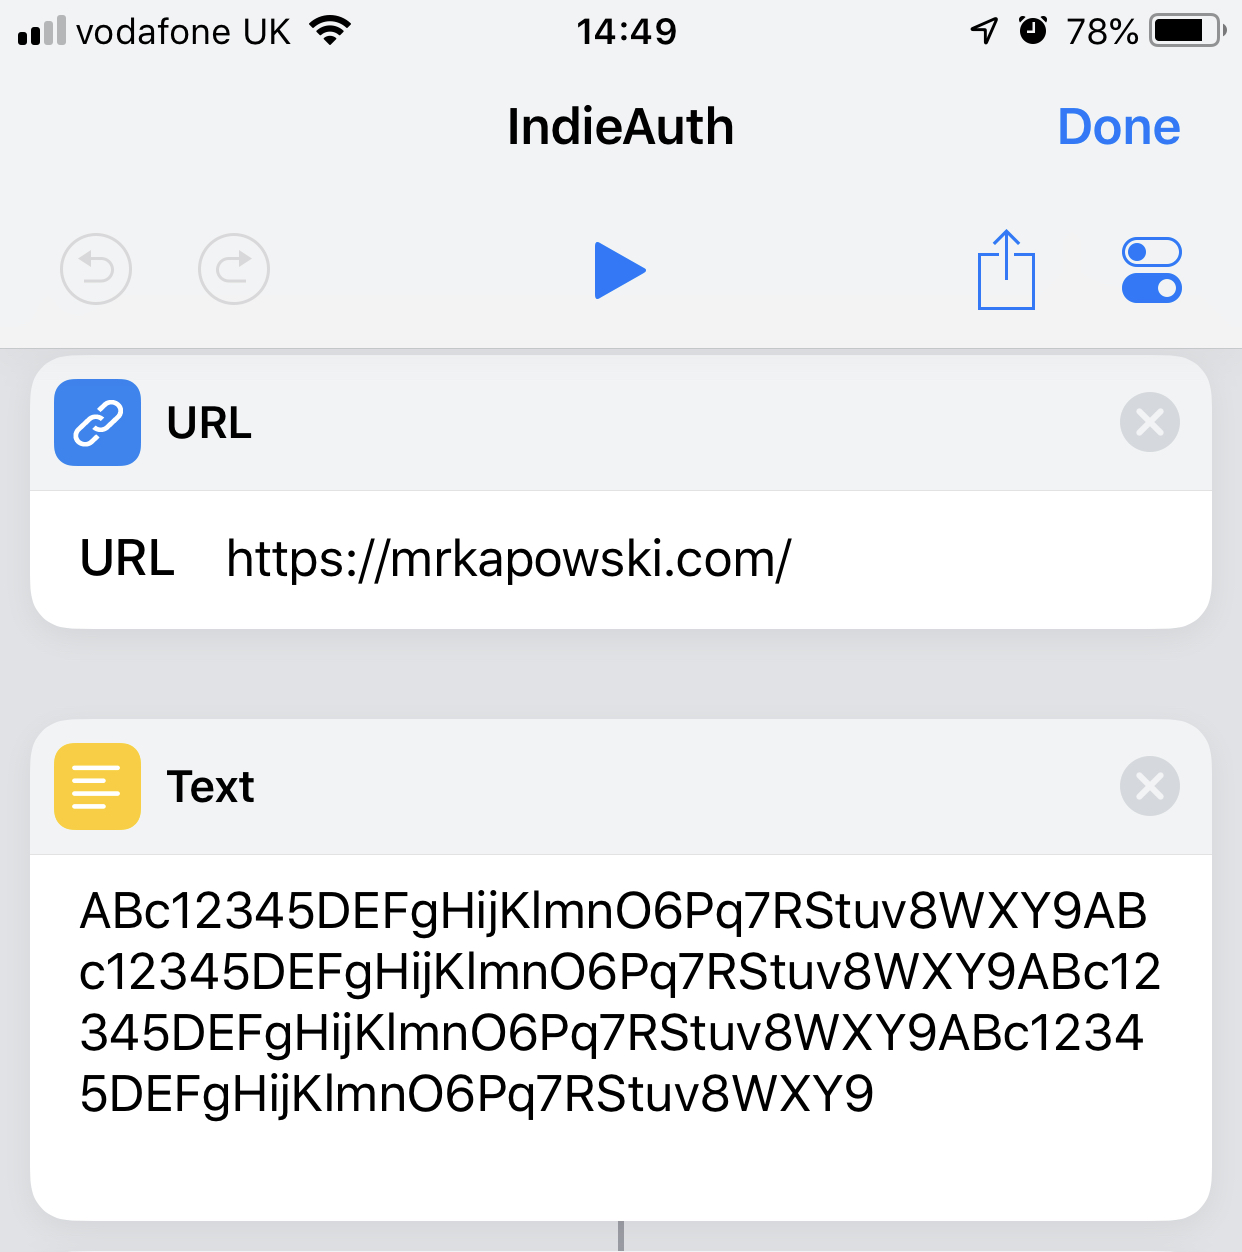
I ran into an issue with the IndieAuth shortcut, where WordPress didn’t interpret the authentication scopes properly, meaning the generated token wouldn’t work. I didn’t spend much time debugging this, so I don’t know if the issue is in the plugin or how Shortcuts sends the request. Thankfully, there’s a workaround. Go to your WordPress admin area > Users > Manage Tokens. At the bottom of the screen will be a form where you can generate an appropriate token. You’ll want to select at least the “create” scope. Do this, then copy and paste the token code in to the text field at the top of the shortcut, like this:
With our authentication mechanism setup, it’s time to build the shortcut proper.
Building the Shortcut.
Initial Setup.
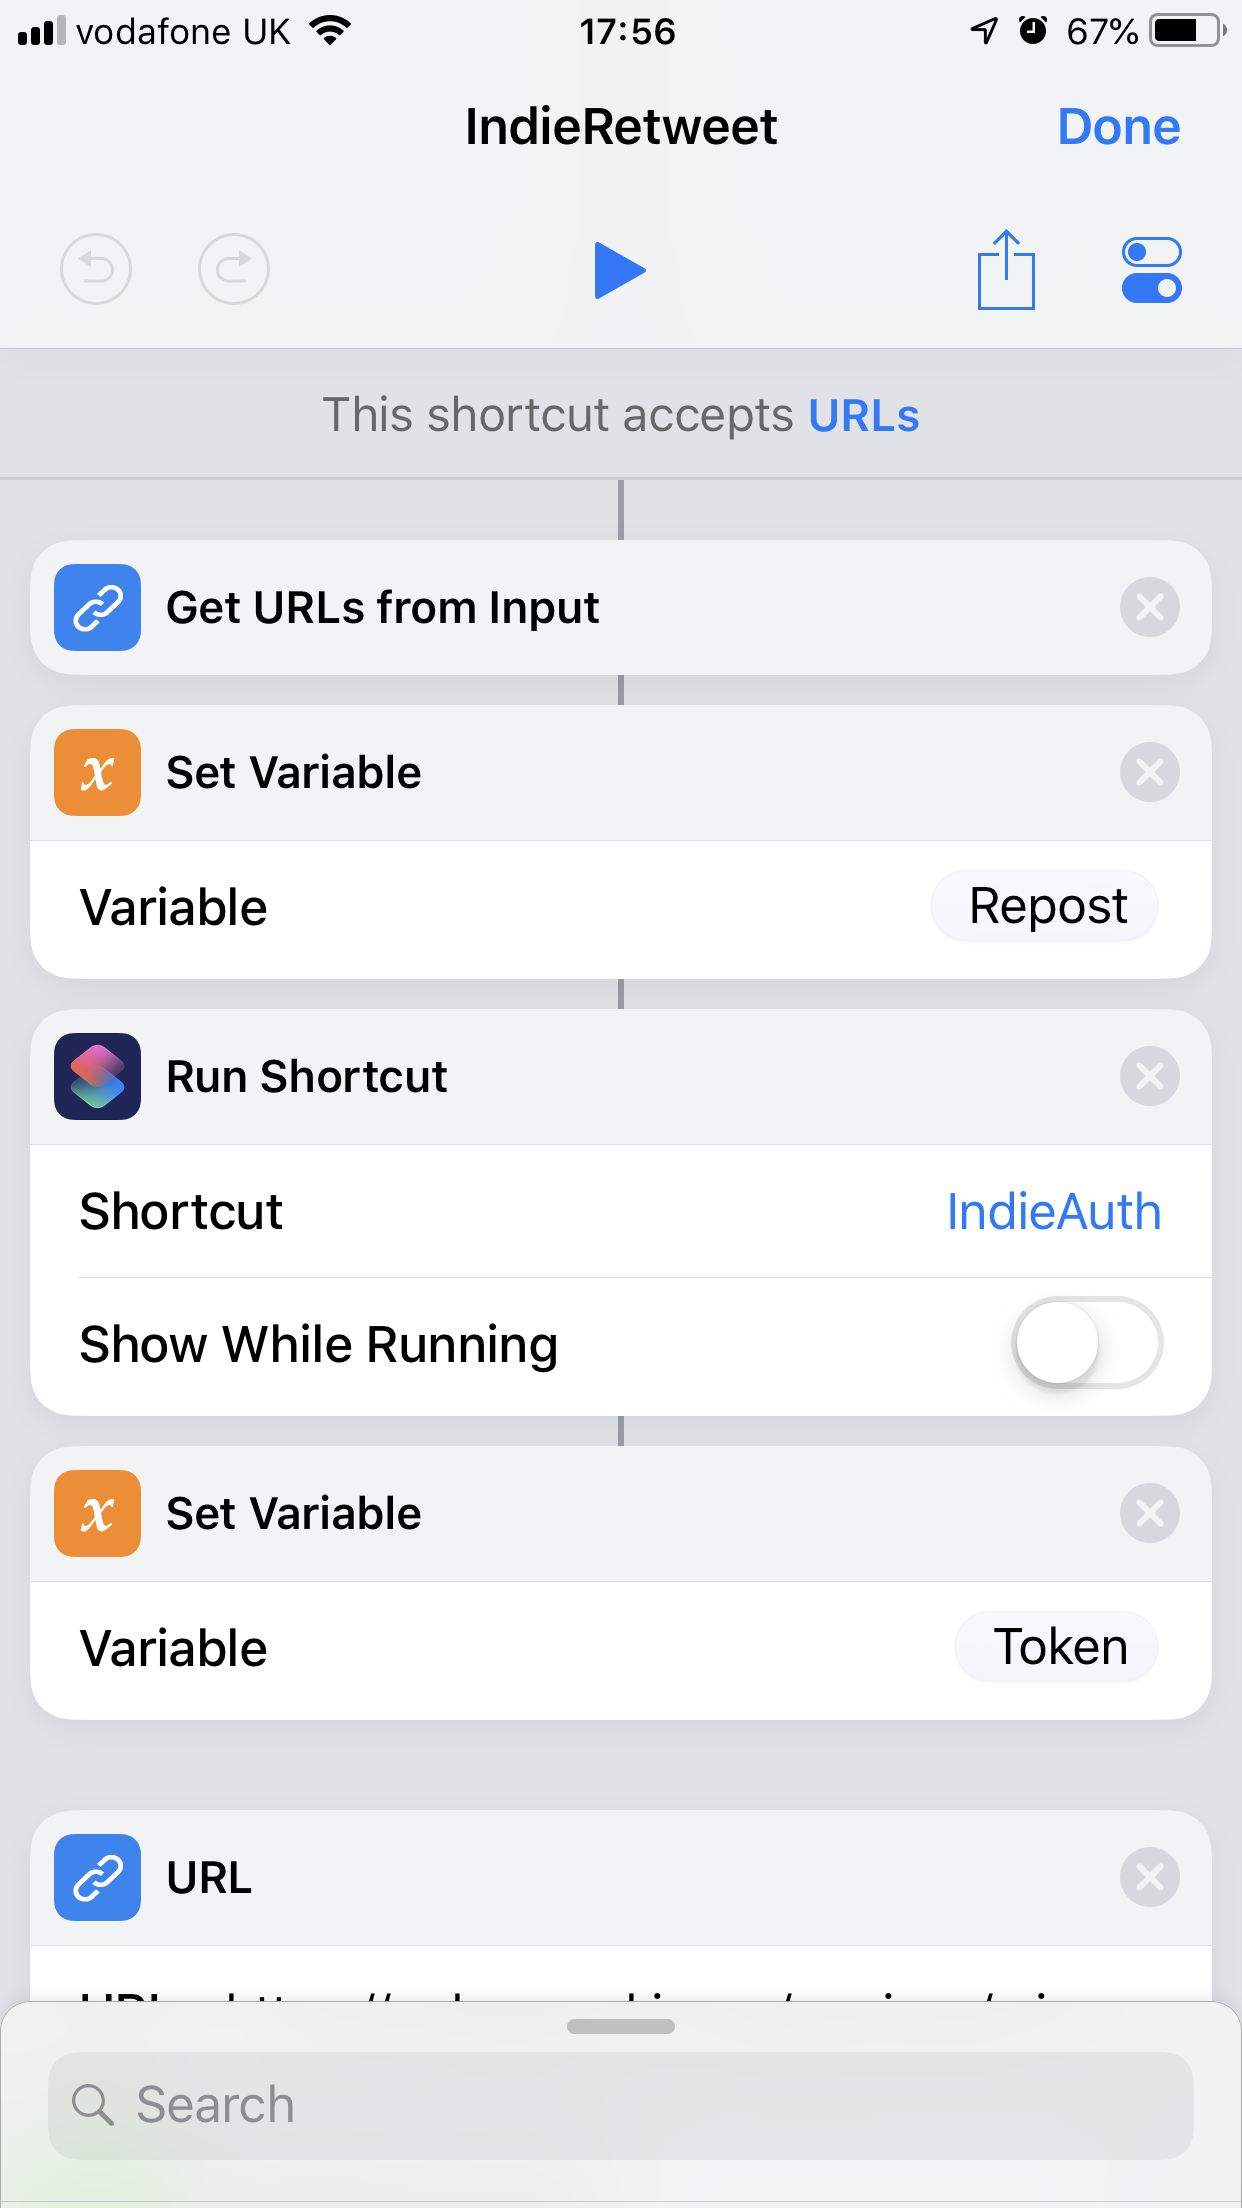
In the Shortcuts app, create a new shortcut. The first thing we need is a “Get URLs from Input” block, then a “Set Variable” block. Name the variable something memorable, as we’ll be using it in a couple of places. I called mine “repost” in my Retweet shortcut.
Next, add a “Run Shortcut” block, and another “Set Variable” block after it. The shortcut block should be set to run your IndieAuth shortcut, and you can turn off “Show While Running”. Set the variable name to “token.” Once done, you should have something like this:
Posting to Your Site.
This is “where the magic happens.” In broad terms, the next few blocks will:
- Be configured with the Micropub endpoint of your site,
- Craft a POST request to your endpoint, with the following pieces of information:
- Your authentication token
- The type of Micropub post we’re creating (“entry”)
- The URL we’re sharing, as a “repost-of”, “like-of”, or whatever
- Set a syndication target.
With these steps in mind, onward we go!
Add a URL block to your site. Enter the URL of your Micropub endpoint. If you’re not sure exactly what this is, check the source of your site. Look for a link tag with rel=“micropub”. Alternatively, I’ve written another shortcut which will try to detect an endpoint for a given domain. You can find it here. Note that I’ve not tested this shortcut on any device but my own, so there may be bugs. The Get Endpoint shortcut will check if the endpoint variable is set, and if not, ask for a domain to parse for the endpoint. Once parsed, the endpoint URL will be copied to the device clipboard for pasting elsewhere, and return a URL.
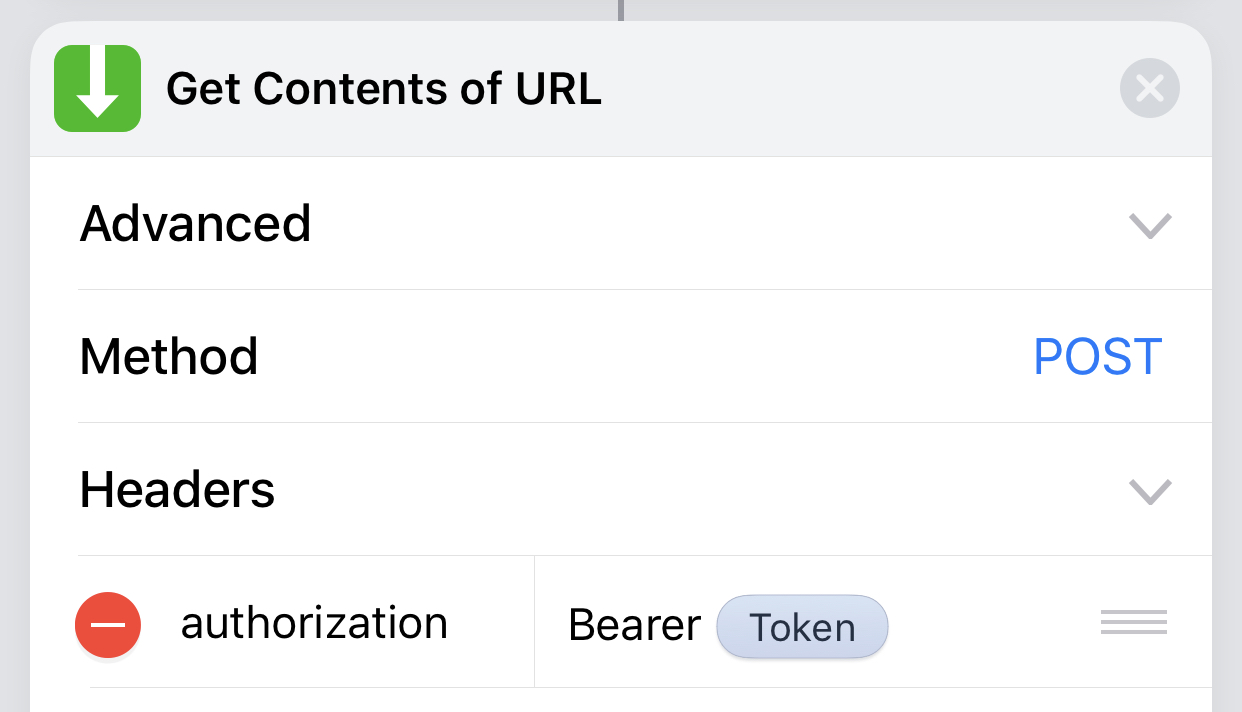
Back in the sharing shortcut, add a “Get Contents of URL” block. Tap on “Advanced,” then set the Method to POST. Tap on “Headers.” Add a header called “authorization” (note the US spelling, if you’re using a UK keyboard or similar). Set the value of this header to “Bearer ” – with the space at the end – then insert the token variable created earlier.
Next, in the Request Body section, set it to Form. If you’re replicating my setup, add three new fields: h, repost-of (or like-of, etc.), and mp-syndicate-to. Set the value of h to entry. Set repost-of to the variable you created from your input URL, right back at the start.

Finally, set mp-syndicate-to to the UID of the syndication target you want to share to. In my WordPress setup, this is twitter-bridgy. Your system may vary, if you’re not using WordPress + the Syndication Links plugin. If you’re not sure what your UID might be, you can try running another shortcut I’ve created, which will query your site to find all the places you can syndicate to. The shortcut requires the “Get Endpoint” shortcut linked above, and will return text listing all UIDs configured for your site. As an example, the output for me looks like this:
{"name":"XYZ IndieWeb","uid":"xyz-indieweb"}
{"name":"XYZ Linking","uid":"xyz-linking"}
{"name":"IndieNews En","uid":"indienews-en"}
{"name":"XYZ Books","uid":"xyz-books"}
{"name":"Twitter via Bridgy","uid":"twitter-bridgy"}
{"name":"Github via Bridgy","uid":"github-bridgy"}
If you don’t want to syndicate your post, remove the mp-syndicate-to field entirely – don’t just leave it blank, or you might run into issues.
Once all fields in your Like/Repost shortcut have been filled in, you should have something like this:

You can leave things here, if you want, or you can add something like a Notification block to show you the returned response from your site, for debugging purposes. Unfortunately, the current limitations of Shortcuts mean we can’t get the URL to our new post from the results. Maybe that will change in iOS 13.
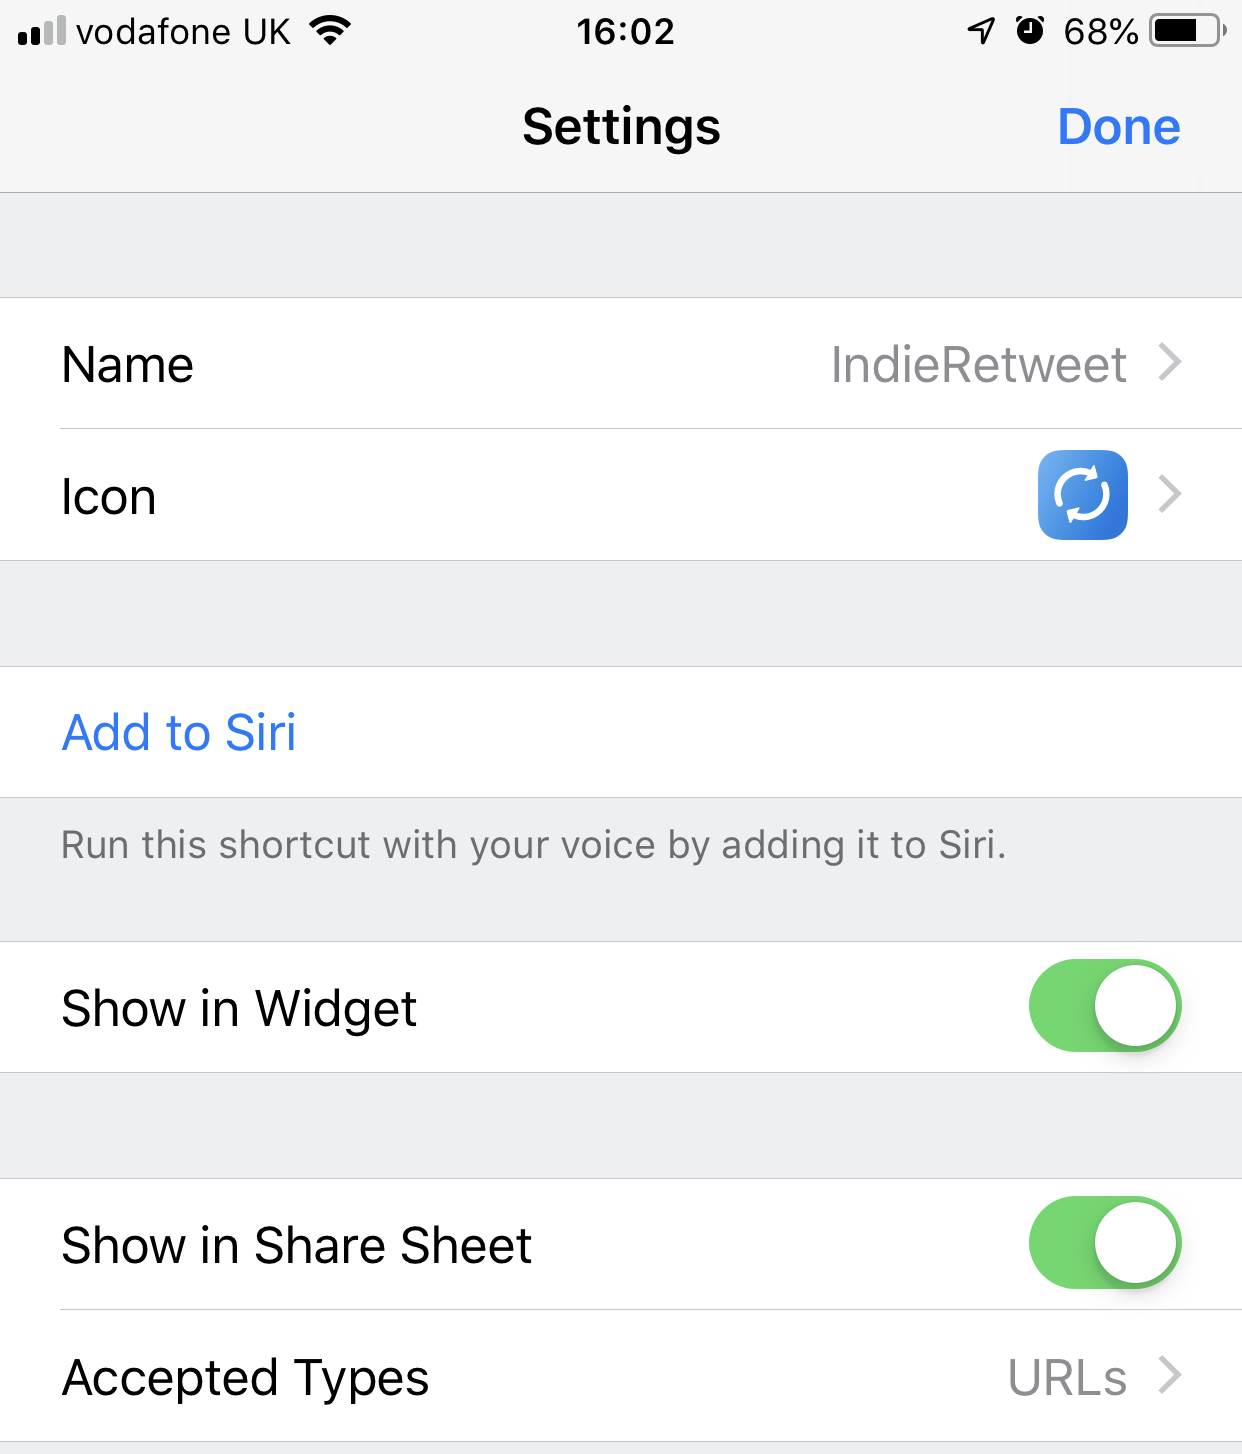
Set your new shortcut with an appropriate name and icon. Turn on the option “Show in Share Sheet,” and optionally set the “Accepted Types” to “URLs.” Tap Done a couple of times, and your shortcut should be complete! The best bit is, you can duplicate the shortcut, change repost-of to like-of (or viceversa), and you’ll have a working Like shortcut too 😃
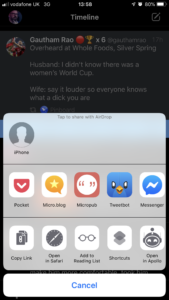
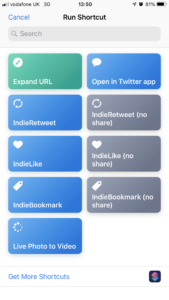
Now, you can use the iOS share sheet for any URL to run your shortcut. Tap the share icon, tap Shortcuts, then tap the relevant shortcut from the list:


As a bonus, here’s a couple of short clips of the Like shortcut in action:
If you run into any issues getting the shortcut created, please do let me know through a comment or Webmention, and I’ll try to help where I can.
@MrKapowski Good writeup – I’ll probably play with with it sometime soon. Cool. Thx
Zach Oglesby liked this article on zach.oglesby.co.
IndieWeb Sharing with iOS Shortcuts | Mr.Kapowski: mrkapowski.com/2019/07/indiew…
Marty McGuire liked this article on martymcgui.re.
Jonathan LaCour liked this article on cleverdevil.io.
Stephen Pieper liked this article on stephenpieper.net.
Jack Jamieson bookmarked this article on jackjamieson.net.
joe jenett mentioned this article on the.dailywebthing.com.
IndieWeb Sharing with iOS Shortcuts | #indieweb.life mrkapowski.com/2019/07/indiew…
OPEN S01E08 – Kalm. – Digging the Digital mentioned this article on diggingthedigital.com.
IndieWeb Sharing with iOS Shortcuts | #indieweb mrkapowski.com/2019/07/indiew…
Hoe gebruik je WordPress en Micropub samen – Digging the Digital mentioned this article on diggingthedigital.com.
Chris M. mentioned this article on mrkapowski.com.
IndieWeb Sharing with iOS Shortcuts | #indieweb mrkapowski.com/2019/07/indiew…